
OIDC Client Apps
This article applies to OpenID Connect. Looking for SAML? Head over to SAML Client Apps.
Each app registration record stores information about, and allows the corresponding third party system to connect with the Cloud SSO app.
Managing App Registrations
On the App Registrations overview screen, within the Single Sign On menu in the CSI Cloud Dashboard, you can see a list of each connected app that you have set up.
To create a new app registration, click the Add App Registration button.
To edit an app registration, click the pencil icon.
To delete an app registration, click the trash icon.
Deleting an app registration will cause the third party SSO to immediately stop working.
App / Integration Name
Example: Example App Solutions
Enter a friendly name for the integration or third party. This is the name that your members will see when signing in / giving consent during the SSO process.
Users will see the following message on the login screen:
Sign in to continue to: [App Name]
Users will see the following message on the consent screen:
Allow [App Name] to access the following information from your account at [iMIS Organization Name]?
Redirect URL(s)
Example: https://thirdparty.example.org/sso/callback
Enter one or more redirect URLs, one per line. These should be provided by the third party.
Profile IQA Query Path
Example: $/SSO/ProfileData
Enter a fully qualified path to an IQA (starting with $/) that will represent the information returned as part of the user's profile.
This IQA must take exactly one (required or optional) parameter - the username of the user signing in. It should always return exactly one result - profile fields and information for only that user.
Click the Validate IQA button to preview the parameters and fields for that IQA.
Refer to the User Profiles section for more information about recommended column names and advanced formatting of the profile object using the IQA.
ID Token Additional Profile Fields
Example: first_name,last_name,email,member_type
Optional. You may enter a comma-separated list of column names that exist in your Profile IQA that will also be included in the ID Token itself (in addition to being accessible via the UserInfo endpoint).
Column names that do not exist in the IQA, or reserved column names, are ignored.
Leave this field blank to disable adding any additional claims/fields to the ID Token. This setting does not affect the UserInfo endpoint.
For a list of reserved/disallowed field names, please refer to the OIDC Profile Data article.
Role IQA Query Path
Example: $/SSO/RoleData
Enter a fully qualified path to an IQA (starting with $/) that will represent a list of roles for the current user.
This IQA must take exactly one (required or optional) parameter - the username of the user signing in. It should always return exactly one column of data. The rows in this column will be sent as the role values for this user.
Click the Validate IQA button to preview the parameters and fields for that IQA.
Refer to the User Profiles section for more information about recommended column names and advanced formatting of the roles using the IQA.
Role Field Format
You can specify one of two data types for your roles. Your RP / third-party may expect roles in a specific format, so be sure to choose the correct one.
Separate Values (Array) Example
Profile Sample via Userinfo Endpoint
{
  "given_name": "Bob",
  "family_name": "Smith",
  "email": "bsmith@example.org",
  "roles": [
    "Administrator",
    "Staff",
    "BoardOfDirectors",
    "Volunteer"
  ]
}
Comma-separated String Example
Profile Sample via Userinfo Endpoint
{
  "given_name": "Bob",
  "family_name": "Smith",
  "email": "bsmith@example.org",
  "roles": "Administrator,Staff,BoardOfDirectors,Volunteer"
}
Role Field Name
The name of the role field, roles is always the same and cannot be changed.
Advanced Options
No Access Mapping
This field allows you to restrict access to this client app / connection based on the results of the IQA.
Your IQA must return a column named "AccessRestrictionCode". The value of this column is checked, and if it is listed in this field, the user will not have access to the third-party client app.
The format of this field is as follows:
Specify the value(s) you want to deny access for, one entry per line.
The value must match what is being returned by the IQA exactly.
To display the built-in (customizable) "No Access" screen, simply put the value on a line by itself.
To redirect the user to an external site that matches this value, put a pipe character (
|) between the value and a fully-qualified URL beginning with https://.Don't include the pipe character if you don't want to redirect the user to a separate URL.
Don't include more than one pipe character per line (
|), including in the destination URL (you must URL-encode it).
In short, each line must be in this format:
CODE_VAL1
Or
CODE_VAL2|https://example.org/my/custom/redirect-destination?with=optional%20parameters
Example
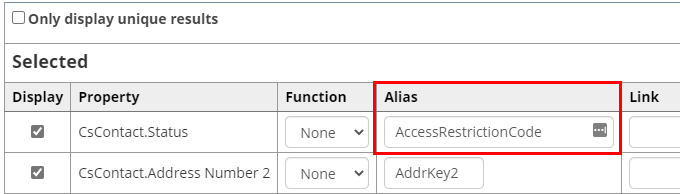
In the following example, we are returning CsContact.Status and assigning an alias to this field called AccessRestrictionCode.
If we enter the following configuration into the No Access Mapping field:
SX|https://example.org/I|https://example.org/reactivate
In the above example:
Members with a status of A are allowed to sign into and use this client app.
Members with a status of S will see a generic "No Access" screen.
Members with a status of I will be redirected to the "/reactivate" page on example.org.
Members with a status of X will be redirected to the homepage of example.org.
Allowed Grant Types
Optionally enable additional grant types for this client application here.
Certain grant types, such as ROPC and Implicit, have weaker security than other grant types (such as Authorization Code). Only enable these grant types if the third party specifically requires them to be on.
Authorization Code (Enabled by default, cannot be disabled)
Implicit
ROPC (Confidential)
ROPC (Public)
Client ID
Example: 958d59d5-5273-4316-bb3f-3aaae7a58df0
This is the OAuth Client ID that should be sent to the third party for use in their OpenID Connect client.
This value is auto-generated and cannot be changed.
Client Secret
Example: 4fURtj7t9MrbTSb25kwdIK9bVfRCfYdwThMiAKCmKTtGeKEmVppYMVUOqh5cTm0E
This is the OAuth Client Secret that should be sent to the third party for use in their OpenID Connect client.
This value is auto-generated and cannot be changed manually. On the Edit screen, you may click the Regenerate button to change this value if it becomes accidentially exposed or compromised.
JWT Signing Key
Example: xrok0GgJhVbERLtQ8SjJdH0wDFAPafbjNqOyVuYssYH0LhFbanAsXTXsOXgCegGh
This is the key that can be used to verify the authenticity of any ID tokens generated via the SSO. ID tokens are signed using HMAC SHA 512. This value should be sent to the third party for use in their OpenID Connect client.
This value is auto-generated and cannot be changed manually. On the Edit screen, you may click the Regenerate button to change this value if it becomes accidentially exposed or compromised.
Signing Algorithm Tip
If you are using an asymmetric signing algorithm (such as RS256 or RS512), this field will be hidden as it is not used with asymmetric keys. Visit the Settings page for more information about asymmetric keys.
Regenerating the Client Secret or JWT Signing Key can cause third party integrations to stop working. Always share the new Client Secret and JWT Signing Key with the third party if you are regenerating the value(s).