
SAML Client Apps
This article applies to SAML. Looking for OpenID Connect? Head over to OIDC Client Apps.
Creating a SAML Client App
You can create a SAML client app in one of two ways:
By uploading a SAML SP Metadata XML document (an .xml file)
By manually configuring the SAML SP information
Service Provider (SP) Metadata Required
The application you are integrating with (the service provider, SP, or third party) must provide you with its SP metadata information, either via an XML document or listed manually. Without this information you will not be able to set up a SAML client app / connection.
Uploading SAML SP Metadata (Preferred)
Your third-party application that supports SAML 2.0 should provide you a SAML SP Metadata document. This is simply an XML file. If you have this file, it is easy to create the SAML Client App in the Cloud SSO app.
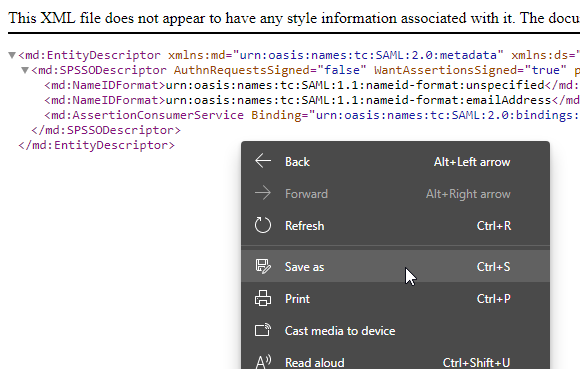
If the metadata document appears as XML code in your browser window, simply right-click inside the browser window and press Save As. Save the resulting file, and ensure that the filetype is .xml.
Simply go to Client Apps and click
Upload SAML SP Metadata.
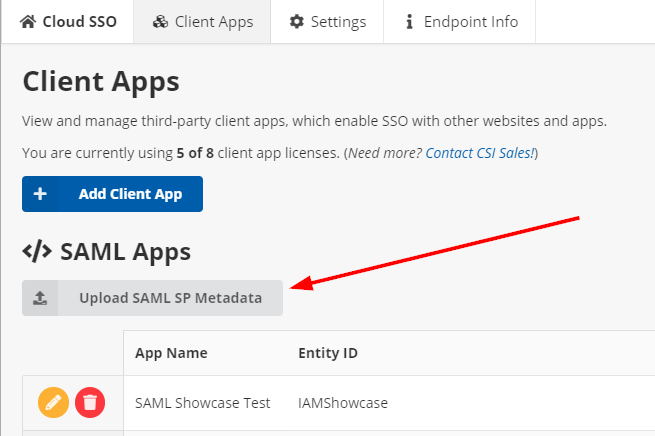
Select your SP Metadata .xml file from your computer, and after the upload is processed, you should see a Preview window appear.
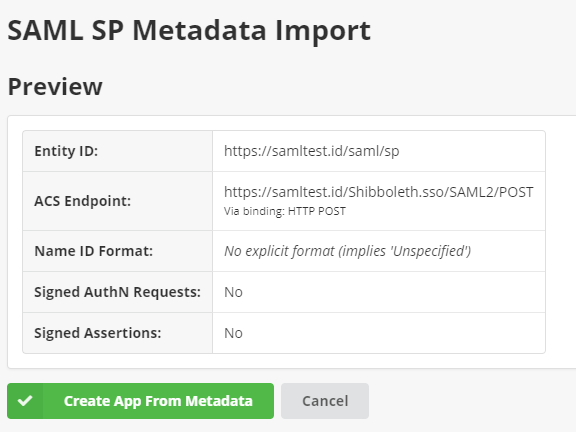
If this information looks correct, press Create App From Metadata.
Entering SP Metadata Information Manually
If your third-party application only provides its SAML SP information in its documentation or on a website somewhere, you may need to enter it manually.
From the Client Apps screen, press Add Client, and then click SAML 2.0.
See below for the full documentation on which form fields to enter.
The minimum requirements from the SAML SP are:
An Assertion Consumer Service URL (the "ACS" or "ACS URL")
The ACS Binding Format (this is most often HTTP POST but in some cases can be HTTP Redirect)
An Entity ID (this is usually a URL, and sometimes the same as the ACS or SP Metadata document URL)
SAML Client App Settings
Fields marked with an asterisk are required.
General Information
App Name

This is a friendly name for the app. End users will see this when logging on (for example, "Sign in to continue to: My Third Party Application").
Profile IQA Query Path
Enter a fully-qualified IQA query path. This query must:
Take exactly ONE parameter: The username of the iMIS user signing in.
Return exactly ONE row of data
Return at least one column of data
The column names and values from the first row are sent via the SAML response as attributes. Since SAML attributes are optional, this IQA setting is optional. Leaving this blank will not send any SAML attributes.
Role IQA Query Path
Enter a fully-qualified IQA query path. This query must:
Take exactly ONE parameter: The username of the iMIS user signing in.
Return exactly ONE column of data.
Return zero or more rows containing a list of roles (as string values) to send
The SAML attribute name for this data is always roles. It cannot be changed at this time.
Role Assertion Format
Specifies how you want the roles to be sent via SAML. This setting does nothing if the Role IQA Query Path setting is not set.
Separate Values (Array) sends each role as a separate SAML attribute value, like so:
<saml:Attribute Name="roles" NameFormat="urn:oasis:names:tc:SAML:2.0:attrname-format:basic">
  <saml:AttributeValue xsi:type="xs:string">CompanyAdministrator</saml:AttributeValue>
  <saml:AttributeValue xsi:type="xs:string">OnBehalfOf</saml:AttributeValue>
  <saml:AttributeValue xsi:type="xs:string">RemoteService</saml:AttributeValue>
  <saml:AttributeValue xsi:type="xs:string">SysAdmin</saml:AttributeValue>
</saml:Attribute>
Comma-Separated String sends one attribute value with the roles delimited by a comma (typically for use as a role list in an identity application such as ASP.NET), like so:
<saml:Attribute Name="roles" NameFormat="urn:oasis:names:tc:SAML:2.0:attrname-format:basic">
  <saml:AttributeValue xsi:type="xs:string">CompanyAdministrator,OnBehalfOf,RemoteService,SysAdmin</saml:AttributeValue>
</saml:Attribute>
Advanced Options
No Access Mapping
This field allows you to restrict access to this client app / connection based on the results of the IQA.
Your IQA must return a column named "AccessRestrictionCode". The value of this column is checked, and if it is listed in this field, the user will not have access to the third-party client app.
The format of this field is as follows:
Specify the value(s) you want to deny access for, one entry per line.
The value must match what is being returned by the IQA exactly.
To display the built-in (customizable) "No Access" screen, simply put the value on a line by itself.
To redirect the user to an external site that matches this value, put a pipe character (
|) between the value and a fully-qualified URL beginning with https://.Don't include the pipe character if you don't want to redirect the user to a separate URL.
Don't include more than one pipe character per line (
|), including in the destination URL (you must URL-encode it).
In short, each line must be in this format:
CODE_VAL1
Or
CODE_VAL2|https://example.org/my/custom/redirect-destination?with=optional%20parameters
Example
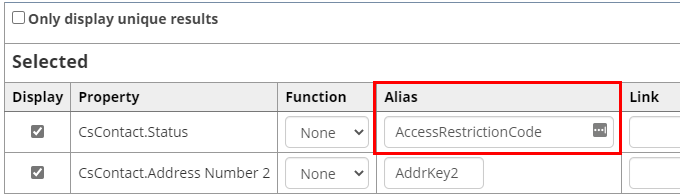
In the following example, we are returning CsContact.Status and assigning an alias to this field called AccessRestrictionCode.
If we enter the following configuration into the No Access Mapping field:
SX|https://example.org/I|https://example.org/reactivate
In the above example:
Members with a status of A are allowed to sign into and use this client app.
Members with a status of S will see a generic "No Access" screen.
Members with a status of I will be redirected to the "/reactivate" page on example.org.
Members with a status of X will be redirected to the homepage of example.org.
Client ID
This is an internally-generated ID representing this client application. It is used to uniquely identify the settings in this client app.
The SP / third party you are integrating with does not need to know this value explicitly. (It is included automatically in parts of the metadata document.)
SAML SP Information
If you imported a SAML SP Metadata XML document/file, this section is locked during client app creation because all of the information is contained within the uploaded document.
However, you may make changes to this section if you save the client app, and then proceed to edit the client app again (this section is unlocked after the initial save).
SP Entity ID
Enter the SP's Entity ID as provided by the third party.
ACS URL
Enter the SP's ACS (Assertion Consumer Service) URL, as provided by the third party. Must start with HTTPS.
ACS Binding Format
Select the SP's preferred ACS binding format.
Most of the time this will be HTTP POST, but in certain cases, it can be HTTP Redirect. Check your SP's documentation, or try HTTP POST, if you aren't sure.
NameID Format
Specify the NameID (username) format that is sent in the SAML assertion response. You may choose one of the following formats:
Unspecified (Username): The iMIS username is sent as the NameID.
Unspecified (iMIS ID): The iMIS ID is sent as the NameID.
E-mail: The iMIS primary e-mail address is sent as the NameID.
Persistent: The iMIS Net Contact Key is sent. This is a GUID which uniquely identifies an individual in iMIS, but has no meaning to a third party.
Transient: A pseudo-random 16-character alphanumeric identifier is generated for each request and sent as the identifier.
Be sure to select a NameID format that your SP supports.
Audience Restriction
Optional, only enter a value here if your SP requires one to be present. Entering an incorrect value can cause the SAML response to be rejected by the SP.
Sign AuthN Requests
Whether or not to sign the outer SAML response XML body.
Sign Assertions
Whether or not to sign the inner SAML assertion XML body.
Enable Single Logout Endpoint
Whether or not to advertise a SAML Single Sign-out endpoint in the IdP metadata document.
Some SPs do not support this and will reject the metadata document if it is present. Only enable this if your SP supports single sign-out and you intend to make use of it.
Public Key
This is the public X.509 certificate that is used to sign the SAML responses.
This certificate is included in the IdP metadata document automatically. Your SP will either read the certificate value from the metadata, or need a copy of this certificate sent manually in order to validate the SAML responses from our endpoints.
Each client app has a different certificate and private key. Do not share a certificate for one client app with the SP of another client app.
Private Key
This is the RSA 2048-bit private key used to sign your XML responses.
Do not send or share this key with anyone, INCLUDING the third-party / SP. It is provided for informational and verification purposes only.
The third-party / SP does NOT need this key in order to complete a SAML request.