
iImport

iImport Windows Interface Screenshot
The documentation on this page is for the Windows desktop application called iImport.
For the browser-based cloud app iDMS iImport that is part of the iMIS Data Management Suite, please click here.
iImport Overview
The Import Tool is used to insert and update new records in iMIS from a spreadsheet.
The spreadsheet format is stored as a template and can be reused for future imports and updates.
The tool supports mapping data to name, address, and custom demographics tabs. iImport applies iMIS rules including address flow-down to ensure data integrity. A report verifies your results.
iImport Basic System Requirements
The following system specifications are required to successfully run iImport:
Windows 7 and higher
SQL Server 2008/2008R2/2012/2014/2016/2017
iMIS version 15.2 or higher
.NET Framework 3.5
UDP port 1434 must be open on the SQL server
The user must have a permissions level of 4 for Customers and 8 for Sys Mgmt in iMIS
Installing iImport
NOTE: It is best practice for all users to be on the same version of iImport.
Download iImport from https://customer.csiinc.com/ to your workstation.
You will need your CSI Website User Name and password. If you do not have this information contact support@csiinc.com
Unzip the folder, and navigate to the unzipped folder.
Double Click the setup.exe
The Setup Wizard will open. Click Next.
The license Agreement will display. Select "I accept..." and Click Next.
Verify the default installation folder. Click Next.
Click Install to start the installation. A screen will then show, displaying the progress of the install.
A screen will confirm that iImport has been successfully installed. Click Finish.
Note: On shared computers (i.e. Terminal Servers, etc.) where more than one user needs access to iImport, the product will need to be installed for each user. The product installs to C:\Users\<username>\AppData\Local\Computer System Innovations\iImport.
About the License Key
When you first log into iImport, the license process will attempt to register your license key automatically by calling back to CSI to get your iMIS information. If the information that CSI has on record is accurate then you will not be prompted with any license key information. It will update your license information automatically.
If the process cannot call CSI or the license key information does not check out with what CSI has on record, then you will be prompted to enter a license key manually. You will need to obtain this key by contacting CSI Support. After the license key has been validated and entered, you will be able to use iImport on your iMIS database. Since the license key is stored in your iMIS database, you will only need to enter this key once per database. Installing iImport on a new computer will not require you to re-enter your license key.
Note: Changing the "Licensed To:" name for iMIS will require a new license key. If the license key detects a change in this, it will follow the same process as above trying to call back to CSI to verify your product information. In most cases, if you are prompted for license information it is likely that CSI does not have your updated iMIS information. Contact CSI at support@csiinc.com with a screen shot of the current iMIS System Setup and a new key will be emailed to you.
Log into iMIS as an administrator (manager)
Click on File > System Setup in the top toolbar
Copy and send to support@csiinc.com
iImport Log In
Once the program is installed a shortcut will be created on the Microsoft Start menu. Log in using your iMIS login and password. DSN represents your iMIS 10 ODBC server location. The web server represents your iMIS 15 (and above) application server location.
The user must have a permissions level of 4 for Customers and 8 for Sys Mgmt in iMIS.
Because iImport lauches with Administrator rights, sometimes, due to the way that network drives are mapped, you may not be able to access them to load files. In this scenario, please contact your system administrator or use the UNC mapping.
Specify File for Import
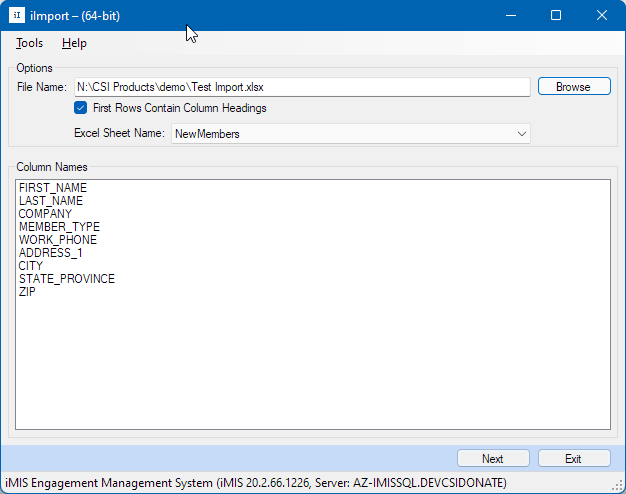
The first step in the import process is to specify the file to be imported. Use the 'Browse' button to locate the file to be imported.
Note: iImport only supports Excel files, comma delimited files, and tab delimited files.
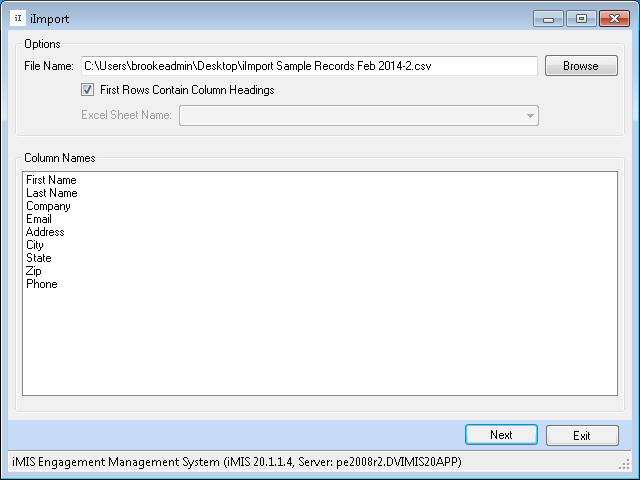
Once the import file has been selected, specify which worksheet to pull the data from and whether the first row contains the column headings (highly recommended). The Membership Import Tool will read the spreadsheet and display a list of the column headings.
Verify the correct spreadsheet has been selected and select 'Next'.
NOTE: If you have edited your spreadsheet by removing rows, please remember to delete the entire row from the spreadsheet, rather than simply deleting the data from that row.
Load an Existing Template
Fields may be mapped to iMIS by either creating a new template or by loading a pre-existing template. Use the menu option File>Load to open an existing template. The currently loaded template will display to the right of the file menu.
Create or Modify a Template
Once a template is loaded it can be modified or alternately you can create a new template. If you expect to reuse the import template for future imports, choose the menu option File > Save to save the template file when you are done.
Match On:
You must define the key fields that link the data in your spreadsheet to the data you want to update in iMIS. All you need to do is locate the drop down for that field/column and choose its corresponding value from the spreadsheet. Then click the "Match On" box to the right of the field to mark it as a field to match on.
The name, address, and custom demographic tabs and their related fields from iMIS are all preloaded. You may choose the following for each field:
Leave it blank, in which case the Membership Import Tool will use iMIS rules to set a default value or will load the field with a '' <blank> value.
Type a fixed value for all import records. The background color of the field will change to beige, representative of a 'hard coded' value. This value will be inserted into iMIS for all imported records.
Choose a column from the import source file to insert into iMIS. The background color of the field will change to green, representative of a mapped field value.
Basic Mapping Requirements
Import | ||
Minimum number of MAPPED fields | 1 field | |
Required field | FIRST_NAME or LAST_NAME or COMPANY |
Update | Match On EXCLUDES ID field | Match On INCLUDES ID field | |
Minimum number of MATCH ON fields | 2 fields | 1 field | |
Required field(s) | 1. FIRST_NAME or LAST_NAME or COMPANY 2. Any field | ID |
Import Company and Company Roster [Import Only] | ||
Minimum number of MAPPED fields | 3 fields | |
Required field(s) | 1. "Company Roster Matching On" |
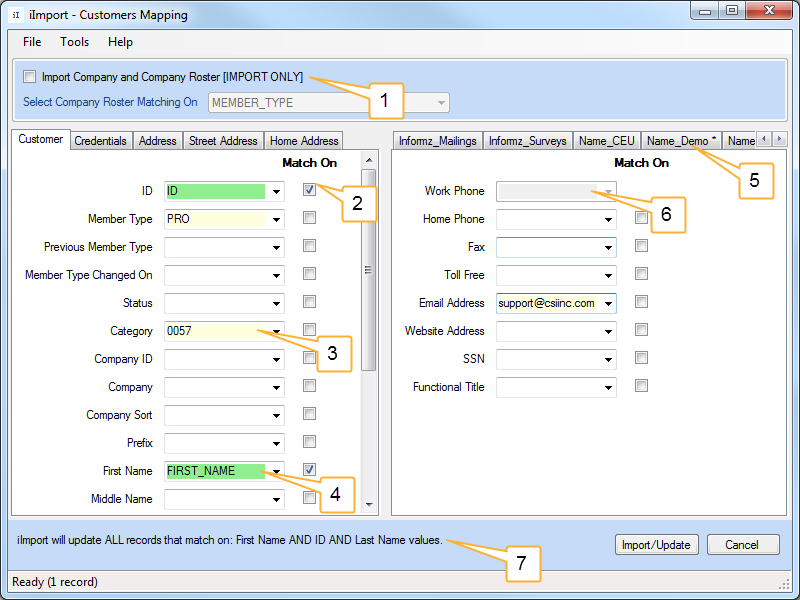
See section “Import Company and Company Roster [IMPORT ONLY]” for details on this feature
"Match On" field links data in import file to the corresponding data in iMIS.
Example of "fixed" value typed in by user which will apply globally to all records. (Beige background)
Example of value selected from drop-down menu (i.e., from import file). (Green background)
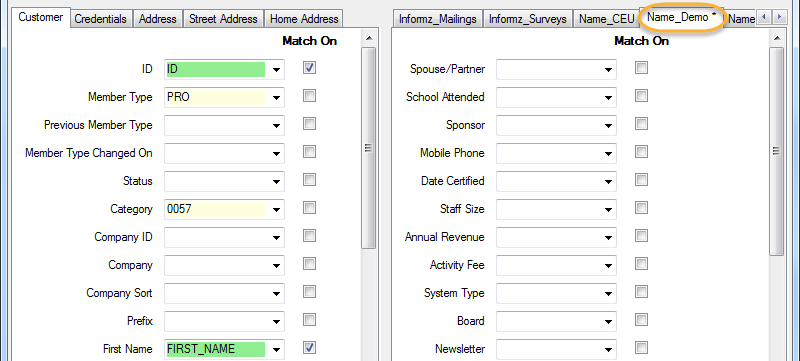
For User Defined tables, the Tabs names match the window names from iMIS desktop. If no window exists, the tab name matches the table name. Tabs with an asterisk denote that multiple windows are represented within the tab. That is, in iMIS, data from a table is displayed on multiple window tabs. For Panel Sources, the tab name matches the Panel Source name.
When synchronization is mapped in iMIS (Customers Setup > Address and notes), the field will be grayed out (with the exception of Email).
The text ribbon displays all "Match On" selections (i.e., from all tabs) fields from all tabs.
When updating multi-instance check boxes, you may use "1" for checked and "0" for unchecked.
Remember: You cannot match on Multi-Instance fields without matching also on the Name Table as well.
Note: If synchronization for email is turned on in iMIS and you enter two different (and non-blank)email addresses on the address and profile tabs, the address from the address tab is the one that will take precedence.
Import Company and Company Roster
This feature allows company records to be imported simultaneously alongside their child records (i.e., company roster). This feature is turned OFF by default. It can be turned ON by checking the checkbox next to "Import Companies and Rosters [IMPORT ONLY]".
When the checkbox is enabled, iImport is placed into import-only mode. The ability to update records is disabled, and the Match On check boxes disabled.
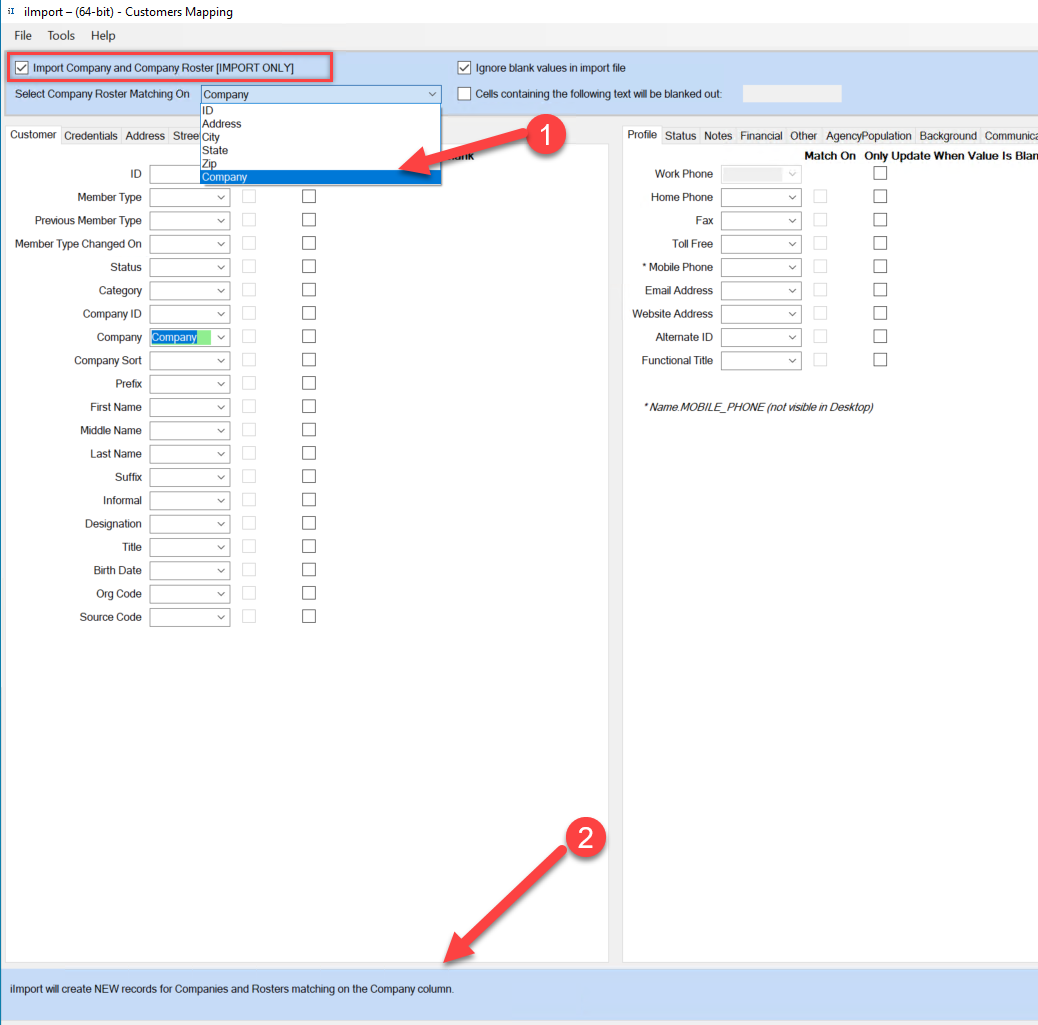
Select Company RosterMatching On field: Select the field used to link company records together. Typically, this field is denoted as COMPANY in the import file.
The text ribbon provides additional validation of the actions that will be performed when the Import/Update button is pressed.
This ribbon will display which field of your import file is being matched on.
IMPORTANT: Remember to also map all the other fields in the import file that you wish to import into iMIS.
When all mappings are complete, click Import/Update.
The log window displays, notifying how many records will be created.
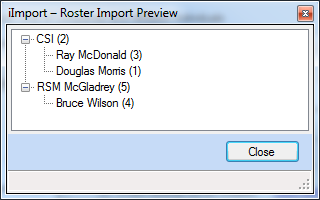
Click here to preview uses the current mapping to show how the post-import roster will appear.
When ready, click Close. Then continue on by clicking Continue or Cancel.
User Credentials
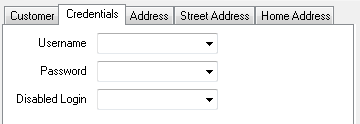
On the Credentials tab, you have the ability to create and change user credentials. Important notes due to iMIS credential rules:
You may add a username to a new or existing record using iImport.
You may not update/change an existing username using iImport.
You may add or update/change a password using iImport.
When importing new credentials, you must supply both username AND password.
IMPORT new data | UPDATE existing data | |
Username | Yes | No |
Password | Yes | Yes |
IMPORTANT! PLEASE READ THE FOLLOWING BULLET POINTS
When using credentials, please make sure that all of the passwords you are providing meet the minimum requirements for iMIS. This is essential in iMIS versions 20 and up. The default minimum requirements for passwords are a minimum length of 7, and the password includes at least one numeric character. If you are not sure what your password requirements are or if they have possibly been changed, you can open the web.config file under your iMIS instance and check for the <CustomizedProvider> tag to confirm your password requirements. If the setting for "requiresQuestionAndAnswer" or "requiresUniqueEmail" is turned on, user credentials will not be able to be imported or updated. This feature will be compatible with iImport when ASI releases a newer version of the ASI.IBO or released their RESTful API.
When creating new user credentials via iImport (i.e. importing a new record), you must be sure that the username is not already in use, or else you will receive an error in your iImport report such as the one below.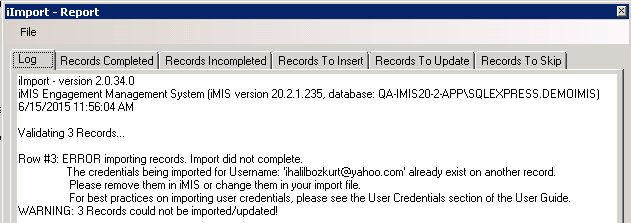
When this error occurs, the record that caused the issue must be cleaned up from the database and/or the username of the new record in the import sheet corrected so that it is not a duplicate of one that is already in use. Once this is fixed, you may re-run the import.iImport checks each line of your file line by line, so if you receive this message more than once, pay attention to which Username is causing the error to be thrown. No records will be imported or updated until all records reflect unique usernames.
If no email is entered on the correct tab relating to the iMIS flowdown, USER CREDENTIALS WILL NOT BE CREATED!
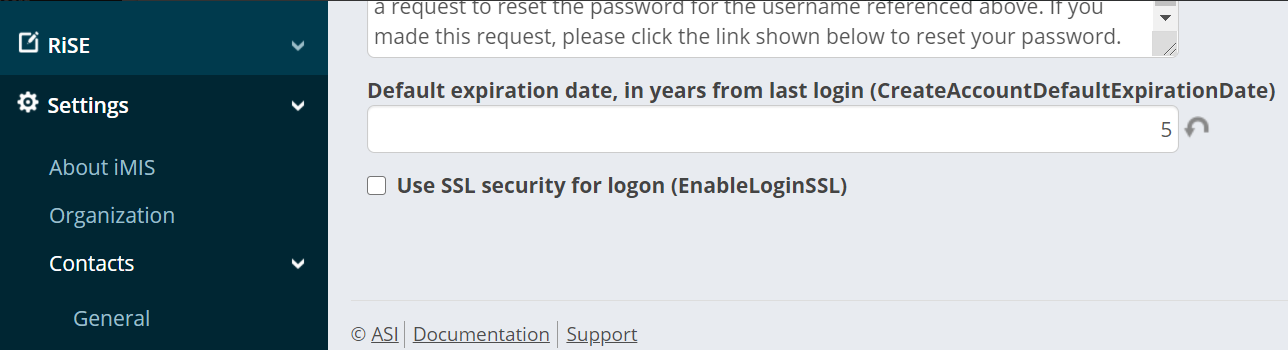
If you have a "Default Expiration Date, in years from last login" set in iMIS as a setting, then it will override any expiration date provided in iImport when the user logs in.
Ignore Blank Values
This feature provides the option to ignore blank values during the import process. This screen can be found by going to Tools>Options. With this option checked, fields which have been chosen for import from your spreadsheet will not overwrite data in iMIS, if those fields are blank.
As an example, let's say you have a spreadsheet with updated email addresses for a hundred of your existing constituents, but there is only an entry in the field if the email is new. Having this option checked will prevent those fields which are blank on your spreadsheet from overwriting valid email values in iMIS. If, of course, there is an entry in the spreadsheet's field, it will overwrite the field in iMIS, effectively updating the data.
However, if on the other hand you do wish to overwrite the field (or fields) in iMIS, even if the spreadsheet has a blank value for some records, unchecking this value in Options will accomplish that. Also note, when the option "Cells containing the following text will be blanked out:" is checked, any cell in the spreadsheet that contains the value entered in the textbox, will be blanked out.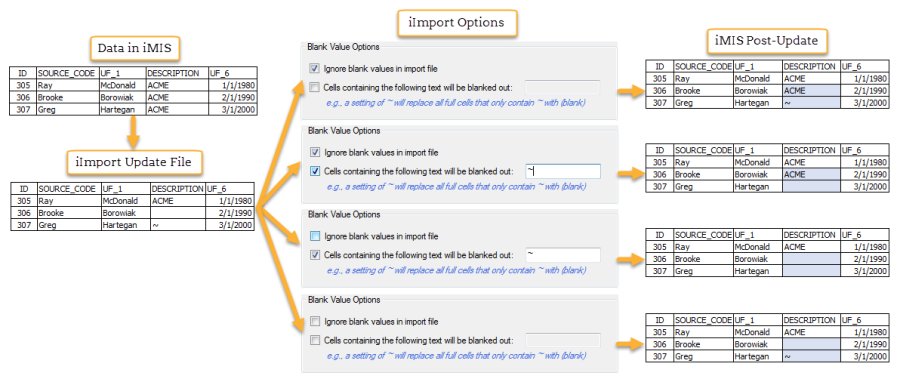
Import the Records
Once the template set up is complete, select the Import/Update button from the lower right corner of the field mapping screen. The Membership Import Tool will immediately begin importing the records. The process may take several minutes to complete if there is a high volume of records. An import of 60 records typically takes less than 30 seconds dependent on other server activity.
Before the records fully process, you will be prompted by a screen such as the one below:
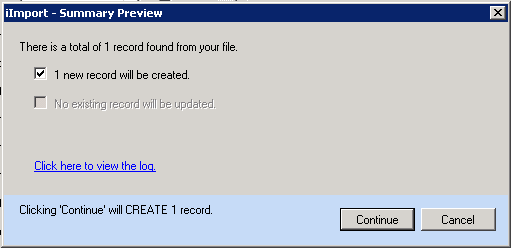
This screen shows the number of records to be imported and the number to be updated. You may select to run iImport and only update, only import, or both. When there are no records in that category, the selection will be disabled (as you can see in the screenshot above). By clicking on Click here to view the log, you have the ability to view which records are going to be imported and which ones will be updated by clicking on their respective tabs.
On completion you will receive a confirmation message and the opportunity to display a report confirming the actions of the import process including a control total of records processed and any errors encountered. By selecting "Yes" a new window will appear.
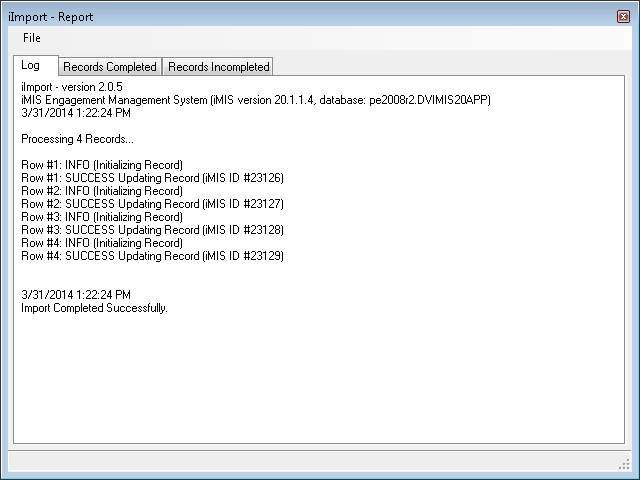
You will have the option to view the log of the import/update, as well as the completed and uncompleted records.
By navigating to File> you have the option to save any of the logs or lists as well as print them.
Validate UD Table Setup
Option -> Validate UD table setup
This troubleshooting utility compares the UD table definitions stored in iMIS against the UD table definitions stored in the SQL system tables. If any discrepancies are found they are displayed on the UD Table Setup Validation window. If no errors are found the results grid will be empty (see below).

In addition, after the initial login to iImport, if there are any discrepancies, a warning will appear (below), instructing the user to check this setup.

Please contact Advanced Solutions International (ASI) or your service provider for assistance in correcting this error.
iImport Troubleshooting
Issue: I am getting a runtime error when I select my spreadsheet. I have a column in my spreadsheet called “iMIS ID.”
Resolution: You cannot have a column header called “iMIS ID.” Please rename to something else and the import should work.
Issue: iImport automatically runs with elevated rights. You have a user that does not have 'admin' rights to their PC (or Terminal Server), and therefore iImport does not run for them.
Resolution: There is not a way around having iImport run with 'Run as Administrator' rights – but there IS a workaround for when a user does not have such rights themselves. The below steps will allow a standard domain user account to run an application as local administrator. Create a shortcut that uses the runas command with the /savecred switch, which saves the local admin password. (Note: A network Admin will need to assist with these steps)
Enable the built-in Administrator account - Search for Command Prompt in the Start menu, right-click the Command Prompt shortcut, and select Run as administrator
Run <net user administrator /active:yes> in the elevated Command Prompt
Create a password for the Administrator account - Open the Control Panel, select User Accounts and Family Safety, and select User Accounts. Click the Manage another account link in the User Accounts window
Create the Shortcut - Right-click the desktop (or elsewhere), point to New, and select Shortcut.
Enter <runas /user:ComputerName\Administrator /savecred "C:\Path\To\Program.exe"> into the box that appears. Replace ComputerName with the name of your computer and C:\Path\To\Program.exe with the full path of the program you want to run.
Customize your shortcut - Enter a name for the shortcut. To select an icon for your new shortcut, right-click it and select Properties. Click the Change Icon button in the Properties window
Save Credentials - The first time you double-click your shortcut, you'll be prompted to enter the Administrator account's password, which you created earlier. This password will be saved – the next time you double-click the shortcut, the application will launch as Administrator without asking you for a password.
Issue: iImport errors out when trying to update or insert certain fields in iMIS.
Resolution: Check to see if there are any custom triggers associated with any of the tables (especially Name, Name_Address, and Usermain). The below script, which can be ‘copy & pasted’ directly into SQL Mangement Studio, will list out all triggers that do not begin with ‘ASI’.
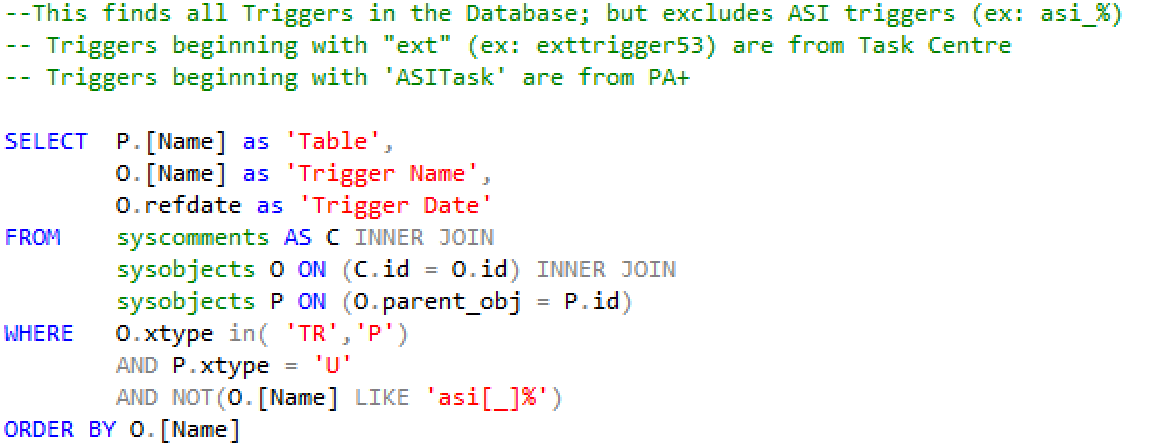
Most error messages in the import log are descriptive. The Membership Import Tool follows iMIS rules for records on import. Therefore,you must define valid values for such things as member types. It is also important that you map fields to the correct corresponding fields in iMIS. Refer to the iMIS database schema to confirm mapping locations.
Issue: Unable to set Solicitor ID
Resolution: Due to iMIS API Limitations, many fields in Name_FR are not available in iImport. Consider upgrading to iDMS. https://www.csiinc.com/iDMS
If you have any issues with iImport, please contact CSI Support at support@csiinc.com. Tickets are normally responded to within 1 to 2 business days after they are submitted.
iImport Release Notes
Version | Date | Notes |
|---|---|---|
2.5.0 | 3/14/2023 | EMS on prem support When importing new records, the records should be created as a company record if the only information set is company name |
2.4.21 | 3/9/2022 | Correct issue with data type bit. Make changes to reload button logic (CW 116028 & 113733) |
2.4.20 | 1/5/2022 | Fix issue with RecordIndex not being reset when new import is loaded. (CW 113733) |
2.4.19 | 9/20/2021 | UD Field Names bug fix. Some fields show without names. (CW 106676) |
2.4.18 | 2/2/2021 | Add support for mobile phone number (CW 102210) |
2.4.15 | 1/18/2021 | Allow Expiration date update/insert for user credentials (CW 101676) |
2.4.14 | 11/4/2020 | Lock down being able to update existing user credentials (CW 99670) |
2.4.12 | 12/4/2019 | International license update; Downgrade .NET 4.6(CW 9451) |
2.4.10 | 10/9/2019 | Resolve bug where mapping to binary fields caused a casting error. (CW 89160) |
2.4.9 | 8/15/2019 | Added menu item 'User Guide' that opens a browser tab to docs.csiinc.com/apps/iimport Removed install of .pdf user guide. Replaced with .url document linking to docs.csiinc.com/apps/iimport |
2.4.8 | 7/3/2019 | Fixed issue in FormatFullName not checking for null or white space strings (CW 85767) |
2.4.7 | 7/1/2019 | Fix issue when synching email address. (CW 85132) |
2.4.6 | 4/1/2019 | Added Configuration label to top of Customers Mapping form. (CW 84280) |
2.4.5 | 3/1/2019 | Fixed issue of when clicking the Reload File button did not reload the file. (CW 83759) |
2.4.4 | 2/21/2019 |
|
2.4.3 | 7/17/2018 | Fixed issue with importing user credentials when user has changed address tab names (CW 76277) |
2.4.2 | 6/04/2018 | Client installation improvements (CW75650) |
2.4.1 | 2/22/2018 | Fixed issue where iMIS credentials were trying to be created when there was no user name specified in the column of the spreadsheet. (CW 73502) |
2.4.0 | 1/29/2018 |
|
2.3.21 | 1/10/2018 | Updated licensing in CSI.Core. (CW 72484) |
2.3.20 | 12/14/2017 | Fixed issue with bad address pointers being found incorrectly. (CW 72195) |
2.3.19 | 11/10/2017 | Enhanced blank field option to not accept apostrophes. (CW 71142) |
2.3.17 | 8/25/2017 | Added validation for Name.ID and Name.CO_ID being the same value. (CW 69295) |
2.3.16 | 7/19/2017 |
|
2.3.15 | 5/31/2017 |
|
2.3.12 | 12/20/2016 | Updated warning for bad address data functionality. (CW 64929) |
2.3.11 | 12/9/2016 | Added warning for bad address data and ability to cancel import if it exists. (CW 64929) |
2.3.0 | 11/10/2016 | Added ID and SEQN column headers in post import report. (CW 64463) |
2.2.9 | 11/1/2016 | Fixed various scenarios with user credentials. If no email is entered for user, user credentials will not be created. (CW 64163) |
2.2.8 | 8/4/2016 |
|
2.2.7 | 7/26/2016 | Improve SQL comparison on finding for invalid user-defined tables (CW 61992) |
2.2.6 | 7/22/2016 | Fix issue with parsing numerical values in numbers field. (CW 62689) |
2.2.5 | 5/3/2016 |
|
2.2.4 | 4/25/2016 | Fix issue when creating/updating credentials. (CW 59745) |
2.2.3 | 3/11/2016 |
|
2.1.0 | 9/28/2015 | Add new feature to Import Company and Company Roster (CW 50187) |
2.0.42 | 8/13/2015 | Fix field length validation on Name table: US_CONGRESS, STATE_SENATE, and STATE_SENATE should be 20 characters long at most. (CW 49612) |
2.0.41 | 8/13/2015 |
|
2.0.38 | 7/16/2015 | Enhancements to login control and iMIS URL handling. (CW 48242) |
2.0.37 | 6/22/2015 |
|
2.0.32 | 5/14/2015 |
|
2.0.26 | 3/9/2015 | Fix issues with Fields on "Other" tab not mapping to the name table. (CW 45593) |
2.0.23 | 12/11/2014 |
|
2.0.21 | 11/17/2014 |
|
2.0.15 | 10/21/2014 | Update tabulation labels for user-defined tables (CW #42428) |
2.0.13 | 10/13/2014 | Fixed a bug when importing international dates (CW #32915) |
2.0.12 | 9/11/2014 |
|
2.0.11 | 9/3/2014 |
|
2.0.10 | 8/12/2014 |
|
2.0.9 | 5/22/2014 | Resolve issues with updating Boolean type field in user defined tables (CW #39859) |
2.0.8 | 5/5/2014 | Improve display message when finding mismatch user-defined table fields (CW #39531) |
2.0.7 | 4/7/2014 | Default connection type selection to iMIS15 setting in common login control (CW #38886) |
2.0.6 | 4/4/2014 | Disable Blank Value Text input field when Ignore Blank Value option is checked (CW #38889) |
2.0.5 | 3/26/2014 | Fix behavior issues with Blank Value options (CW #38889) |
2.0.4 | 3/25/2014 |
|
2.0.3 | 3/24/2014 | Remove deprecated logging options (CW # 38889) |
2.0.2 | 2/18/2014 | Minor installer updates (CW # 37748) |
2.0.1 | 2/18/2014 | Fix issues finding multiple records (CW # 38251) |
2.0.0 | 2/6/2014 | Merge iImport Updater functionality with main iImport program (CW #37748) |
1.2.5 | 1/24/2014 |
|
1.2.4 | 11/5/2013 | Fix mapping issues with currency and number data types (CW #36018) |
1.2.3 | 10/4/2013 |
|
1.2.2 | 8/9/2013 | Fix the issue of login control Web Server Url (remove "/cs" or "/cs2") for iMIS 20 |
1.2.0 | 7/24/2013 |
|
1.0.23 | 7/5/2013 |
|
1.0.22 | 5/17/2013 | Fix the error when updating a Date filed with null value (CW #32271) |
1.0.21 | 1/14/2013 |
|
1.0.20 | 12/18/2012 | Fix import action stuck when no primary key is set (CW #29799) |
1.0.19 | 9/20/2012 | Fix display of mapping fields missing default prompt (CW #28316) |
1.0.17 | 9/20/2012 | Fix display of mapping fields missing default prompt (CW #28316) |
1.0.16 | 8/20/2012 | Add backup/restoration of "Membership Import.exe.config" file (CW #26144) |
1.0.15 | 6/5/2012 | Add support for XLSX files (CW #26143) |
1.0.14 | Fix support for x64 operating systems | |
1.0.13 | Fix references to ADODB library 2.8 | |
1.0.12 | Force application to run in 32 bit mode | |
1.0.11 | Update CSIUtil.DLL to version 1.1 | |
1.0.10 | Fix Paid Thru Date not being updated | |
1.0.9 | Update CSIUtil.DLL library file to allow custom connection string | |
1.0.8 | Miscellaneous fixes | |
1.0.7 | Fix installer issue with ASIUtil.DLL file | |
1.0.6 | Fix login issue with ADODB assembly requirement |