
Webhooks and HTTP Triggers
Overview
A task in iUpdate Cloud has the ability to be invoked dynamically from any external system that is capable of calling a webhook URL via HTTP POST. Using these features requires the iSchedule module.
Webhook Information
To view webhook / trigger information for a task, press the icon next to a task. Webhook information can be found under the POST Webhook URLs header.
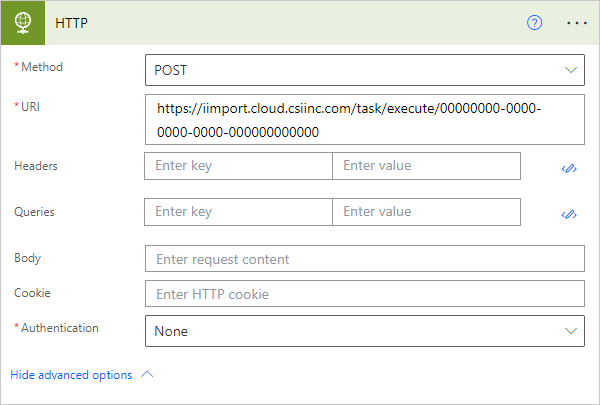
Standard (Fire-and-Forget) URL
This is the URL with original, unchanged behavior from previous versions of iDMS.
This webhook type will start the corresponding iUpdate task. It will return an error only if there was an issue initializing / starting the job.
This webhook type will not:
Wait for the iUpdate job to finish.
Tell you if the iUpdate job succeeded or failed (at the end).
Tell you how many records it retrieved and/or processed.
Examples
Use the HTTP action:
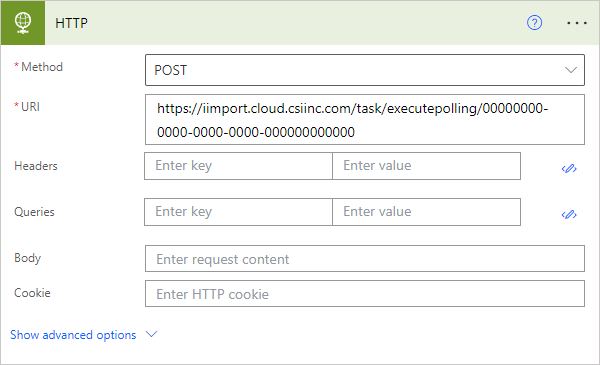
Asynchronous Polling URL
This is the URL with newer, "wait for completion" functionality in iDMS which supports iUpdate job chaining and has better support for external tooling such as Microsoft Power Automate.
This webhook type will start the corresponding iUpdate task and return a special HTTP status code that indicates that the job has started, and where you can poll to retrieve the job status. This endpoint will also notify you when the job has been completed.
This webhook type will not:
Wait for the job to complete before returning the HTTP response. (Jobs can take much longer than the maximum HTTP timeout value.)
HTTP Polling Overview
To use the polling endpoint, you must have an application or tool that is compatible with the Asynchronous Request-Response Pattern, or you can write your own custom script/application that implements this pattern.
The asynchronous polling pattern can be summarized as:
You make a standard webhook POST call to the polling endpoint, the same as other webhooks
You will receive a 202 Accepted response, with two important headers: Location and Retry-After.
Location specifies where you need to poll for the job status
Retry-After specifies how often you should poll
You issue a GET request to the polling endpoint. You will receive one of two possible responses back:
202 Accepted - Indicates that the job has not yet completed.
The JSON body of this response will contain the job status (typically "in progress") as well as the percentage completion and some other useful status values.
Your application should re-issue this same GET request after the specified "Retry-After" interval (typically 30 seconds).
200 OK - Indicates the job has completed.
The JSON body indicates if the job was successful or not, and contains statistics about the number of records processed, etc.
Your application should stop polling after receiving this response. Subsequent requests to this endpoint will always return the same JSON response.
Examples
Use the HTTP action:
Click the menu and select Settings.
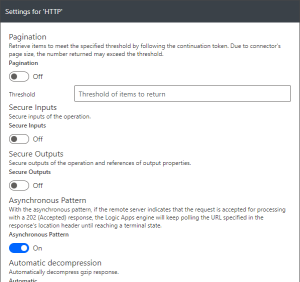
Ensure that Asynchronous Pattern is on.
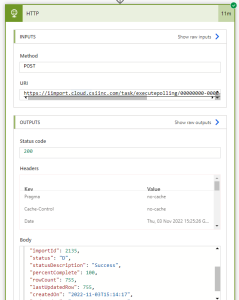
Now, Power Automate will not continue on to the next action until the iDMS job is completed. It is therefore possible to chain multiple iDMS jobs in sequence using this method with Power Automate.
When you run your workflow action(s), note that Power Automate does not display the intermediate polling steps (the "202 Accepted" polling requests). The action will remain in an "executing" or "waiting" status until the iDMS job is completed. Polling is handled internally by Power Automate.
The following screenshot shows that the task took 11 minutes to process. The Power Automate workflow continued to the next step only after the iDMS job was completed.
Passing IQA Query Parameters with Webhooks
It is possible to pass IQA parameters (prompts marked "Optional" or "Required" in iMIS) into a webhook request (standard or polling) and have those parameters apply to the IQA dynamically at runtime.
To view the webhook body template, and see the list of parameter names that are able to be passed into the webhook, click the icon next to a task, and expand the collapsible section titled Query Parameters Overload on POST Request.
You'll see a preview window containing a JSON object template that you can use to pass parameters in.
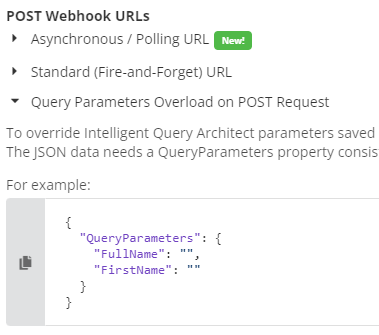
This JSON object should be included in your initial webhook POST body.
IQA Query Parameter Key Names
The names of the parameters are derived from the column name from the Business Object (or source IQA) of the corresponding filter row in the IQA.
If you have filter lines for CsContact.FirstName, CsContact.LastName, and CsContact.Email, then your query parameter keys JSON object would look like this:
{
  "QueryParameters": {
    "FirstName": "",
    "LastName": "",
    "Email": "",
  }
}
Passing in a null or empty string will cause iDMS to use the default parameter provided in the iDMS interface when the task was set up, or, the default parameter in the IQA if the iDMS task also does not have a value.
Column Name Limitation
It is not currently possible to have two filter rows in an IQA that share the same column name.
For example, if you add CsContact1 and CsContact2 (linked via the Company ID relationship), it would not be possible to provide parameter values for both the parent company "ImisId" and individual child "ImisId" filters at the same time, since the column name is the same.
This limitation will be addressed in a future version of iDMS.