
Getting Started
Overview
This guide will provide you with a brief, step-by-step walkthrough on how to get your cloud account set up for the first time.
Don't have your Cloud ID yet?
No problem - just follow our Environment Setup guide, and send CSI your iMIS URL, and we'll get you a Cloud ID!
1. Log In to the Cloud Dashboard
Once you have your Cloud ID, you can sign into the CSI Cloud Dashboard along with your iMIS username and password.
Learn More
If this is your first time signing in, you'll be given admin rights. To learn more about what an admin user can do, please see our Account and App Security guide.
2. Set Up Your Account
To configure your account settings, click the yellow " Incomplete Setup" banner when you first log in, or manually navigate to My Account and click Update My Account Info.
Fill out the Background Account and Preferences sections. See below for which iMIS account to use for the background account.
For more information, please refer to: What is a Background Account?
For iMIS Cloud Professional:
Use any staff user that has Remote Service and SysAdmin roles assigned.
For iMIS 2017 / iMIS Cloud Enterprise:
If possible, use the MANAGER account as the background account, as this ensures that all permissions necessary for the cloud apps to run are present.
Alternately, you can use any iMIS staff user that has Remote Service and SysAdmin roles assigned.
Important: Account Credential Changes
For PCI Compliance reasons, you may need to update the password on this account every 90 days.
If that is the case, also remember to update the Background Account as well. Failure to do so may result in loss of functionality for certain cloud apps.
For more information, please refer to the Background Account overview page.
3. (Optional) Add Admin User(s)
If you wish to assign additional iMIS users the admin role, navigate to My Account > Add or Remove Admin Users. Start typing, and select the username of a user to add, then click the button to add that user. Click the icon next to a user to remove them as an admin.
For more information on Admin Users, please see the Account and App Security guide.
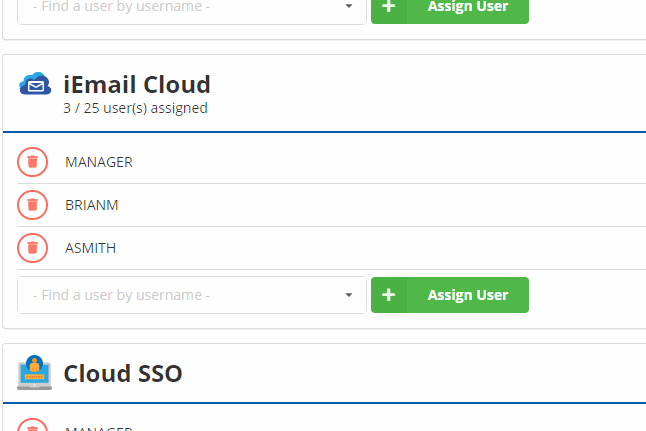
4. Add App User(s)
Before any apps will appear in the side navigation, users must be assigned to use them (including yourself). For more information on how this works, please see the Account and App Security guide.
To assign one or more users to be able to use various cloud apps, navigate to My Account > Assign or Remove Users on the far left side near the bottom.
On this screen, you will see a list of all licensed cloud apps. To add a user, start typing an iMIS username in the box. Click to select one, and then press Assign User.
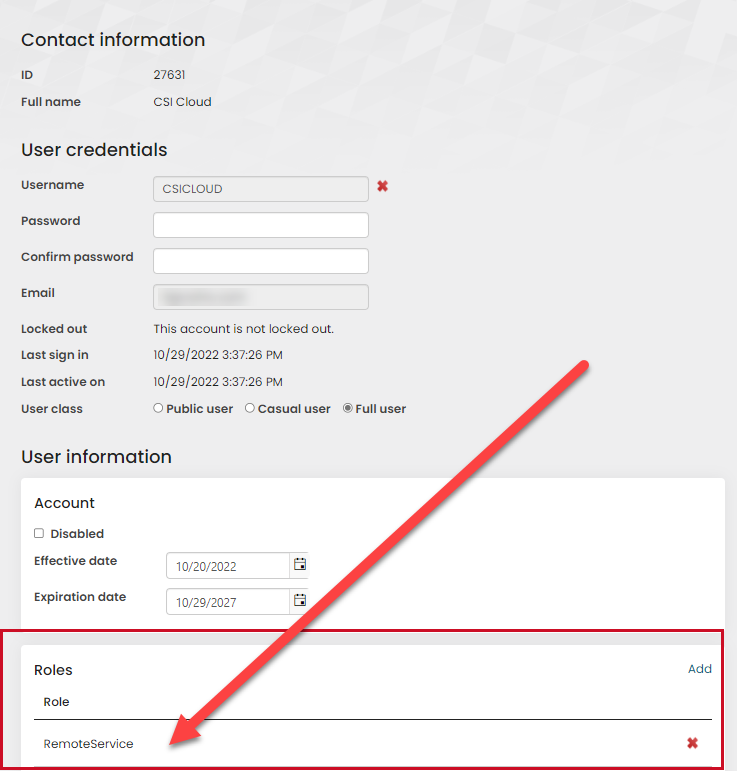
4a. Add the RemoteService Role for New Users
Any users that should be able to log in to the Cloud Dashboard and use any Cloud Apps, will need the remote service role assigned to themselves.
To add this security role to a user, follow these steps:
In the iMIS Staff site, navigate to Community > Security > Users
Search for a user by username or other criteria
Click the username in the search results to open the user's security record
Near the bottom of the page under User information, in the Roles section, click Add role
Check the RemoteService role and click OK
In the lower-right corner, click Save
It may take anywhere from 15 minutes to a few hours for this change to take effect, so if you are not able to log in to the cloud right away, please wait a bit and try again.
Or, you can click "Purge System Cache" from the RiSE About page, which has been known to speed up the process.
5. Done!
Log back into your Cloud account and you should now see your apps in the center and on the left side.
You are now ready to use CSI's cloud-based apps and services!
If you have any questions regarding your cloud account setup, please contact our support team.