
iEmail
iEmail Overview
iEmail is a utility that integrates Outlook™ with your iMIS database. It allows you …
To search the iMIS database for email addresses and add them to the To, Cc, or Bcc fields in Outlook™
The option to insert emails directly into iMIS as activities along with text and attachments.
You have the choice of inserting the email as an activity when you send the email or after an email is sent or received.
To import Tasks and Appointments from your iMIS database to your Tasks and Calendar in Outlook™
Since Outlook is not a mass emailing tool, iEmail allows the System Administrator to limit user access in the iMIS database and set limits on the number of recipients allowed to receive emails at one time.
Note: This article covers iEmail v3. Support for iEmail v2 concludes on July 1st, 2022. While customers with iEmail v2 will be able to continue to use the software, we will not be able to support any issues which may arise. If you are interested in the latest version of iEmail v3, please email support@csiinc.com.
Note: Microsoft has recently released the New Outlook for trial purposes. 
Currently, New Outlook will NOT support Com Add-ins. The iEmail application is a Com Add-in, so it will not run on the New Outlook. iEmail Cloud is the replacement for iEmail. As always, if you have any questions about this, please email support@csiinc.com. (updated: 2/1/24)
iEmail System Requirements
iEmail Web Services
The following system specifications are required to successfully run iEmail Web Services:
SQL Server 2008R2/2012/2014 (32-bit and 64-bit)
1024MB RAM
100MB Free Hard Drive Space
Microsoft .NET Framework v4.6.2
iEmail Client
The following system specifications are required to successfully run iEmail Client:
Windows 10 or higher
Microsoft OutlookTM 2016 or higher (Add-in will not install/run on O365 web interface)
iMIS 15.2, 20.1, 20.2 (2017)
1024MB RAM
100MB Free Hard Drive Space
Microsoft .NET Framework v4.6.2
Disclaimer
The installation of iEmail assumes an environment that allows the default settings to function seamlessly (i.e. installation to DEFAULT WEBSITE, Port 80 open, no unusual restrictions placed in the Firewall, DNS server. Client installations that do not include other 3rd party Outlook add-ins, no restrictions placed for local users that might prevent proper client installation of software, etc.)
If the servers, network, security, etc. are set up in such a way that iEmail installation needs to deviate from the default installation, it is not supported by the support agreement. That is not to say the product cannot be installed, and we have taken extra steps to help address exceptions (comprehensive Troubleshooting Guide, instructions to create a unique website in IIS if necessary), but any time needed by CSI to assist or perform such installations or troubleshooting, would then be billable. Please feel free to contact us with any specific questions on what may or may not be covered.
IMPORTANT -Read before beginning!
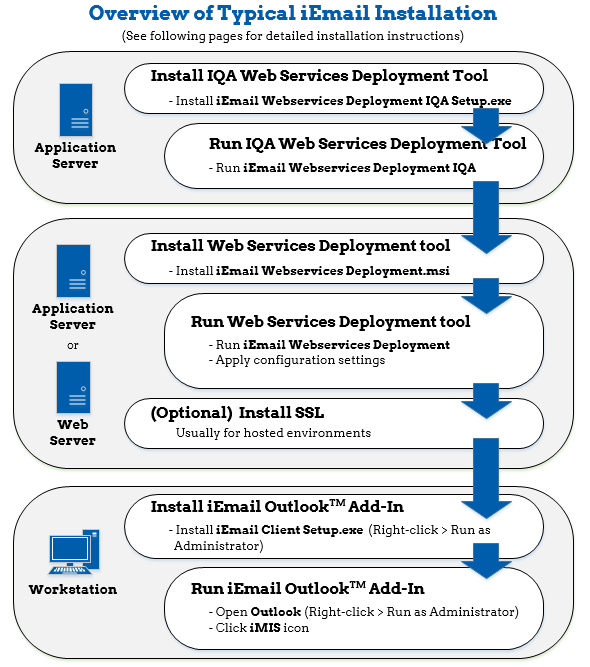
iEmail V3 is composed of three separate programs:
iEmail IQA Web Service
The (IQA) web service for iEmail will typically be installed on the local web server where iMIS casual view website is installed. The iEmail web services need to reside exactly on the same folder where iMIS is installed.
iEmail Web Services
The web service for iEmail will typically be installed on the local web server. However, for some installations, there might be just an application server. This is fine, however the server needs to have IIS installed and running and must be able to communicate effectively with the SQL server.
iEmail Client Side Installation
There is a 32-bit or 64-bit install for iEmail V3 client side. You only need to install one per client pc. You do not need to determine the version needed, simply run the iEmail Client Setup Application
iEmail Licensing
• Licensing for iEmail V3 is now per user. You will have to add the role of CSI-iEmail to your iMIS system detailed below. Then add that role for each licensed user of iEmail V3.
After you have extracted iEmail onto your computer/network, you will see the two folders and setup exe.
You will be running the Setup in the Web Services and Web Services IQA folders as necessary.
With the exception of the base web services, you should run each setup as an Administrator. To perform this, right-click on the iEmail Client Setup.exe (or iEmail Webservices Deployment IQA Setup) file, then select "Run as administrator".
For extreme cases where the user does not have any local pc rights, you may have to login to the PC as an Administrator to install the client. Run the software after installed, then log back in as the user to make sure everything installed properly.
Installing iEmail for the First Time
Step #1: Configure your Application/Web Server
The web service for iEmail typically will be installed on the local web server and/or iMIS 15 Application Server. If you wish to use iEmail outside of your organization's firewall, it must be on a publicly accessible webserver. The server must have IIS installed and configured and must be able to communicate with the SQL Server. See the System Recommendations above.
For Windows 2008 and/or Windows 7* Web Service Installations, the IIS 6 Management Compatibility Components must be installed. One of the features that the iEmail Web Service needs to have turned on is the IIS 6.0 Management Capability. Below are the steps to adding those roles, depending on the server operating system as highlighted:
Windows Server 2012 or higher using the Server Manager Tool
Click Start, click Windows Administrative Tools, and then click Server Manager.
From the dashboard, select Add Roles and Features.
In the Add Roles and Features box, click next.
Ensure the Role-Based or Feature-based installation radio button is selected. Click next.
Ensure the select a server from the server pool radio button is selected. Also confirm the server you are on is highlighted in the server pool window. Click next.
Expand Web Server (IIS)> Management Tools>IIS Management Compatibility
Click to select the IIS 6 Metabase Compatibility, IIS 6 Management Console and IIS 6 WMI Compatibility check boxes. Click next.
Click next on features screen without making any changes.
In the Confirm Installations Selections pane, click Install.
Click Close to exit the Add Role and Features wizard.
Windows Server 2008 or 2008R2 using the Server Manager Tool
Click Start, click Windows Administrative Tools, and then click Server Manager.
In the navigation pane, expand Roles, right-click Web Server (IIS), and then click Add Role Services.
In the Select Role Services pane, scroll down to IIS 6 Management Compatibility.
Click to select the IIS 6 Metabase Compatibility, IIS 6 WMI Compatibility, and IIS 6 Management Console check boxes.
In the Select Role Services pane, click Next.
In the Confirm Installations Selections pane, click Install.
Click Close to exit the Add Role Services wizard.
Windows 7 or Windows Vista from Control Panel
Click Start, click Control Panel, click Programs and Features, and then click Turn Windows features on or off.
Open Internet Information Services.
Open Web Management Tools.
Open IIS 6.0 Management Compatibility.
Click to select the IIS 6 Metabase and IIS 6 configuration compatibility, IIS 6 WMI Compatibility, and IIS 6 Management Console check boxes.
Click OK.
Normally you would not install the iEmail V3 web service on a Windows 7 machine. However, for testing and/or demo purposes, you may.
Step #2: Installing iEmail (Intelligent Query Architect support) Web Services
In order for the Intelligent Query Architect (IQA) tab in iEmail (Address Book from new mail message) to operate properly, you need to install the iEmail (IQA) Web Services at the same location as the iMIS casual website and then configure the regular iEmail Web Services settings to indicate what the iMIS casual website URL is.
Installing iEmail (IQA) Web Services
Unzip the iEmail installation files you received from ASI/CSI.
Browse to the folder "Web Services IQA"
Run the setup program "iEmail Webservices Deployment IQA Setup.
Click through the installation wizard.
Run the installed iEmail Web Services Deployment IQA program.
Configuring iEmail (IQA) Web Services
Please note at the completion of this section, iMIS will restart, therefore it is recommended that people are not working in iMIS while you install the iEmail IQA Web Services.
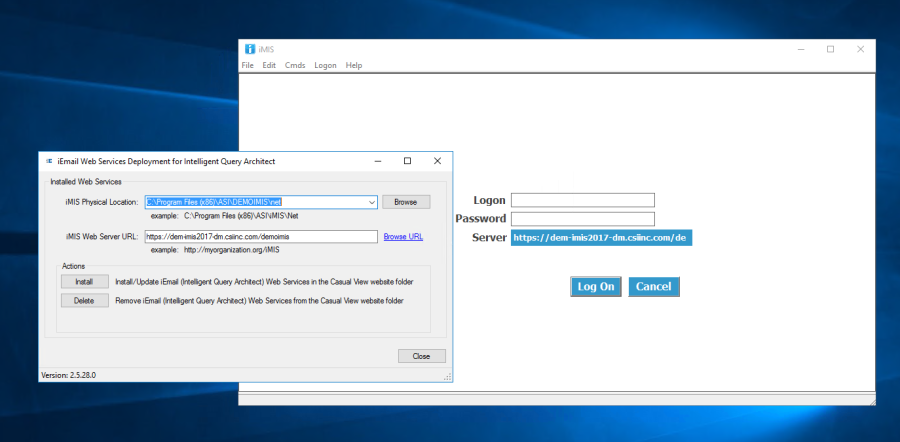
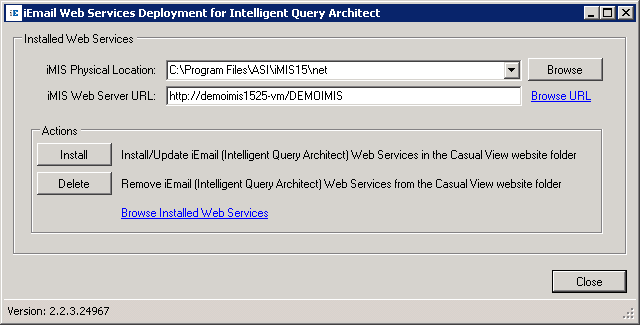
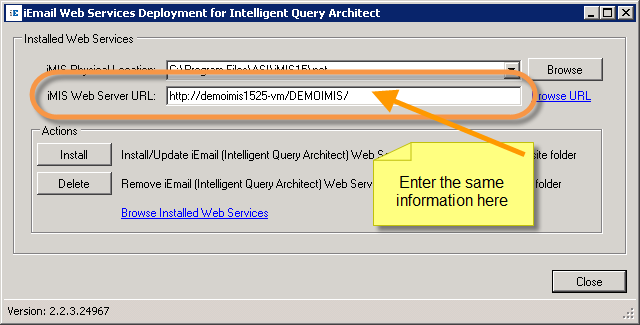
Run the installed iEmail Web Services Deployment IQA program
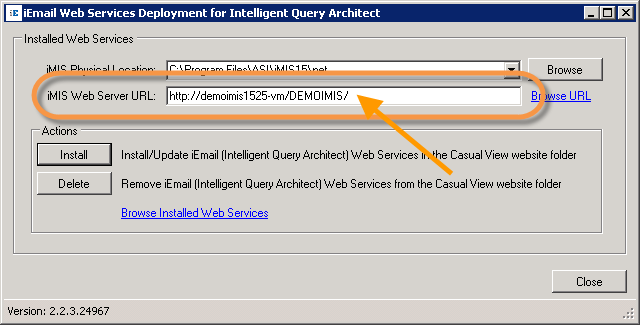
Enter the physical path corresponding to the iMIS casual website (iMIS Physical Location – note you want \NET on the end of your Path)
Enter the URL corresponding to the iMIS Staff website (iMIS Web Server URL) – This is the URL from your login screen in iMIS (If it exists, do not include the /CS at the end.)
After entering the iMIS Staff site URL, click Browse URL to ensure it opens correctly
Click on Install to complete the installation of the iEmail (IQA) Web Services. You should receive a pop up box that says 'Web service was successfully installed.'
After the installation is completed, allow some time for the iMIS casual website to restart.
Step #3: Installing the iEmail v3 Web Services Deployment Program
Returning back to the CSI IEmail installation folders you unzipped above, from the 'Web Services' folder, double click on iEmail Webservices Deployment Setup. This step installs the Web Services Deployment Program that will be used to install the Web Service(s) required by iEmail. Continue through the installation wizard steps.
Destination Folder: Click Change to modify where the program will be installed. Click Next to continue and then Install to begin the installation.
Once the program has been installed, you will see a program called "iEmail Webservices Deployment" under the CSI Programs folder in All Programs. Click on this to begin the installation of the iEmail Webservice. You must run the deployment tool after installing it!
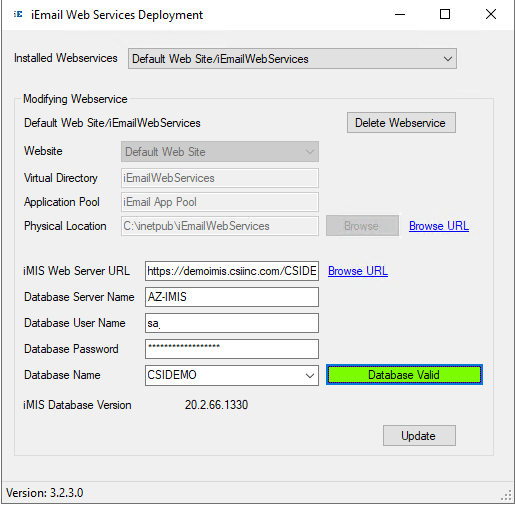
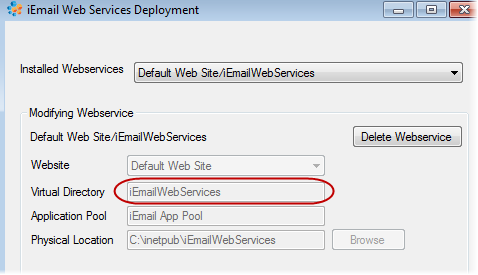
The iEmail Web Services Deployment Program will enable you to create, administer, and delete the iEmail Web Service. The dropdown at the top ("Installed Webservices") will show you what web services are currently installed. If you select "Add New Webservice", you will be prompted to enter the fields required for adding a new web service (such as for your Test iMIS).
Enter the Website, the Name of the Virtual Directory, and the Application Pool.
Website:Normally, your Default Website is acceptable here AND IS HIGHLY RECOMMENDED.
Virtual Directory:This will be the name of your iEmail Web Service. We recommend leaving the default of 'iEmailWebServices'
Application Pool:This will be the name of a new dedicated Application Pool for the iEmail Web Service. We recommend leaving the default of 'iEmail App Pool'
Physical Location: Actual installed location of the iEmail Web Service. We recommend leaving the default of 'C:\inetpub\iEmailWebServices'
Enter Database Server Name, User Name, Password, and Database Name.
iMIS Web Server URL: The URL that you use to launch iMIS minus the /CS at the end (see iMIS Login Screen). Use the same Staff site URL you entered above during the Configuring iEmail (IQA) Web Services step, DO NOT FORGET TO START WITH HTTPS:// as HTTP:// will not work.
Database Server Name: The SQL Server that iMIS resides on.
Database User Name: SQL Administrator Username (This will be different than your iMIS user name)
Database Password: SQL Administrator Password (This will be different than your iMIS password)
Database Name: The name of the iMIS Database.
You can then click the "Validate Database" button to make sure there is a connection. If the database validates correctly, the 'Database Valid' button will turn green in color.
6. IMPORTANT: Once validated, click the "Update" button to create the iEmail Web Service. Allow a minute or two to allow this process to complete. Once completed, you will receive a pop up box that says 'Webservice was successfully created.'
Note: You may get an error message about the iMIS Webserver URL timing out. Wait 1 minute and then try again. If it fails, check the URL in the log and attempt to browse to that URL (don't forget HTTPS) . If it appears, click the Update button one last time. If it does not, see the troubleshooting section of the this user guide.
7. Click the X in the upper right corner of the iEmail Web Services Deployment window to close it.
Step #4: Install SSL Cert for iEmail Web Service (optional)
This step is recommended if you will be using iEmail outside of your firewall and/or if your iMIS Database is hosted and your Outlook is local.
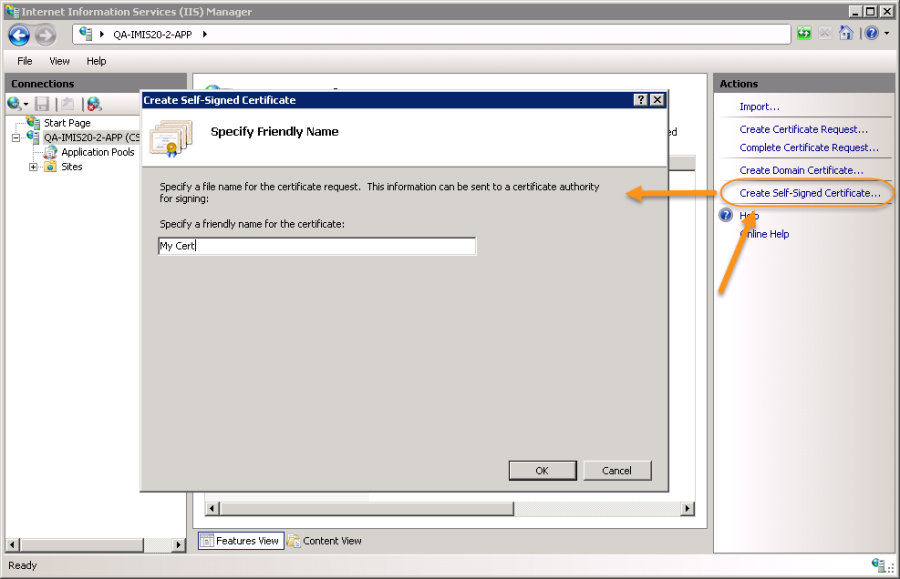
For IIS 7 (Windows 2008 & Windows 7)
Click on the server name and then "Server Certificates."
Double click on "Create Self-Signed Certificate…" Enter the friendly name for the certificate.
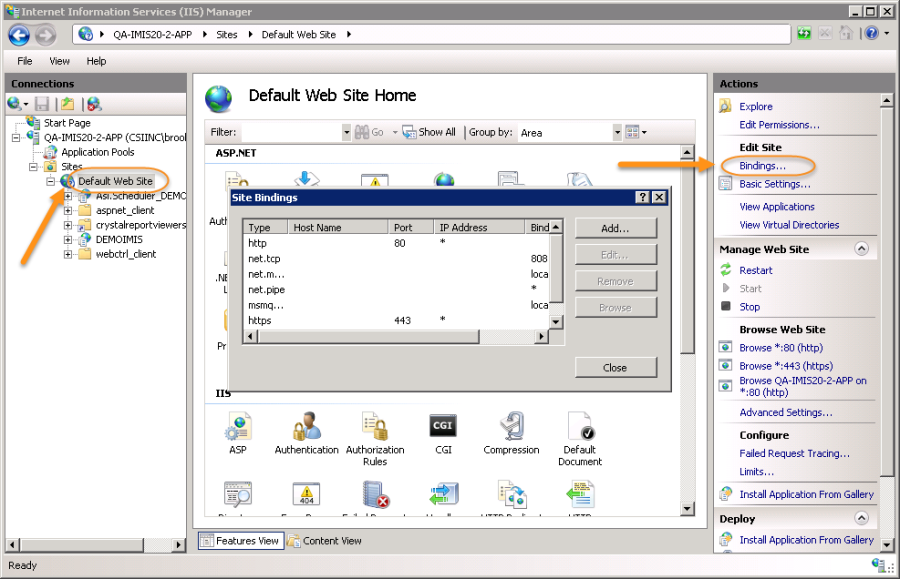
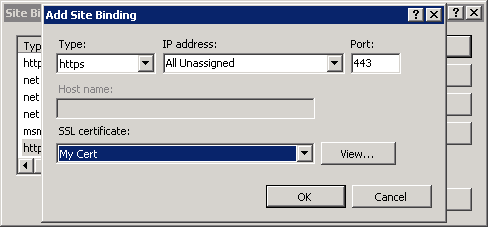
Click on the "site," then click on "Bindings." Click "Add" to add a new binding.
Select "https" for the type and select the friendly certificate in the SSL certificate dropdown.
For IIS 6 (Windows 2003)
Right click and select Properties on the iEmail Web Services installation.
Go to the Directory Security tab, click the Edit button in the Secure Communications section.
Within Secure Communications, click on and check the checkbox for Require secure channel (SSL) and make sure Ignore client certificates is selected if you do not have a current SSL certificate. Click OK to accept the settings.
Step #5: Install Client Based iEmail Software for Outlook
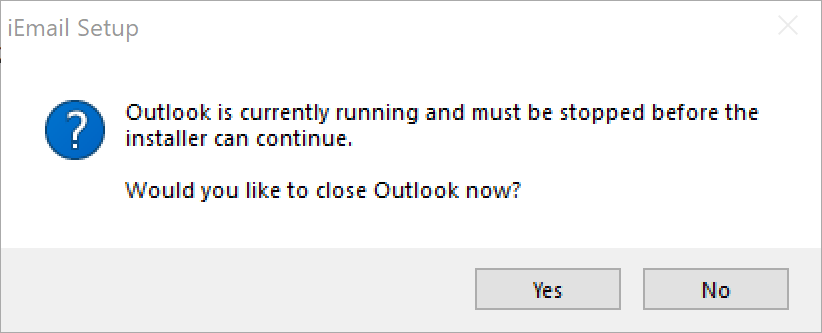
You will now install the iEmail Client on the machine that is using the iEmail plug-in! Please make sure that Outlook is closed before proceeding.
Now you will go back into the folder you downloaded and right click the "iEmail Client Outlook Add-in 3.X.XX.exe" and select Run As Admininstator. If you have not closed Outlook, you will be prompted with this message which will give you the option to close Outlook for you. Click Yes to have Outlook closed for you.
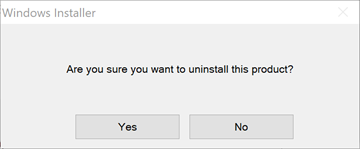
If you have not uninstalled iEmail prior to the upgrade, you will be prompted to uninstall the older version of iEmail. Make sure to select YES to uninstall the previous version. If you do not uninstall, the product will not upgrade.

Make sure to select YES here as well
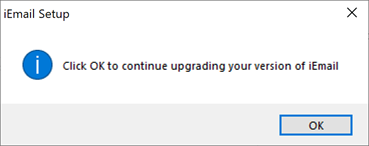
Click OK to continue upgrading
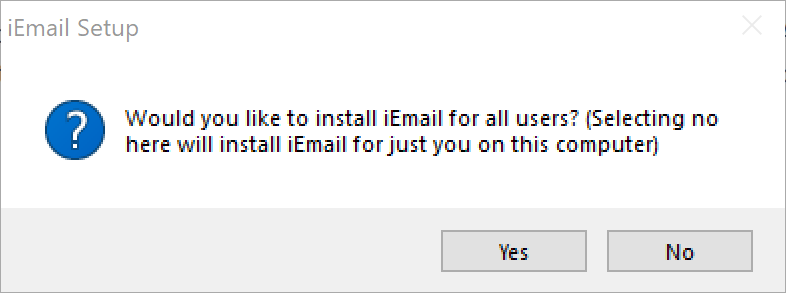
You will then be prompted if you want to install iEmail for all users or just the current user on the machine. Typically clients will select YES to install the iEmail plug-in for all users of that machine.
The Installer Wizard for iEmail will start. Continue clicking next until you reach the license agreement screen. Select "I Agree" and click Next.
A screen will display prompting an install location. Confirm this is where you want iEmail installed and click Next, continuing to follow prompts until iEmail is installed.
That is it! The Client should now be installed. Please launch Outlook to confirm the installation was successful.
Step #6: Create License Role
In your iMIS Staff site, login as a System Admin (Manager). Go to Security->Roles. Click on “Add a role.”
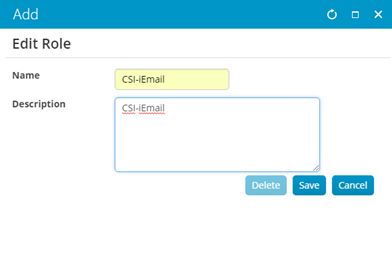
Fill out the new role as described in the screenshot below and SAVE.
Step #7: Add the CSI-iEmail role to all licensed users
While still in the Staff site, go to Security->Users. Lookup a user you would like to apply the license to. Under User Information there is a section for Roles. Click on “Add role”. You should see “CSI-iEmail” as a role. Please mark the checkbox and click OK.
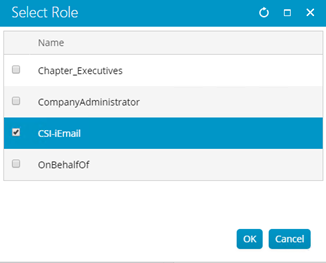
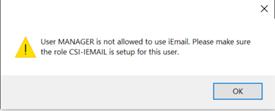
NOTE: If you see a message box like below, then the user has not had the role added to their user login.
Step #8: Add/Edit an Email Activity Type in iMIS Desktop
The purpose of this step is to edit an existing iEmail activity type (if needed) or create a new one if it is missing via iMIS Desktop.
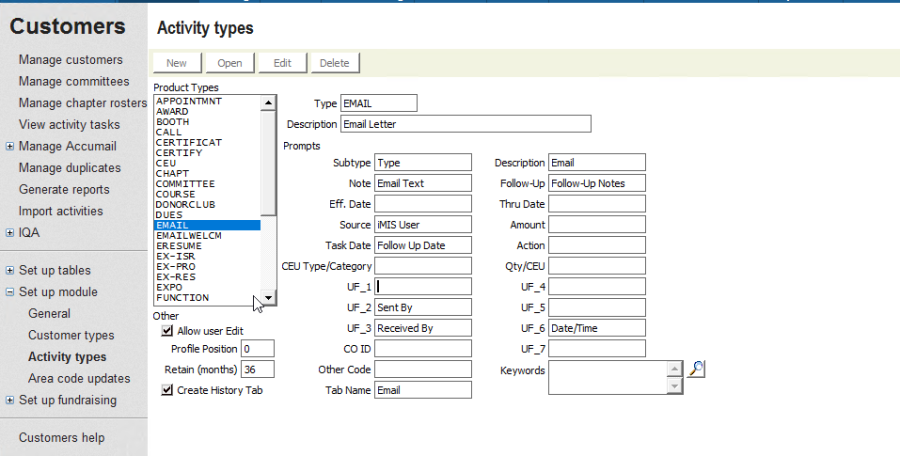
In the iMIS Desktop, navigate to Customers > Set up Module > Activity Types.
To Add a new EMAIL activity type, click New.
To Edit an existing EMAIL activity type, select it in the list and then click Edit.
Edit/Update the fields. (below is a sample of recommended fields) and click Save.
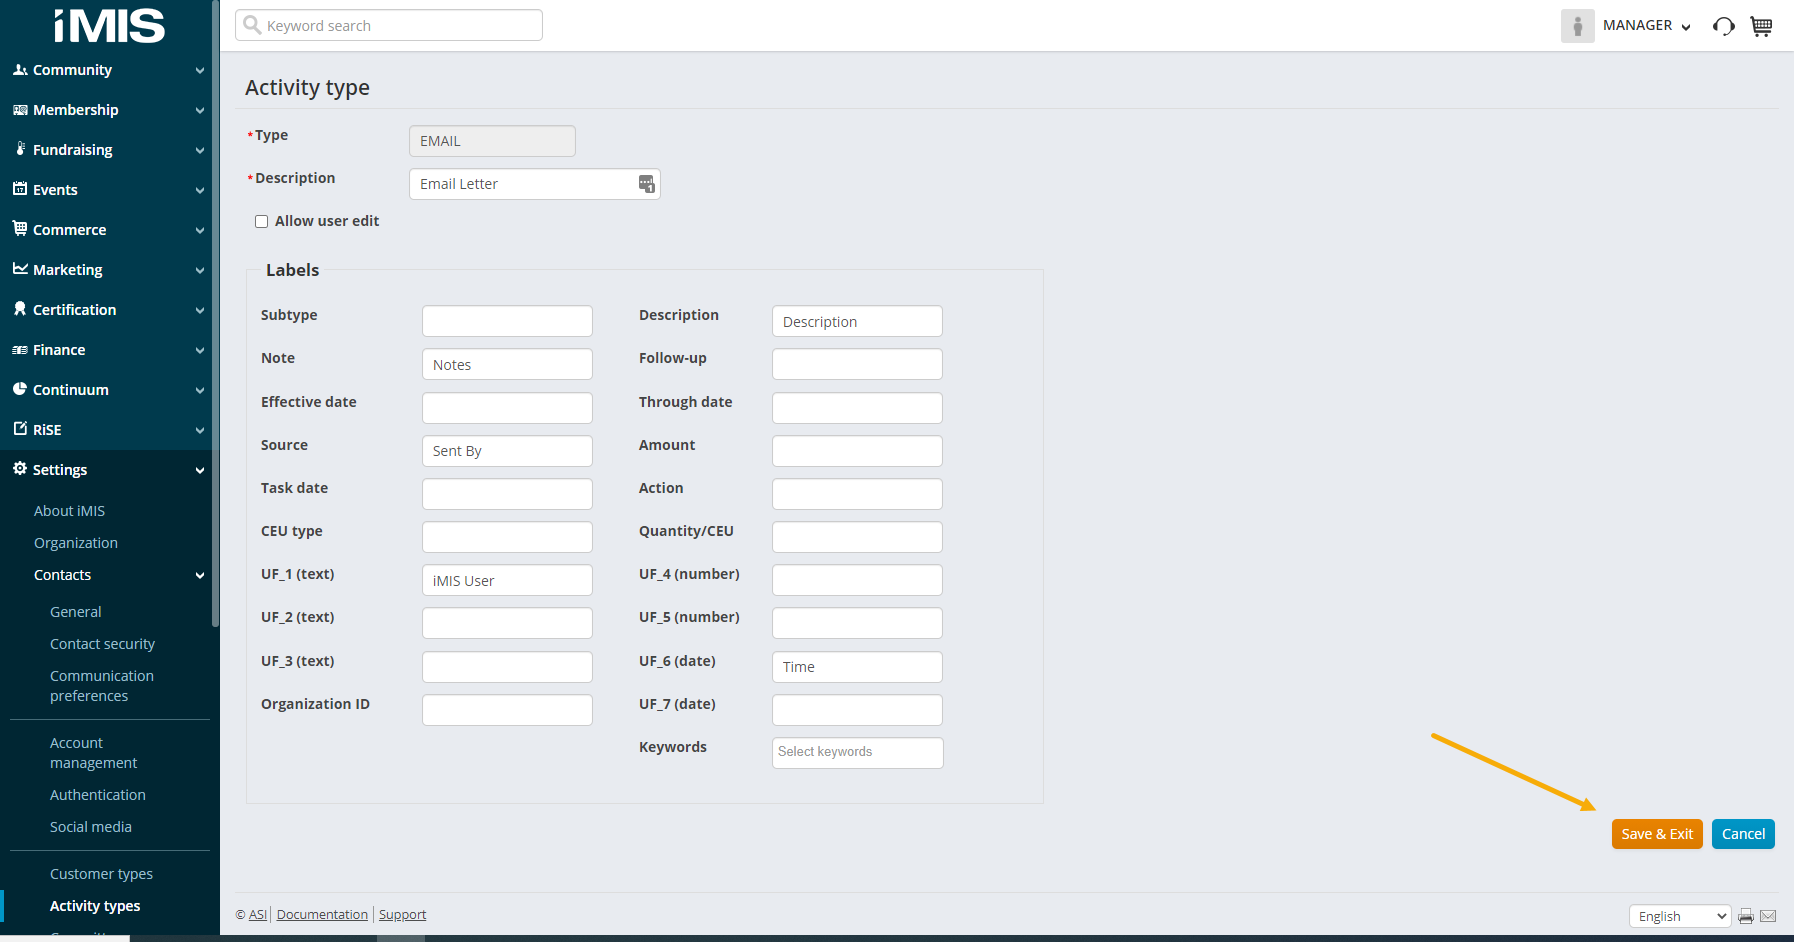
Step #9: Add/Edit an Email Activity Type in iMIS Staff Site
The purpose of this step is to edit an existing iEmail activity type (if needed) or create a new one if it is missing via iMIS Staff Site.
In the iMIS Staff Site, navigate to Settings > Contacts > Activity Types.
To Add a new EMAIL activity type, click Add new activity type.
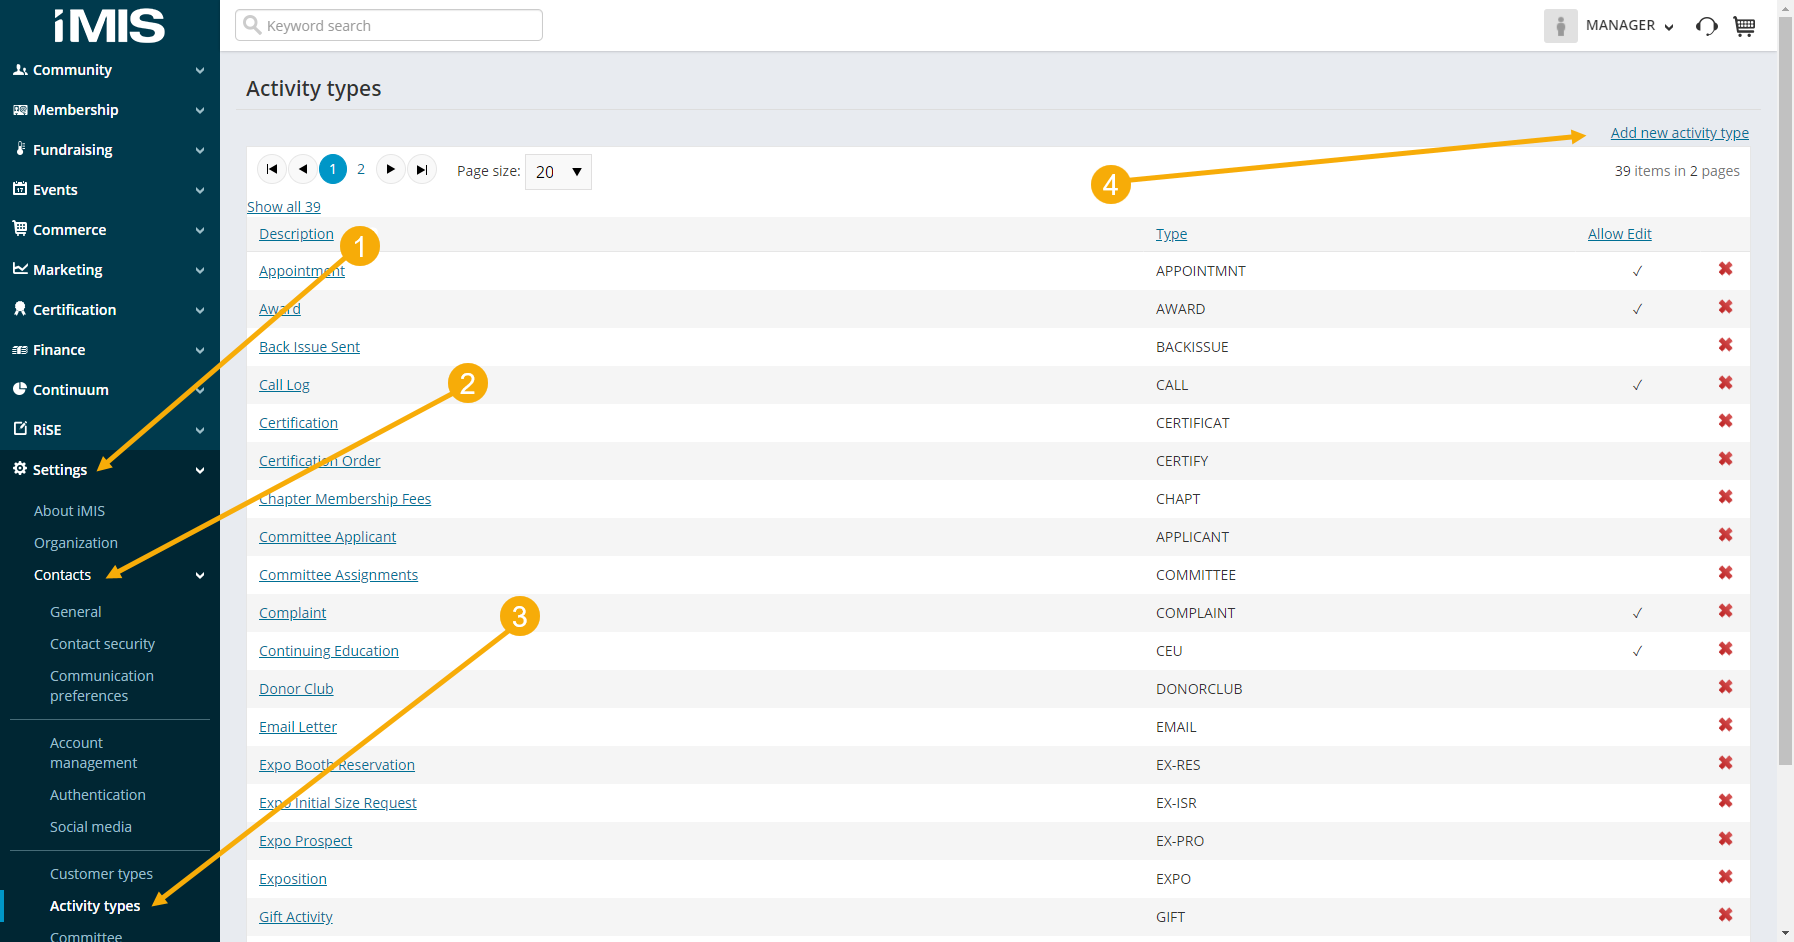
To Edit an existing EMAIL activity type, click on the activity type name in the list.
Edit/Update the fields (below is a sample of recommended fields) and click Save & Exit.
iEmail Client - Silent Installation
You are able to script the installation or use a third party tool to deploy the iEmail Client Outlook Add-in file.
The command to perform the silent installation is "iEmail Client Outlook Add-in 3.X.X.X.exe" /S.
Where 3.X.X.X. is the current iEmail Version you are installing. The directions below will show an example for iEmail Client Outlook Add-in 3.1.29.0
So, for example, if the iEmail Client Outlook Add-in 3.1.29.0.exe file is located in C:\Users\JohnSmith\Desktop\iEmail Setup Package, you can open command prompt and type:
cd "C:\Users\JohnSmith\Desktop\iEmail Setup Package"
"iEmail Client Outlook Add-in 3.1.29.0.exe" /S
That will perform the silent install. It will also remove any previous version of the iEmail client and close Outlook if it is currently running.
Running iEmail for the First Time
After installing iEmail, launch Outlook and start a new email.

Note: Occasionally, Outlook will disable add-ins that delay the launch of Outlook, even when just by less than a second, including iEmail. To permanently enable iEmail, in Outlook, go to File > Manage COM Add-Ins > Find iEmail Outlook COM Add-in > Select "Enable this add-in" > Close.
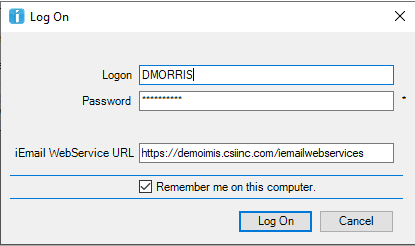
Click on the iMIS icon and you will be presented with the iEmail Login Screen. This is the only time you will see this screen (iEmail will remember your user name and password) unless you change databases at some point.

Enter your iMIS Logon, Password, and the iEmail Web Service URL (note: this is not the iMIS Server URL). This is the server name that the Webservices were installed on (step#3) as well as the Virtual Directory you specified while installing these. The webservice URL must start with HTTPS:// not HTTP://
About the License Key
When you first log into iEmail, (using your iMIS login), the program will try to call a CSI API to check for a valid license key. If it finds a valid key, it will self license. If you do not have a license key, you may only use iEmail with an iMIS Demo database. When connecting to an iMIS Demo Database, iEmail will not ask for a license key.
Installing iEmail on a new computer will not require you to enter a license key.
Updating iEmail
With each upgrade for iEmail you need to install the updates for both the client and server applications.
The client being the Outlook COM Add-In: that is the iEmail application running inside Microsoft Outlook (usually installed on every workstation running Outlook).
The server being the iEmail Web Services website application (usually install once on the web server) that the client is connecting to in order to access the iMIS features.
Starting from the version 2.3 of iEmail there is a new iEmail Web Services (IQA) component that needs to be installed (and updated as well) on the iMIS casual view website in order to support the Intelligent Query Architect functionalities in iEmail.
Perform the following steps to update all components of iEmail…
Updating client application: iEmail COM Add-In for Outlook
iEmail should already be installed on the workstation.
You can verify the installed version using the Programs and Features and search for iEmail:
In this example the current version is 3.0.1.
Close Microsoft Outlook and make sure it is not running in the background as a process.
You can use the Task Manager to inspect that Outlook is closed properly.
After closing Outlook run iEmail Client Setup.exe.
Follow the steps as directed during the installation of iEmail.
After the installation has completed, you can verify the new version has been correctly installed
Once the client application (iEmail COM Add-In for Outlook) has been successfully installed you need to now update the server application (iEmail Web Services) in order to run iEmail.
If you update the client application only and forget to update the server application, and you try to run iEmail you may receive the following message:

It is a reminder that both client and server applications need to be running on the same major/minor version (the first two numbers must match. Thus a client may be on 2.5.41 but the server may be 2.5.38.).
Proceed with the next step to update the server application.
Updating server application: iEmail Web Services
Determine the web server where the iEmail Web Services Deployment application is installed.
You can also verify the installed version using the Programs and Features and search for iEmail
Run the iEmail Web Services Deployment installer.
Follow the steps as directed during the installation.
Once the iEmail Web Services Deployment application has been installed successfully run the program from the Start menu:

The iEmail Web Services Deployment application should already detect the previous installation of the web services website and select it from the Installed Webservices drop down list control,
Click on the Validate Database button to verify the connection to the iMIS database is still valid.
The Validate Database button should turn green and the label should change to Database Valid.
Finally click on the Update button. This will refresh all the necessary web files and configuration.
Updating server application: iEmail Web Services (IQA)
Determine the web server where iMIS casual web site is installed.
In our example below the web server is called DM-IMIS20 and the URL is:
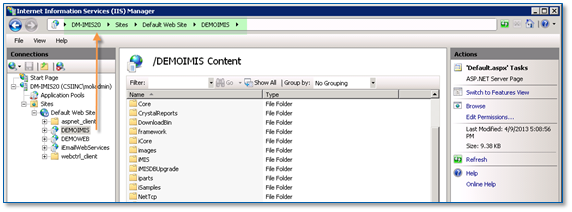
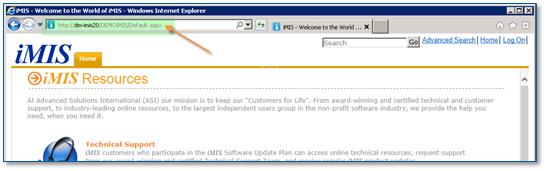
On the web server where the iMIS casual web site is running,
2. Run the iEmail Web Services Deployment IQA Setup installer
3. Follow the steps as directed during the installation.
4. Once the iEmail Web Services Deployment IQA application has been installed successfully, run the program from the Start menu. The iEmail Web Services Deployment for Intelligent Query Architect application should already have detected the previous installation of the web services and would select it from the iMIS Physical Location dropdown list control.
5. Click Install to proceed with updating the web services selected.
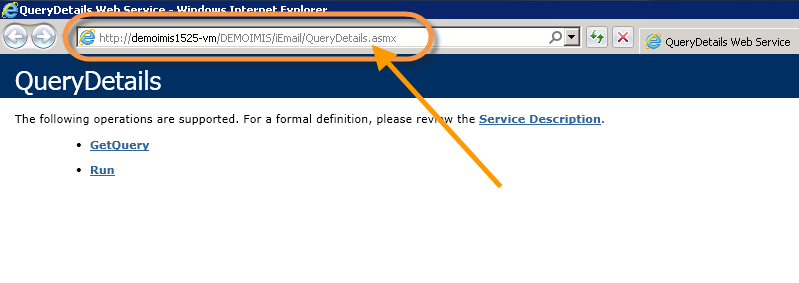
The deployment tool installs a new web service file called "QueryDetails.asmx" in an iEmail folder under the selected iMIS casual web site:
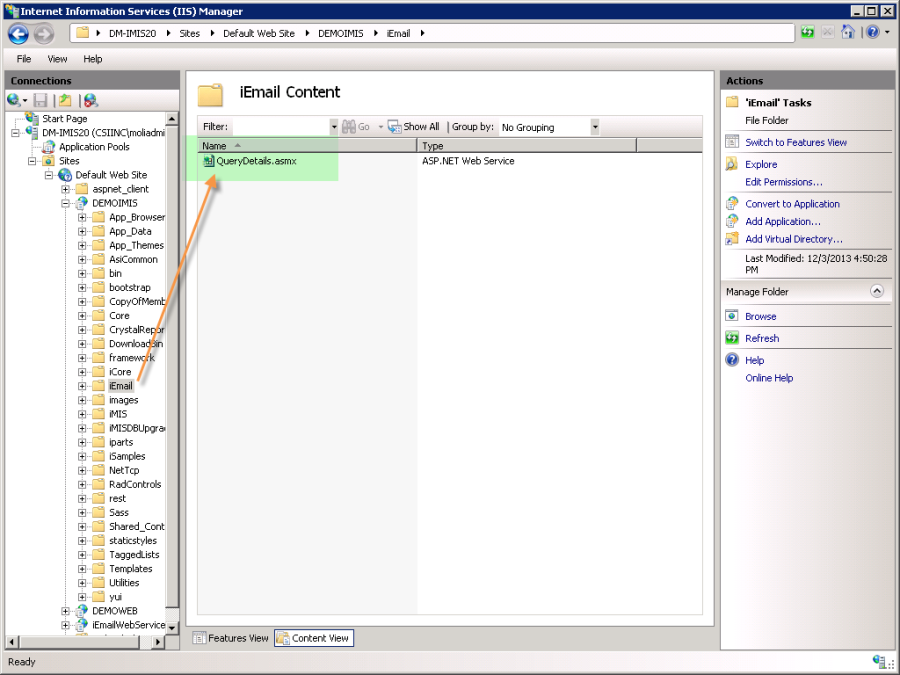
There are also some binary files installed alongside the web service that will cause the website to restart. Depending on the web server it may take 30 seconds to a few minutes for the site to come up again6.
Using iEmail
Search for addresses
Open Outlook™.
Click on New to compose a new email.
Once iEmail is installed the iMIS icon will display in your Outlook™ toolbar. Click on the iMIS icon to search for email addresses in iMIS.
4. Enter your iMIS login. (You will only be asked to enter your name and password the first time you use iEmail and after any updates to iEmail).
5. Enter the iEmail Web Service URL (THIS IS NOT THE iMIS Server URL) and MUST START WITH HTTPS://
6. Options for searching:
Multiple iMIS fields
Ad Hoc search from your iMIS database
Committees from your iMIS database
Events and the functions within Events
Views

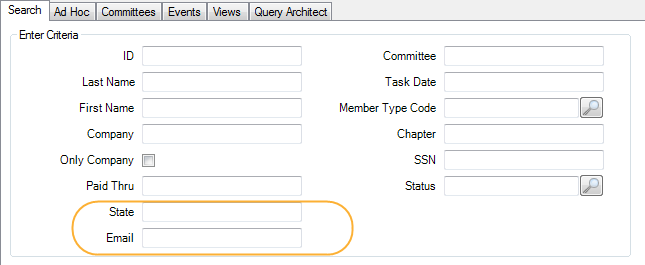
Search by iMIS Search Fields
On the Search Tab, enter the criteria by which you would like to search (ie. Name, Company, ID, etc.).
The criteria are based on the search fields available in your iMIS database. iEmail customizes the search fields based on the specific iMIS database. The four user defined search indexes are also included if they are set up in your iMIS database. These search indexes can be setup in iMIS via Customers > Setup Module > General > Indexes. See your system administrator.
User defined Indexes
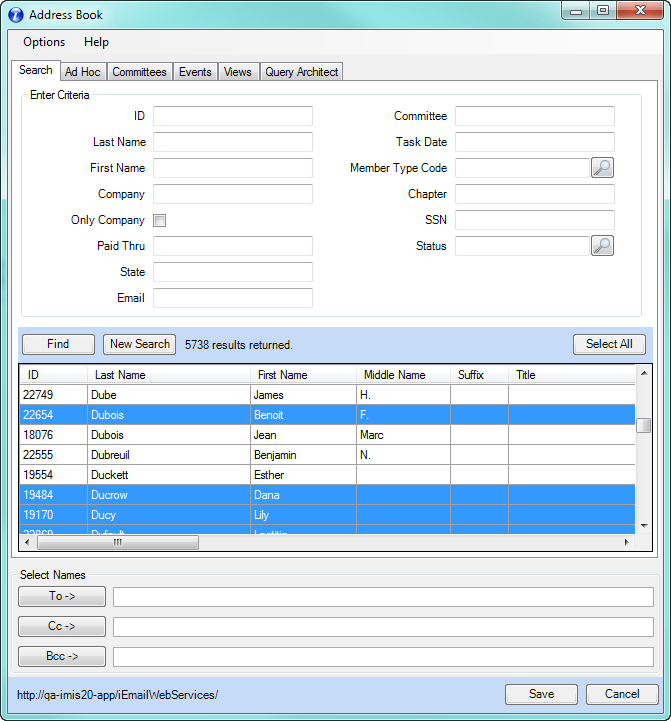
2. Type in the search criteria and click Find.
3. After performing a search, you will notice that all of the records with email addresses are NOT shaded. Double click on the person you wish to insert into the To, Cc or Bcc box or you may press Ctrl A to select all. You may also hold down the Ctrl key and select specific rows. Then hit the To, Cc or Bcc buttons to insert. Remember, the email address must first be in iMIS for iEmail to insert it into any send box in Outlook™.
4. Click Save and the email addresses will be inserted into the email.
Search by Committees
There are several ways in which you can search by Committees from iMIS. These include: type, term, and sort by functionality. 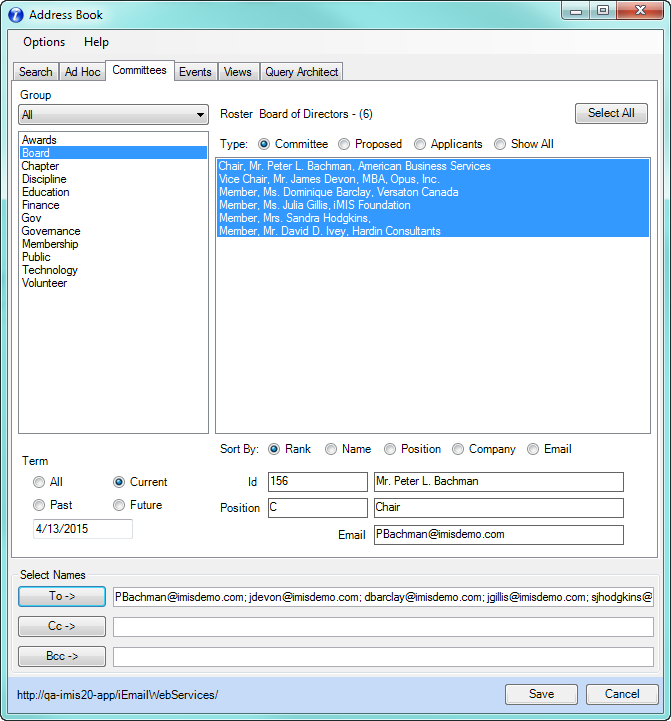
Select the Committee tab on the Address Book window to search by Committee.
Select the desired Committee
You may select all the committee members by selecting the first member and pressing Ctrl A or click on each member to select who will receive the email
After selecting the desired recipients, click the To, Cc, or Bcc button to enter the email addresses into the appropriate send box
Click OK to finish.
You may wish to Cc or Bcc an individual who is not on the committee. Prior to selecting OK, go back to the Search tab to select individuals who are not on the committee. Again, you may search by iMIS fields or Ad Hoc search.
Once you have all the emails selected, click OK and the addresses will be inserted into the email.
Search by Ad Hoc
Select the Ad Hoc search tab.
Any Ad Hoc searches stored in your iMIS database will display.
Double click on the desired Ad Hoc search.
NOTE: If you have changed your Ad Hoc Search criteria and do not see the changes within iEmail, please go to the Options menu item and select Web System Setup (requires iMIS Sys Mgmt. authorization level: "8 – System Setup"). Within this screen you will be able hit the "Recycle Application" button in order to get the most recent changes from Ad Hoc.
The records found in the Ad Hoc search will display on the Address Book window. You may select all the individuals by clicking on the top line and pressing Ctrl-A or double click on selected individuals or hold the Ctrl key and select specific individuals to receive the email. You may use the Search Tab to add any emails not in the Ad Hoc search.
Search by Events
Search by Events is different than the other search tabs. In the Events search, you can drill down by using the Events search tabs. To search by Events click on the Events tab in the Address Book window.
Click on the secondary Event tab to see a list of all available Events.
Double click on the desired Event to automatically open the Function tab. All the Functions within the Event will display.
Double click on the desired Function and iEmail will automatically go to the Registrant tab where all the registrants for that Function will be displayed. You may select all Functions by clicking on the top Function and pressing Ctrl A or hold the Ctrl key and select specific functions you need. Click on the Registrant tab to view all registrants.
Select the record you need by either double clicking on the individual or clicking on the To, Cc or Bcc box and then clicking on the individual to insert the email address into the appropriate box. You may select all by clicking on the top person and pressing Ctrl A or hold down the Ctrl key and select the individuals.
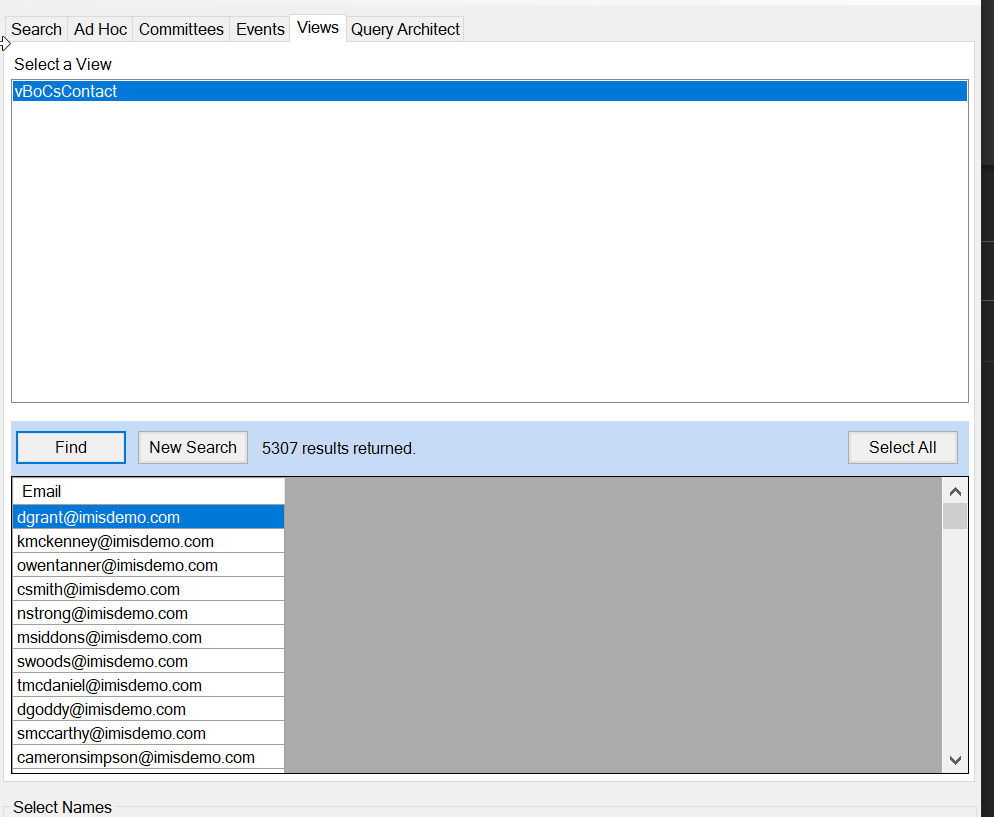
Search by Views
With iEmail, you also have the ability to search using views. By default only Views which use an Email field will display.
You may click on individual records or click on the top record and press Ctrl-A to select all or hold the Ctrl key and select individual records.
The total number of results returned will display .
Hint: On most searches you can right-click on the grid result to open the pop-up menu providing shortcut for common action such as selecting all the lines, sending to the selecte d row.
Set up iMIS to allow email attachments
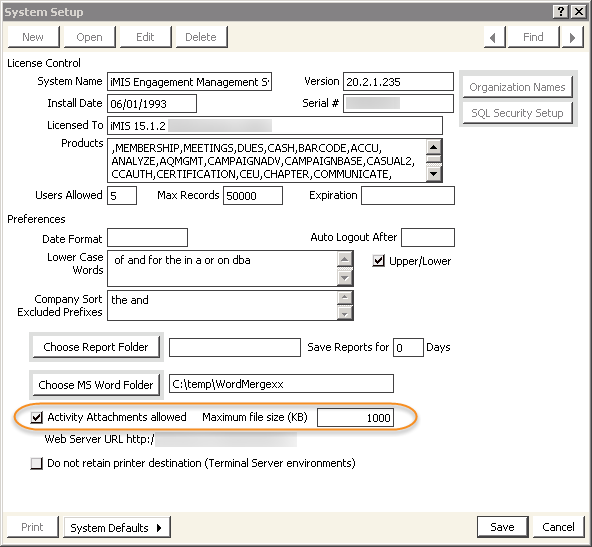
In the iMIS Desktop, go to File > System Setup.
Select the checkbox Activity Attachments allowed.
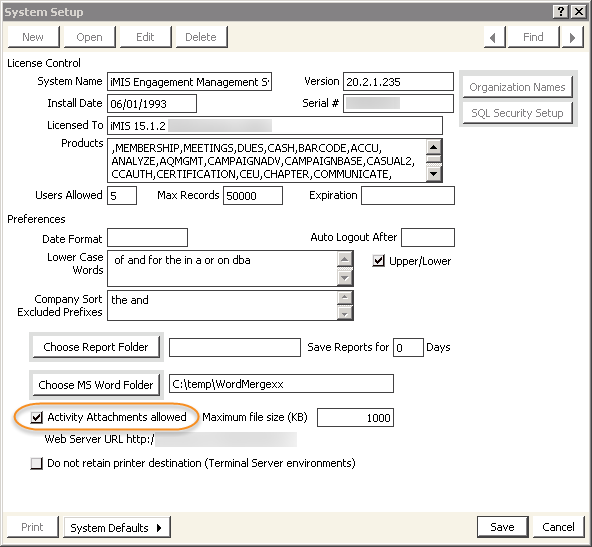
*Maximum file size: The maximum file size allowed affects the amount of storage space utilized on the iMIS database. CSI has found that a file size of 1,000 KB will be sufficient for most emails. If needed, the system administrator can always adjust the maximum file size accordingly.
Set up iMIS to Limit Access to Certain Committees
At times, a user needs to be limited from access to certain committees within iEmail. To see a committee, the user needs to be a member of the committee. You would need to restrict the committee list to the committees that you want to allow everyone to email. You will also need to create an IQA for each committee which a user needs access (alternatively you could create one IQA that shows all the people on all the committees the user is on). These instructions assume you want to make a committee IQA for each committee. This IQA will not return any results if a user is not on the committee. This IQA will return results for each member on the committee if the user is also on the committee.
The example below assumes you want to only show active committee members. It also assumes you don't use Applicants or Proposed committee members; if you do, you will need to add an additional filter.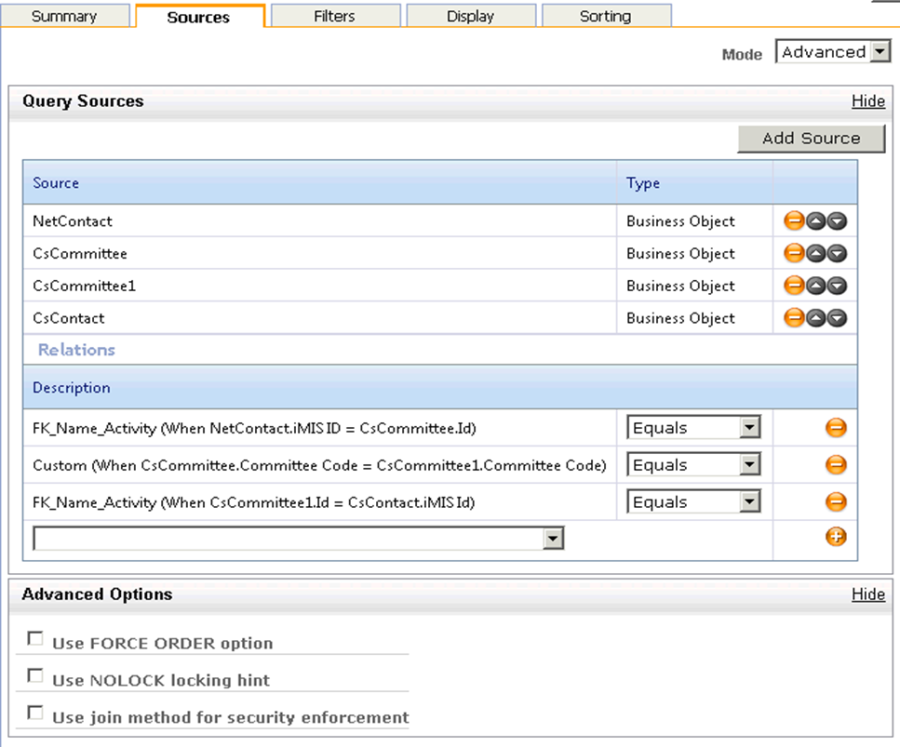
Filters Tab in IQA
For NetContact.Contact Key's Value of "@LoggedInUser" the quotes are required to be put into the field.Value of @date is entered by clicking the "run" button.
To filter on a specific committee, select CsCommittee.Committee Code from dropdown and set equal to COMMITTEECODE. If you keep the filters as pictured, we are returning all committees for this user in the same IQA.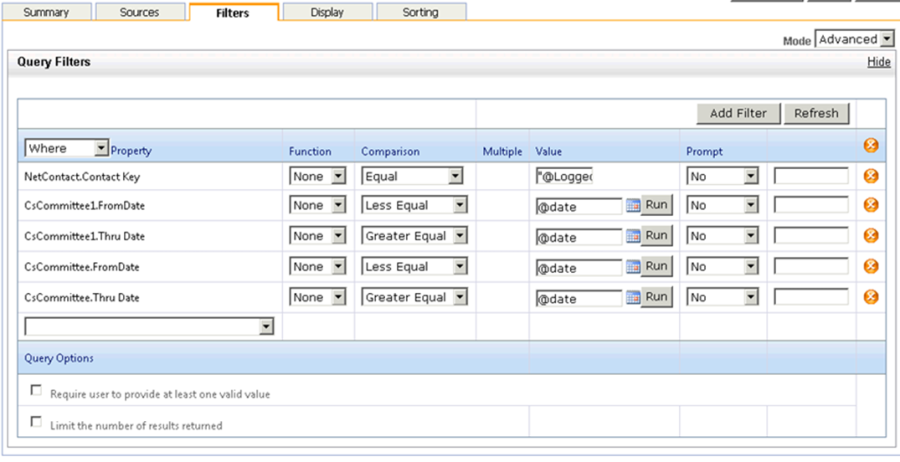
Display Tab in IQA
"Only display unique results" has been selected. This may not be required, depending on your data. 
Using iEmail with Outlook Appointments
Create a new appointment in Outlook.
Click on the iMIS button to display the iEmail Address Book window.
Notice that the appointment is automatically saved each time the iMIS is clicked.
Use the regular functionalities in iEmail with an Outlook Appointment.
Create an Email Activity in iMIS
Send and Insert Email Activity directly into iMIS
Please Note: if you do not have an EMAIL activity type set up in your iMIS database and you attempt to insert an activity, you will receive this message:
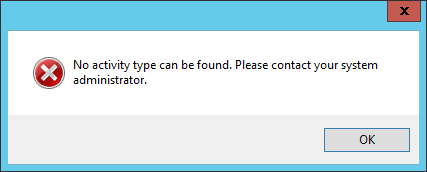
To add a new EMAIL activity type or edit an existing one, please refer to the instructions in the section: Step #8 Add/Edit an Email Activity Type in iMIS.
Once you have an EMAIL activity type setup in iMIS, iEmail will default to that activity type even if you have NO preferences setup in Activity Type Setup in iEmail.
(Option 1)
This feature allows the user to send an Email from Outlook™ and have iEmail create an EMAIL activity in iMIS from the message sent.
Create a new email.
When you are ready to send the email, use the button Send/Insert Activity instead of the default Send button in Outlook™:
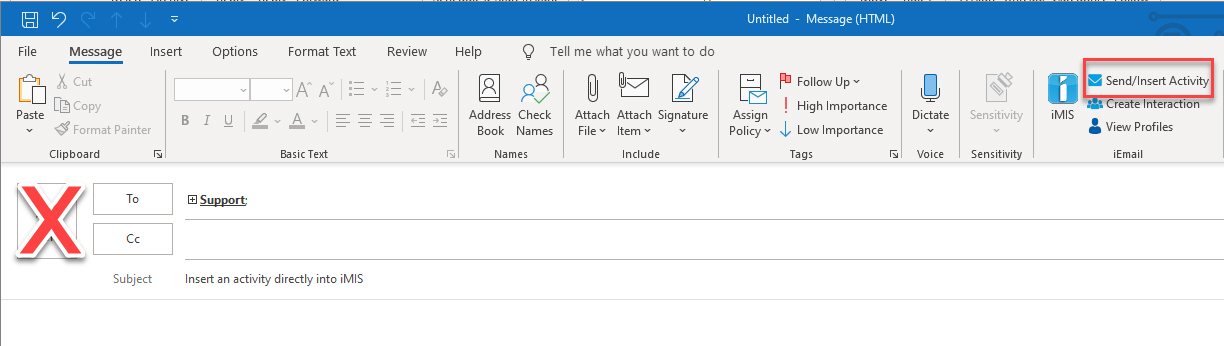
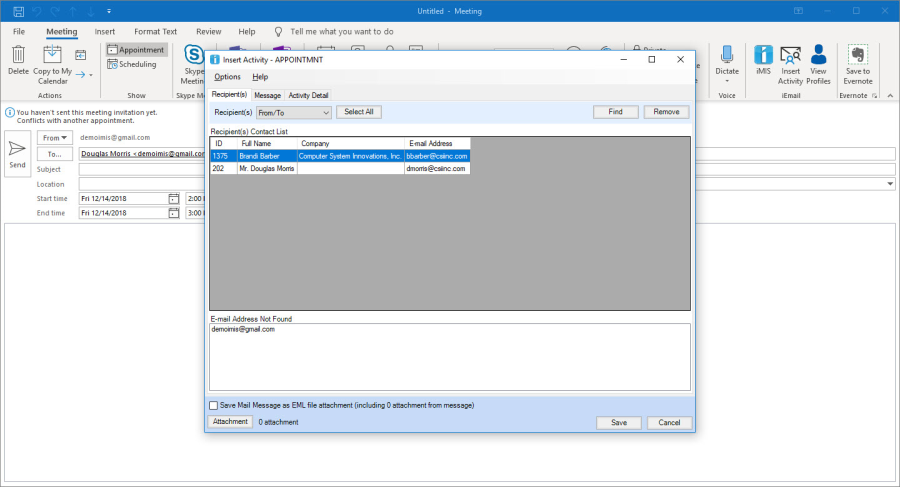
3. iEmail will send the message and display the Insert Activity window.
4. Click on Save to create a new EMAIL activity in iMIS.
Insert Activity - Create an Email Activity in iMIS after email is sent or received
(Option 2)
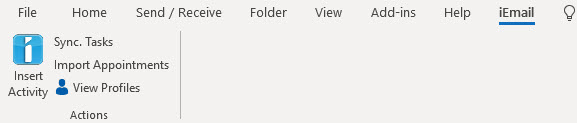
After you have installed iEmail, a new icon will display on your Outlook™ tool bar.
From Outlook™ select the email you wish to insert into an activity by clicking on the email. (You may select any email in Outlook™ whether it is in your inbox, sent box, or any folder)
NOTE: You cannot select multiple emails to be inserted as activities. On the other hand, if an email was sent to multiple people it will create an activity for each person.
Click on the Insert Activity icon.
If you do not have an email activity set up in your iMIS database a message will display notifying you that an email activity does not exist.
You may choose to setup Activity Types available within the Options > Insert Activity Setup menu item (requires iMIS Sys Mgmt. authorization level: "8 – System Setup").
On the Insert Activity Setup screen you are able to pick the "available" activity types to move them to the "selected" column. The "selected" activities will be the only ones allowed to Insert an Activity.
The Setup Activity Types tab allows the user to select the Activity Type and fill in the activity types specific fields with the email fields. Click Save.
Back on the Insert Activity page you may select which To box you would like iEmail to search the iMIS database. (From only, To only, or both).
By default iEmail will save attachment(s) to the selected activity. This option may be turned off by the System, Administrator. iEmail follows the iMIS rules which have been set up for email attachments.
(Optional) Enable the Save Mail Message as EML file attachment checkbox.
(Optional) Click Attachment on the lower left corner to attach files.
The Activity Attachment window displays. Click New to navigate to a file you would like to attach. Once you have an attachment, clicking Open, or delete it using Delete. Once you are done with the Activity Attachments, click Save to go back to the Insert Activity window.
Click Save, located at the bottom of the Insert Activity screen, to add the activity into your iMIS database
A message will display notifying you that the activity will be inserted into IMIS, click Yes.
NOTE: If you select an email that was sent to multiple people iEmail will create activities for everyone, unless you choose to remove them from the Activity Insert.
A message will display notifying you that the activity has been inserted into iMIS, click OK.
Confirm the activity has been inserted into your iMIS database.
Find the record which you inserted the activity for and select the Activities-All tab
*Notice that the email has been inserted as an email activity and the attachment has been saved as well.
NOTE: The recipient will always default to "From only" when using Insert Activity except when the e-mail message is stored on the Sent Items folder. In that case, the recipient will default to "To only".
Insert Activity when Replying to or Forwarding an Email
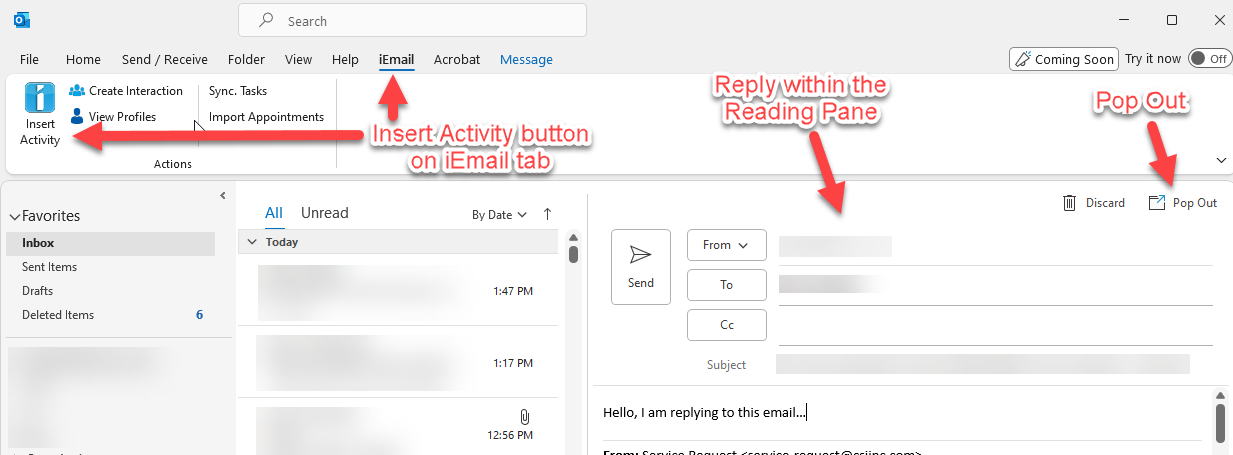
A special situation arises when you wish to insert an Activity from an email you are replying to or forwarding. When you click on the Reply, Reply All, or Forward button in an existing email, the Send, From, To, CC, Subject header information as well as the new email body area appear at the top of the existing email all within the Reading Pane.
If you type your reply message and then click the Insert Activity button on the iEmail tab, it will open the Insert Activity window but, your reply text will not appear.
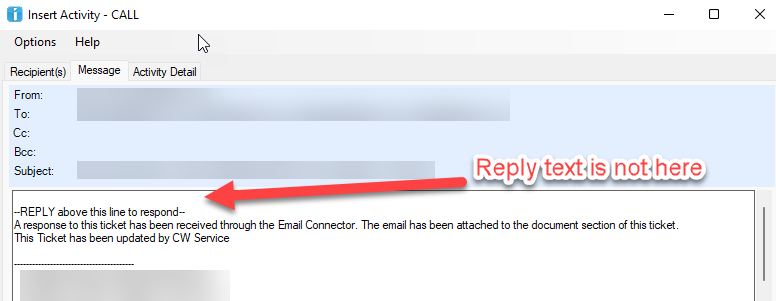
There are two options to solve this problem.
Send the email first, and then go to your Sent Items folder and click on the sent email, then click on the Insert Activity button.
Or, before sending your reply, click on the Pop Out icon in the upper right corner of the email to pop the reply out of the Reading Pane (see 2 images up).
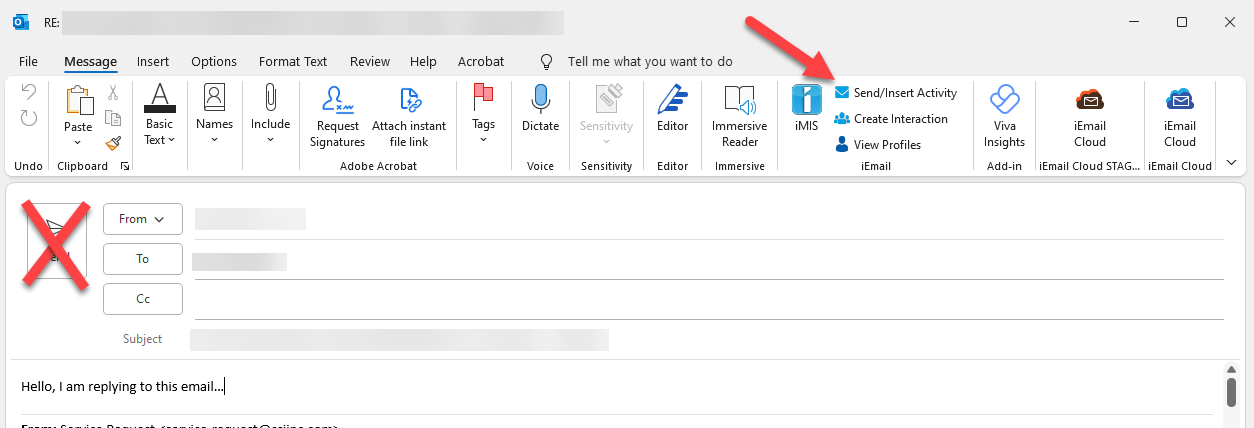
This will look like the New Email window and the Send/Insert Activity button will be available in the Message tool ribbon. After you complete writing your reply, click the Send/Insert Activity button instead of the email Send button and your reply will be sent and the Activity will be saved all in one step.
Insert Activity Setup – Setup Activity Types
The Setup Activity Types allows administrators to configure how information is written for each activity type selected.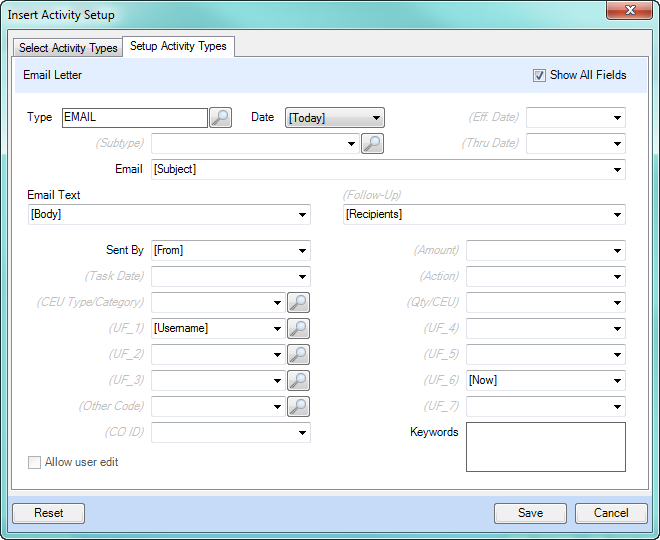
Each field can be mapped with a predetermined value from the associated drop down list:
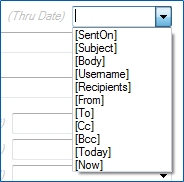
[SentOn] | Corresponds to the date the email message was sent on |
[Subject] | Corresponds to the subject line of the email message |
[Body] | Body section (entire message text) of the email message |
[Username] | Corresponds to the logged in user name (from iMIS) |
[Recipients] | Comma separated list of all recipients email addresses |
[From] | Email address who has sent the email message |
[To] | Email addresses the email message was sent to |
[Cc] | Email addresses the email message was copied to |
[Bcc] | Email addresses blind carbon copied |
[Today] | Current date, for example: 4/12/2013 12:00 AM |
[Now] | Current date and time, for example: 4/12/2013 9:30 AM |
Note: The 'Allow user edit' button at the bottom of the screen is never modifiable through iEmail. This is set in iMIS Set up Module > Activity Types > Allow User Edit (per activity type).
The Transaction Date field can only have two specific determined values:
[SentOn] | Corresponds to the date the email message was sent on |
[Today] | Current date, for example: 4/12/2019 12:00 AM |
It is important that the field mappings on the activity setup match the corresponding activity field type. For example, selecting the [SentTo] field in the Activity User-Defined Field 4 will always result in a "0" (zero) value – since a date cannot be converted to a numerical value.
For this reason, make sure the activity mapping looks correct on the Activity Detail tab:
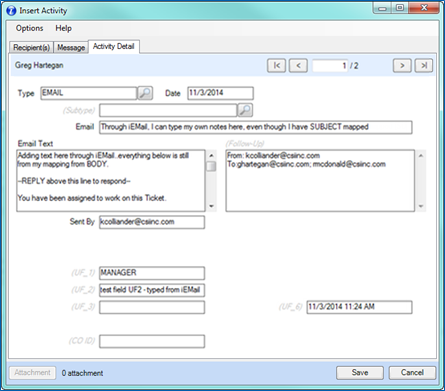
Going to the ‘Activity Detail’ tab, you now have the ability to edit the subject line (Email) and the body(Email Text), to change how it will appear as an activity in iMIS (this in no way affects the original email).
View Profiles in Staff Site
You can view the profile of a member from iEmail by clicking on the View Profiles button on the menu ribbon.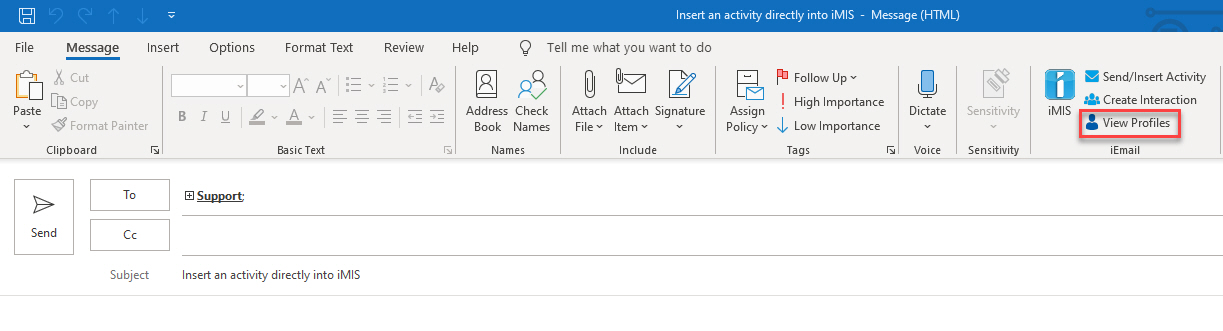
Click on the "View Profile" button for the member's profile you would like to see. As long as the System Setting ->Profile URL is setup correctly, this will take you to the Staff profile of the member. 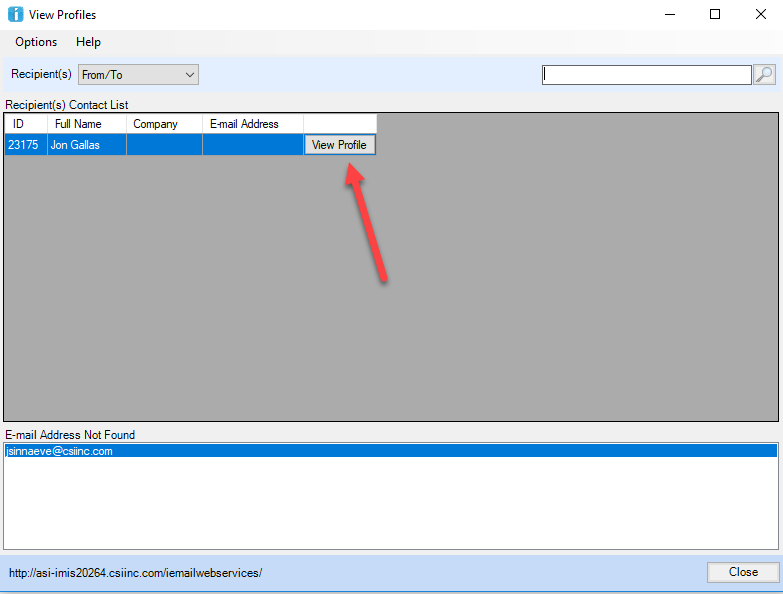
Syncing Tasks & Appointments with iMIS and Outlook
Import Tasks from the iMIS database into Outlook Tasks
Tasks in iMIS are generated when you have a Task or Follow up date in an activity in iMIS. 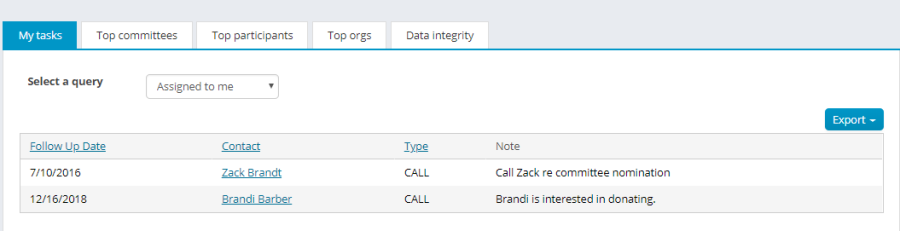
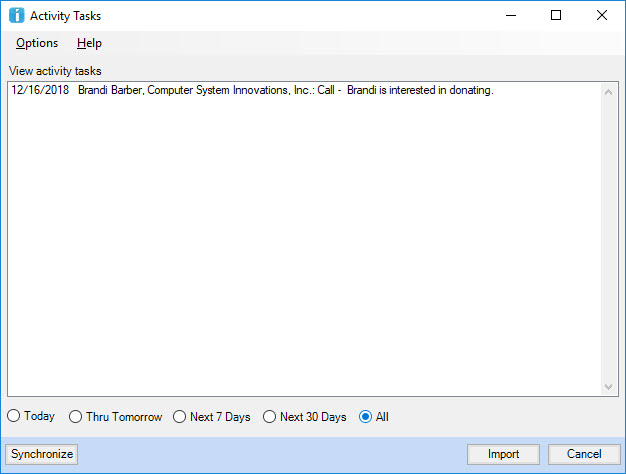
From Outlook click on Sync Tasks. All current tasks which have been set up in iMIS will display.
Select the task you wish to import into Outlook (Only one task may be selected at a time) and click the Import icon.
A message will display that a task has been inserted into Outlook. Click Ok.
Go to Tasks in Outlook to confirm the task has been imported
Open Tasks > Select Tasks
Click on the Synchronize button to update iMIS Activities from Outlook Tasks that are marked as completed.
Scheduling an Appointment in iMIS
From the staff site and find the person with whom you would like to create an appointment
Locate the Appointments panel and click the plus sign to add a new Appointment.
Fill in all pertinent information:
Subject
Location
Notes
Assigned To
Start Time
Duration
Reminder
Click Save.
The appointment is now in your iMIS Activities.
Importing an Appointment Activity into your Outlook Calendar
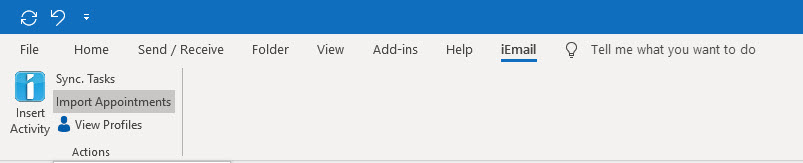
From Outlook click Import Appointments.
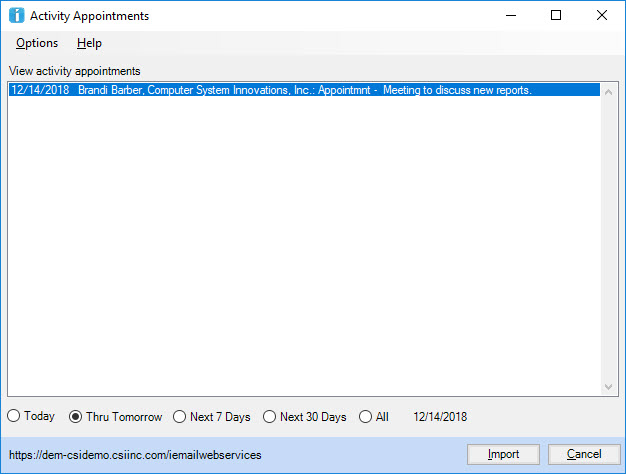
Select an appointment in the activity list (Only activity appointments which are assigned to the person who is logged into iMIS will display).
By double clicking on the Activity you can see the Activity Details.
Click on "Import" to add the appointment in Outlook.
A pop up will appear, notifying you that an appointment had been inserted. Click OK.
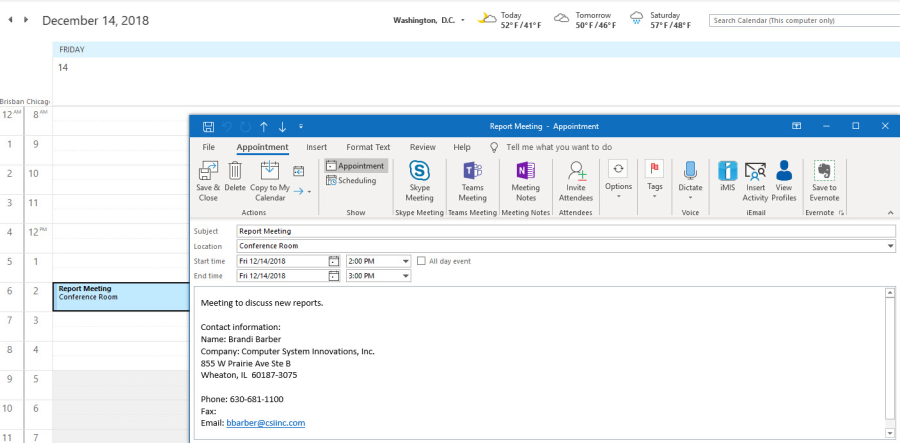
The appointment is now created in your Outlook Calendar.
Inserting an Appointment Activity into iMIS from your Outlook Calendar
For a new Appointment:
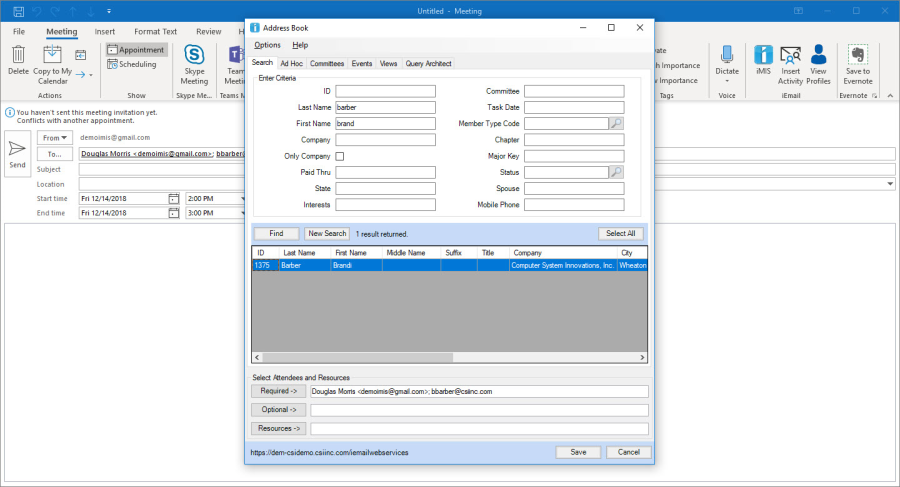
From Outlook click New Meeting.
(Optional) Click the iMIS button to display the iEmail Address Book window.
Add invitees and meeting information (time, date, etc.) to your invitation.
Before sending, click Insert Activity.
Verify your APPOINTMNT activity has been appropriately set up by choosing the Activity Detail tab.
Click Save. This will enter an APPPOINTMNT activity onto the iMIS records of all those invited to the meeting
For an existing Appointment:
From Outlook open existing appointment
Click Insert Activity
Verify your APPOINTMNT activity has been appropriately set up by choosing the Activity Detail tab.
Click Save. This will enter an APPPOINTMNT activity onto the iMIS records of all those who attended the meeting.
Create an Email Interaction in iMIS
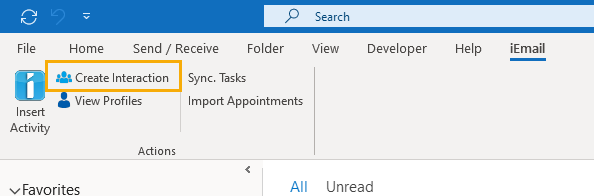
From Outlook click Create Interaction.
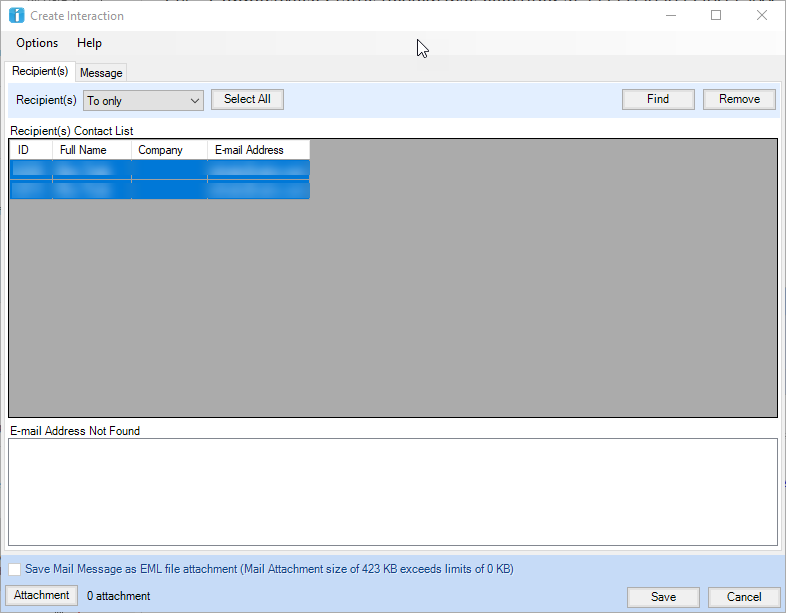
When the Create Interaction window opens, you will see the Recipients tab with a list of recipients matching those in the email. Any recipients that could not be matched will be listed in the E-mail Address Not Found section.
The recipients list filter defaults to To only. You can change the filter by dropping it down and selecting From only or From/To.
If the recipients are not in the list, you can click the Find button and search based on a variety of criteria.
To view the email message that is being added as an interaction, click the Message tab.
To view, add, or delete attachments, click the Attachment button.
If you would like the email message itself to be saved as a file attachment to the interaction, check the Save Mail Message as EML file attachment checkbox.
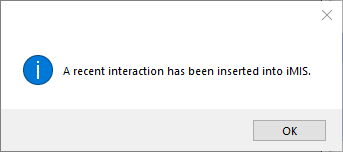
Once you are satisfied with recipients list, click the Save button. The interaction will be saved and a confirmation will appear.
Click OK to close the popup and the Create Interaction window will close as well.
System Setup Menu
To access the menu, the iMIS System Management authorization level must be at least "8 – System Setup."
By default, all iEmail Tabs show in the end user's view. The System Administrator can limit what tabs are able to be viewed, limit the number of recipients allowed in the Send boxes of an email, the format which email addresses are inserted into Outlook™, and whether to allow email attachment to be saved in iMIS activities. The System Administrator can also limit what Committees and Views will display. Any rules set on the System Setup form apply to all iEmail users.
From Outlook™, click on New Email, and then on the iEmail iMIS icon.
Click Options > System Setup (requires iMIS Sys Mgmt. authorization level: "8 – System Setup").
Search Options
Enable/Disable any of the default iEmail tabs.
Access Keywords override these settings on a per-user basis.
Enable Primary Chapter Search forces iEmail to search on Name.Chapter instead of using the Subscriptions table 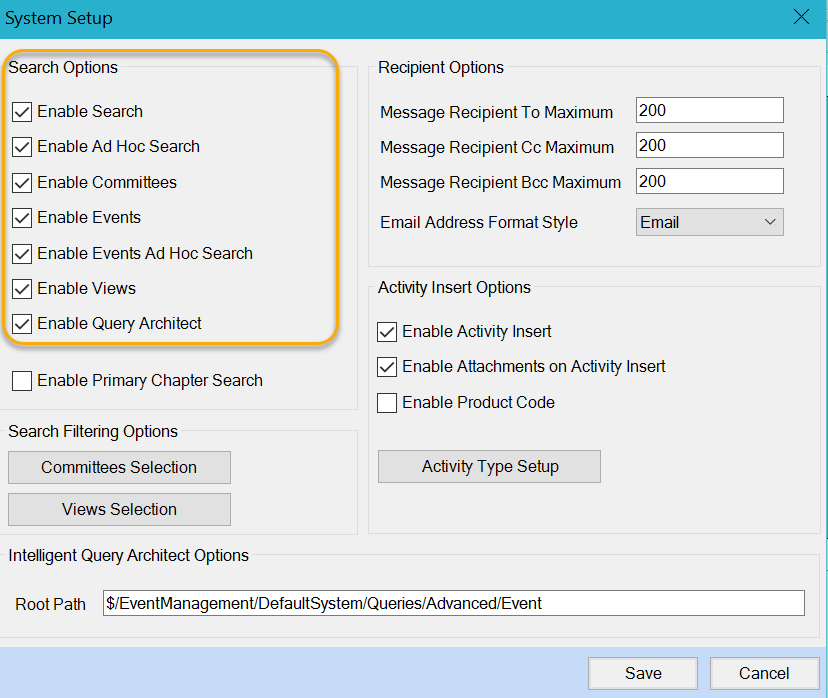
Search Filtering Options (Committees and Views)
.jpg?inst-v=5a3c6042-efc3-4081-a4a1-224421b92b30)
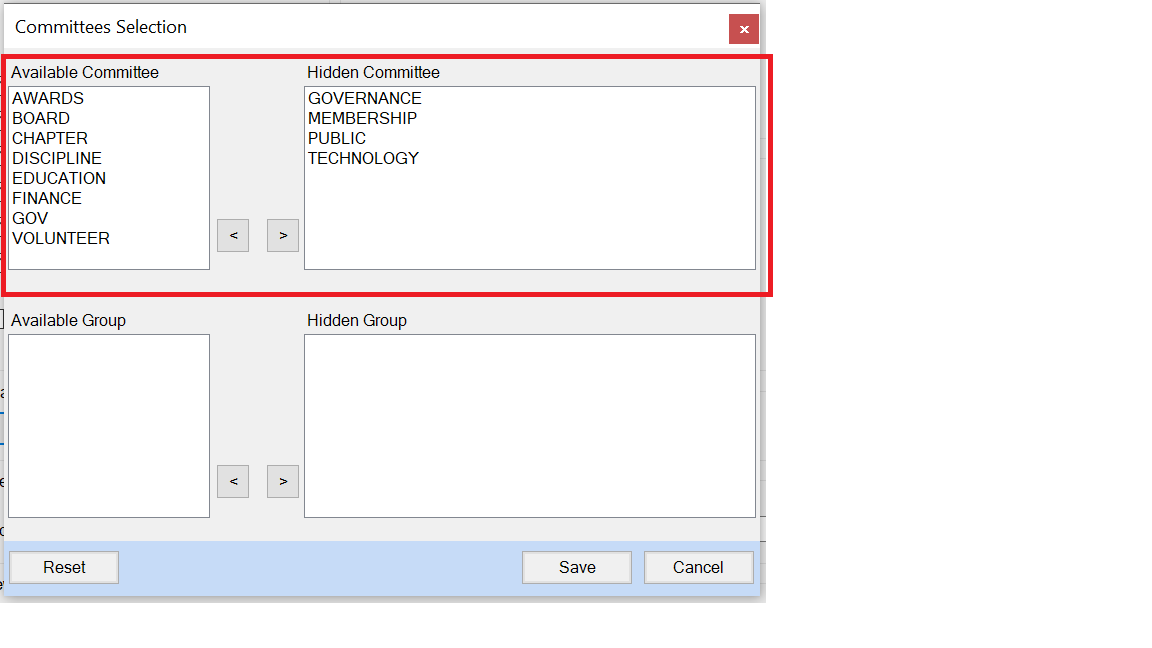
The Committees Selection button allows the user to define the specific committees and/or groups of committees available to iEmail.
The Views button allows the user to define the User Defined or System views available to the end user. This is very powerful if specific criteria must always be followed for searches.
Moving a Committee over to the Hidden area will remove it from the listing of selectable Committees:
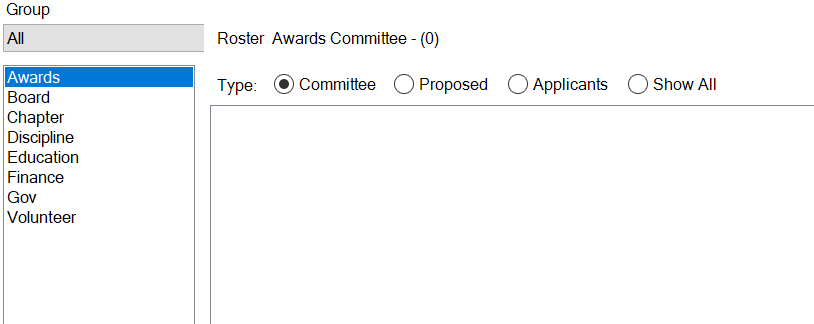
If you group your committees in iMIS (see screen shot below):
.png?inst-v=5a3c6042-efc3-4081-a4a1-224421b92b30)
You can define which "Groups" of committees are visible within iEmail:
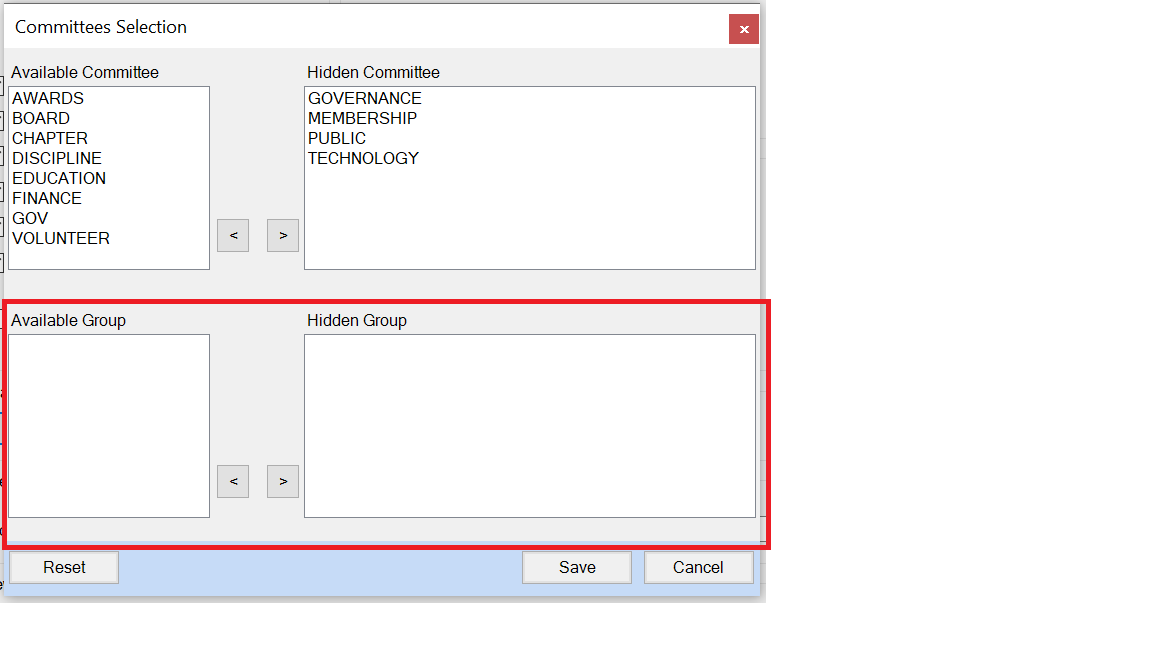
The available groups will be usable while those in the hidden group column will be hidden, the same as with normal committees (as seen above).
This works in an opposite fashion for Views, moving a View over to the available area will allow it to be used as a selectable View:
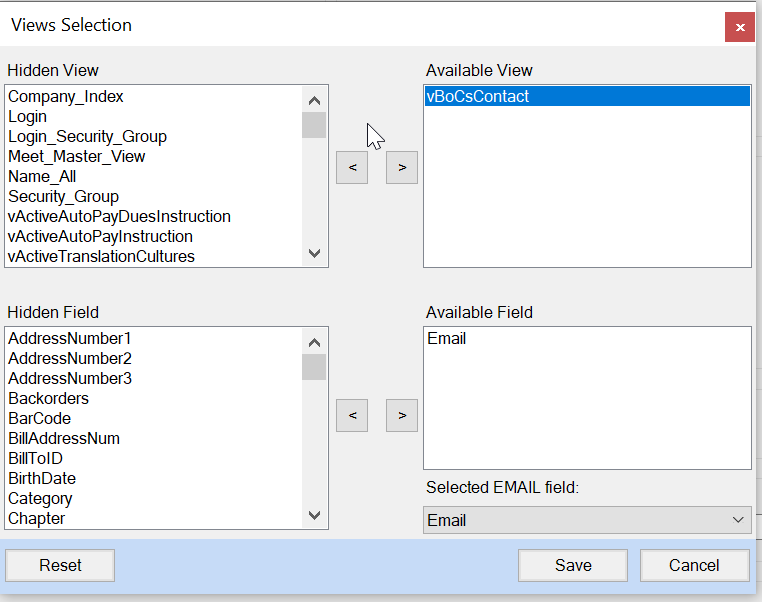
Ensure that you also add an available field and set the EMAIL field prior to saving.
NOTE: Views should be removed from iEmail before they are removed from SQL - otherwise you will have to re-add it in order to delete from iEmail
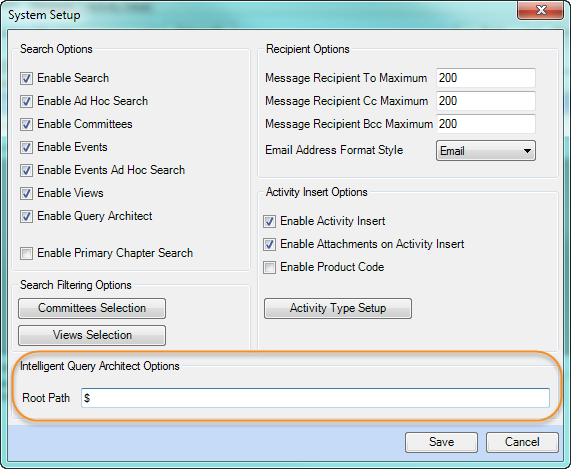
Intelligent Query Architect Options
Set the Root Path to be used with the Query Architect (IQA) tab.
e.g., $/ContactManagement/DefaultSystem/Queries/Advanced/Contact
The Root Path is used to determine where to start when finding queries to use for the Query Architect tab.
$/ results in a full directory listing:
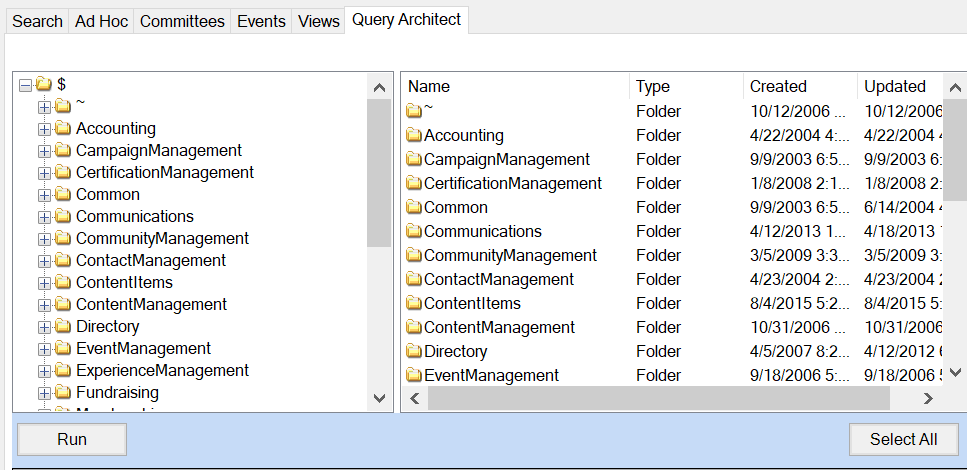
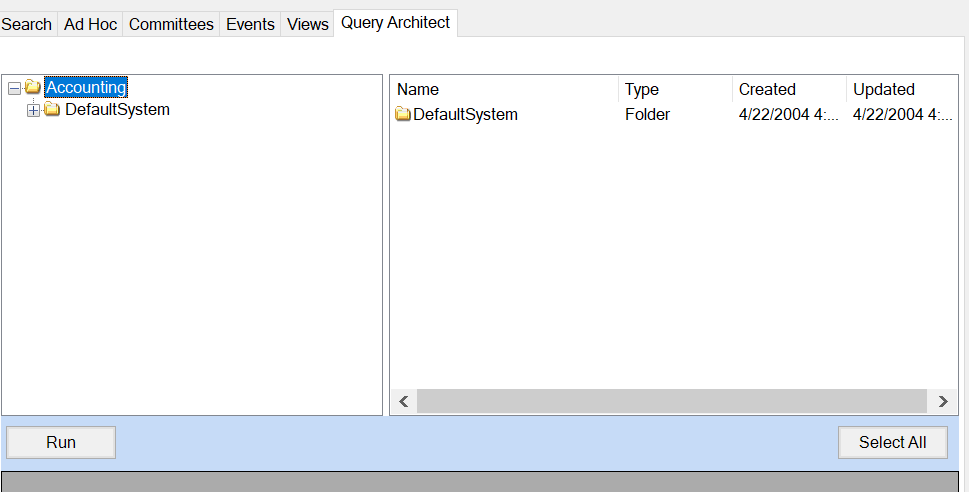
Meanwhile, $/Accounting/ limits the directory to starting within the Accounting folder so all the other $/ folders aren't shown:
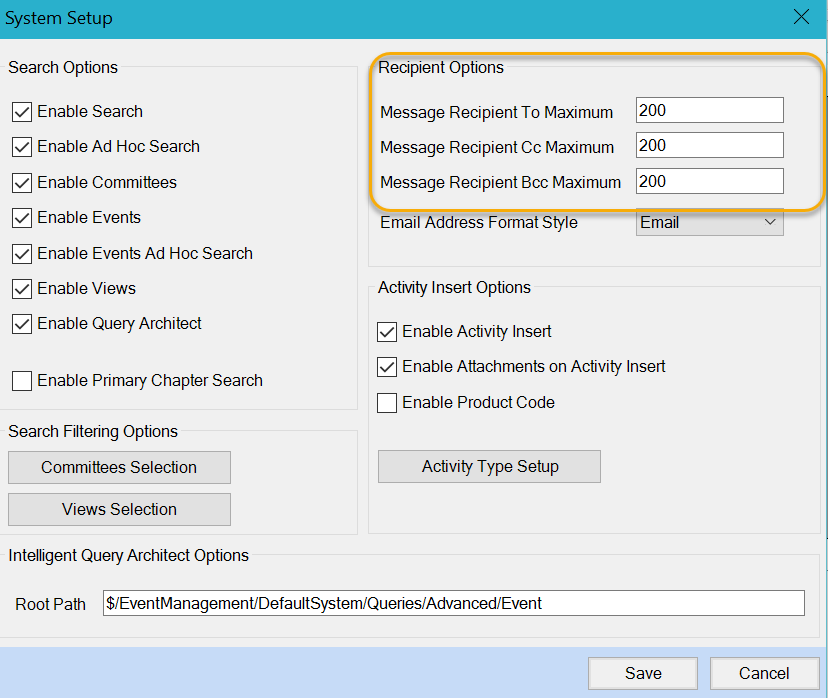
Recipient Options
Enter the maximum number of recipients allowed in the To, Cc, and Bcc fields.
iEmail is not a mass email tool! CSI recommends no more than 200 total email addresses per email.
Activity Insert Options
Enable/Disable the ability to insert activities, attachments, and product codes.
Enable Product Code
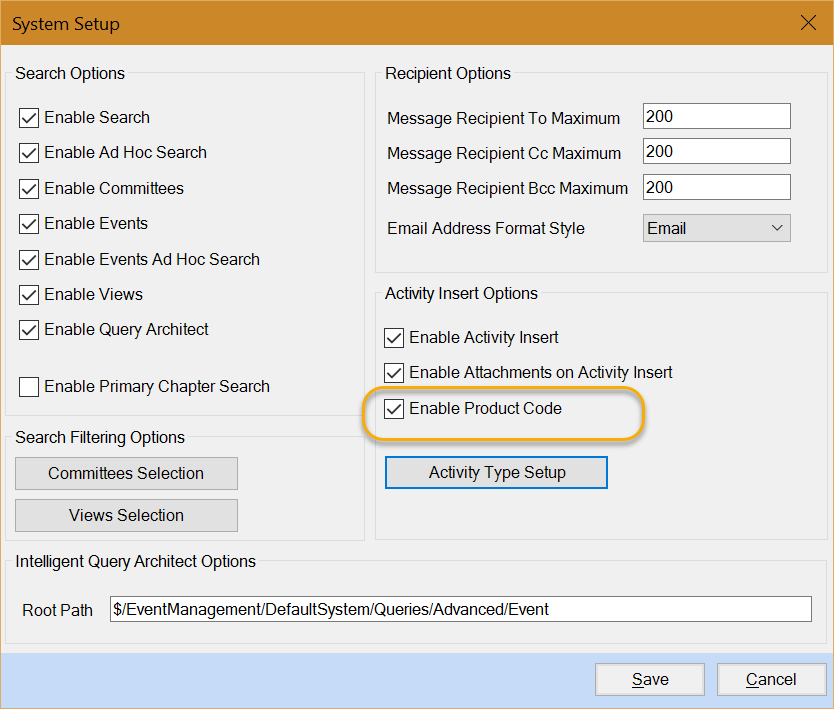
Use the Activity Type Setup button to specify which activity types are enabled in iEmail. It is also used to map iEmail data to fields within the activity type.
If a field is defined in iMIS to use a lookup field, the drop-down menu displayed in iMIS for that field will also display in iEmail
View Profiles Options
The Profile URL setting textbox allows a client to specify their staff site URL to be able to link to their RiSE profile page. For example: https://asi-imis20264.csiinc.com/DEMOIMIS/iCore/Contacts/ContactLayouts/Account_Page_Staff.aspx_ 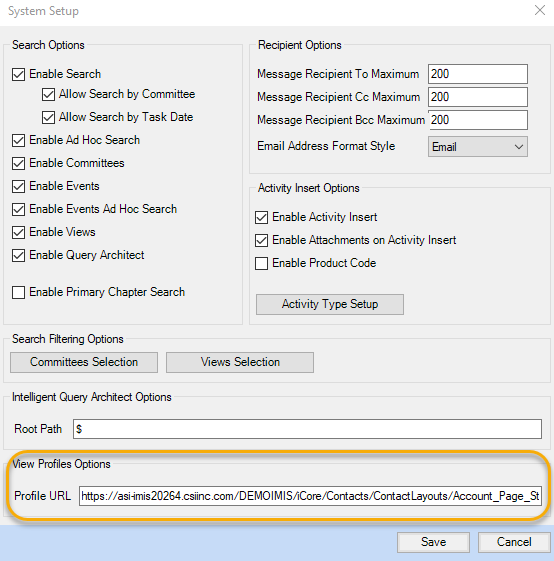
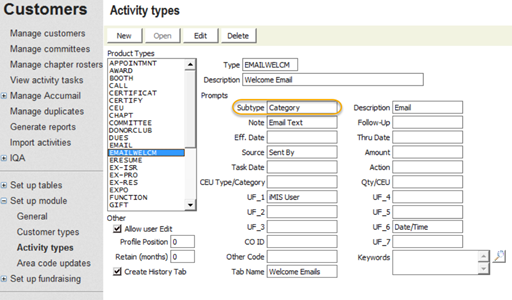
Configuring Product Code lookup
iMIS Desktop > Customers > Set up module > Activity types > (select an activity)
In the example below, the Type field is "EMAILWELCM" and the Subtype field is "Category."
Confirm Allow user Edit is enabled.
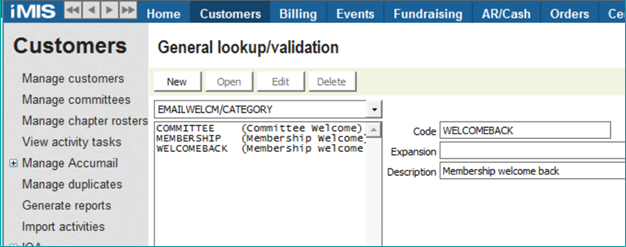
iMIS Desktop > Customers > Set up tables > General lookup/validation
Create a lookup table named using format [Activity Type]/[Subtype label]
For example, the lookup table in this scenario is named “EMAILWELCM/CATEGORY”
Populate the lookup table created in Step 2.
The Category field on "EMAILWELCM" activities now displays the defined lookup values when the magnifying glass icon on the Category field is clicked.
iEmail > Options > Web System Setup . . . > click Recycle Application.
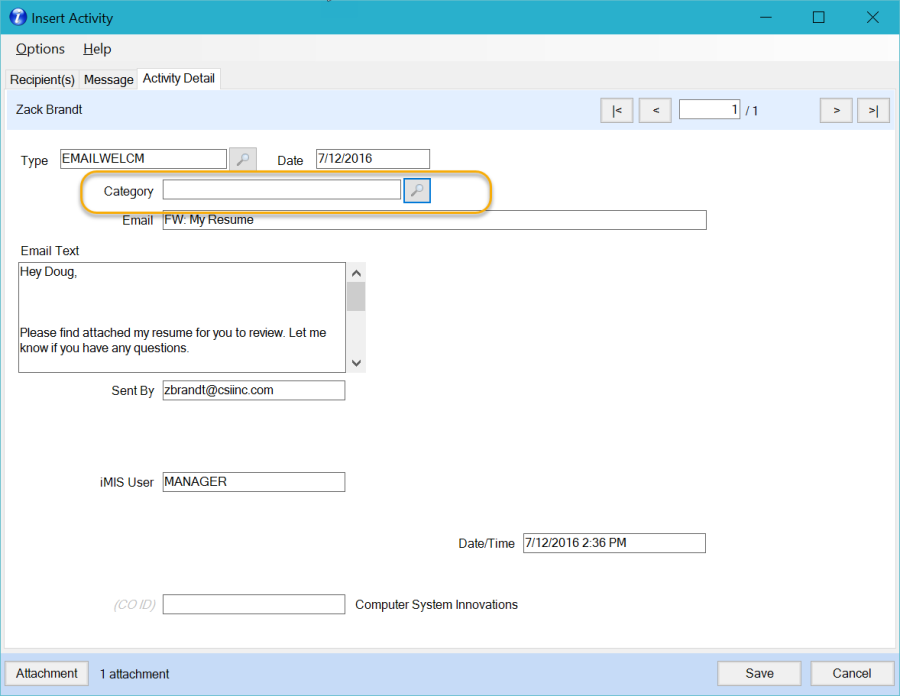
In Outlook, select an existing email and click Insert Activity. Click the Activity Detail tab and confirm Type is set to the proper value (in this example, it should be "EMAILWELCM")
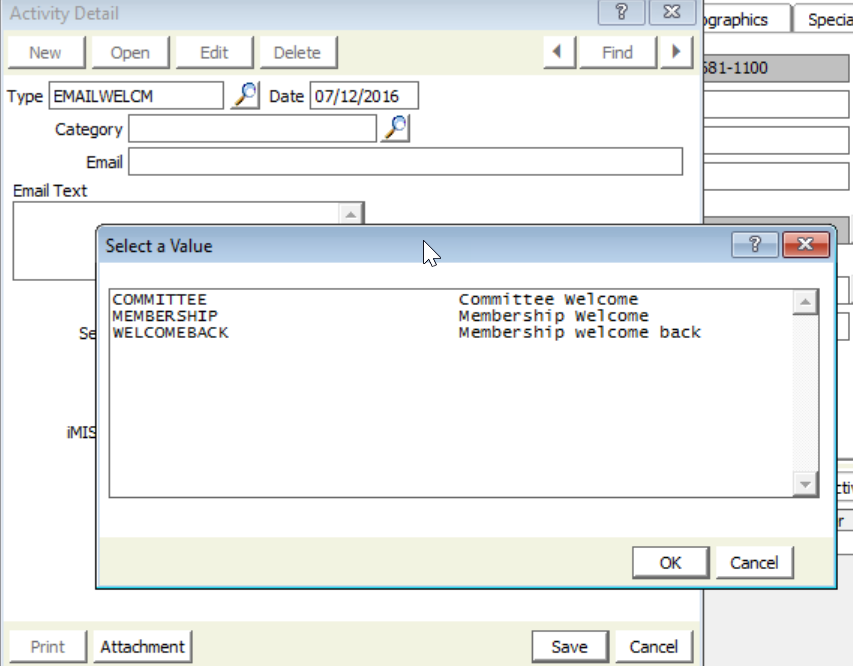
Click the magnifying glass icon on the Category field to display the lookup values
Web System Setup Menu
This window displays diagnostic information (Computer Name, Asp.NET Account, Asp.NET Version, Application Pool Name, Application Trust Level, IP Address).
Recycle Application button
After updating configuration settings in iMIS (e.g., add/remove/rename committee, add/remove Ad Hoc query, etc.) press this button to refresh iEmail with the current iMIS values.
Connect to Web Service (Changing iEmail Login Credentials and Web Service URL)
Once logged into iEmail, you will not be prompted to enter your credentials if you have clicked the "Remember me on this computer" checkbox. In order to change your credentials you will have to click on the Options file menu and then connect to Web Service. This will allow you to change both the logon credentials and iEmail Web Service URL.
Custom iMIS Access Keywords
Because the System Setup preferences are applicable for all users, iEmail allows administrators to grant access for specific users to certain tabs by using user-defined Access Keywords in iMIS. Those Access Keywords will override the default setting in the System Setup.
For example, when a user is granted the Access Keyword IEM_VIEWS in iMIS, that user will be able to display the Views Tab in iEmail, even though the System Setup is configured to not display the Views Tab,
The following iMIS Access Keywords are supported by iEmail:
IEM_ADMIN to display all Tabs
IEM_SEARCH, IEM_ADHOC, IEM_COMMI, IEM_EVENT, IEM_VIEWS, and IEM_IQA to display respectively the Search Tab, Ad Hoc Tab, the Committee Tab, the Events Tab, the Views Tab, and the Query Architect Tab
IEM_INSACT to allow usage of Insert Activity function
Setup for iMIS Intelligent Query Architect
iMIS Intelligent Query Architect (IQA) is supported by iEmail since version 1.1.47.
Within the iEmail System Setup, an administrator can select the default path for each user:
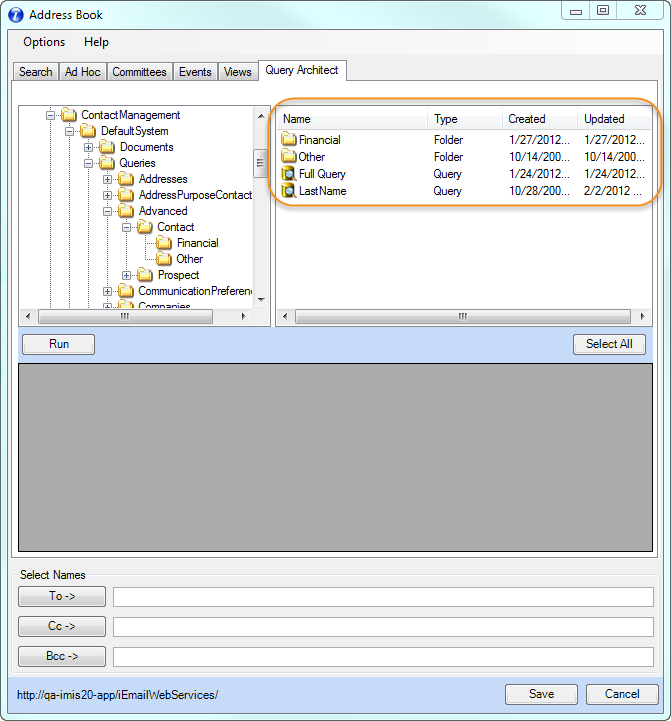
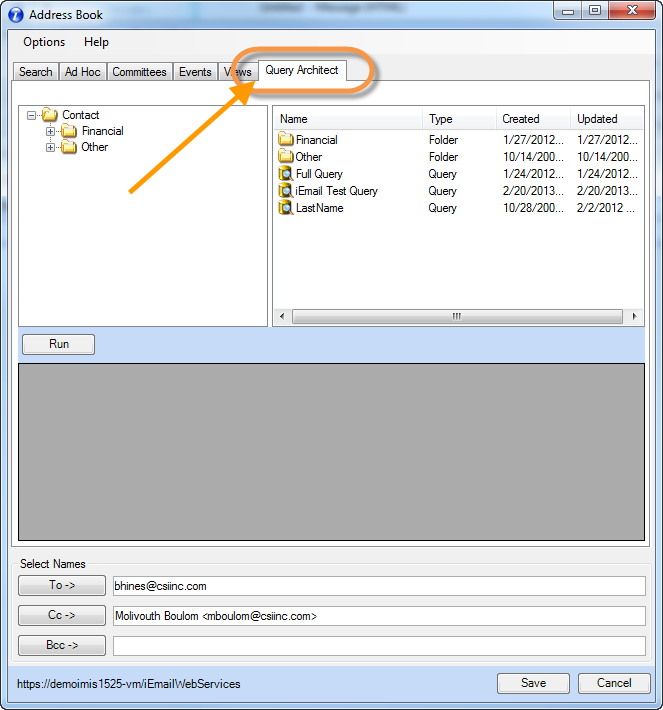
Select the Query Architect tab to browse the IQA folders and query documents:
Double-click on a query document from the right pane to bring the Query Results window:
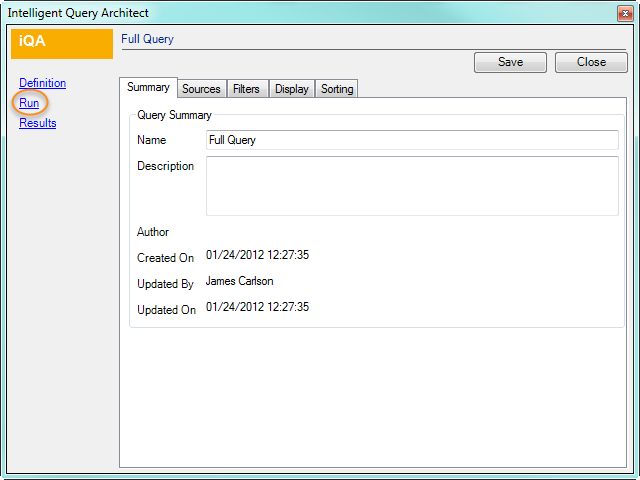
From the Intelligent Query Architect window, you can select the Run link to view the query results – The Results tab will be selected with the corresponding records. Click Go – Send to iEmail to automatically close the Query Results and go back to the iEmail Address Book with the results from the IQA query:
Depending on the query type, the user might be asked to filter the data with a parameter list. Select Filter to see the results.
Hit the Save button to select these rows into the IQA iEmail results window.
iEmail will use the first Email field found on the query for the message recipients.
iEmail Known Issues
By default, once you have inserted an address into an email, the email is saved to the draft folder. If you change your mind and cancel out of the email, it will still be saved in the draft folder, even if it is blank. An idea to keep your drafts folder clean is to set up a rule that deletes any drafts that have a blank body or a blank subject.
Create an Appointment or Meeting and insert at least one participant. If you cancel out of the meeting, a blank meeting will still be displayed on your Calendar.
When using Send/Insert Activity, depending on the version of iEmail, you may notice a copy of the email added to the DELETED ITEMS folder in Outlook. iEmail behaves normally otherwise (Activity is created, email is sent, copy goes to SENT folder).
Troubleshooting
If you have any issues with iEmail, please contact CSI Support at support@csiinc.com. Tickets are normally responded to within 1 to 2 business days after they are submitted.
Insert Activity issues
Issue
When I use the Insert Activity button, I don't see my email attachment(s) on the Insert activities window; or I get the message "A file exceeds the allowed limit of … KB" when I try to add an attachment.
Resolution
Contact your System Administrator to verify that the Activity Attachment Allow is enabled and verify the Max file size.
Open the iMIS Desktop and click on File on the menu toolbar
Click on System Setup (you must have a security setting of at least 8 to edit the System Setup)
Check the Activity Attachments preferences and make changes if necessary.
Issue
When I use the Insert Activity button, I receive this error 'There was an exception running the extensions specified in the config file. ---> Maximum request length exceeded.'
Resolution
There is a default setting in the iMIS Web.Config file, that is set too low for larger attachments. Add the below line to the iEmail Web.Config file –
<httpRuntime maxRequestLength="20240" />
This line should be inserted immediately after this section –
<system.web>
<!-- CSI customization (start) -->
iEmail Ribbon Bar Appears Several Times
Issue
The CSI Toolbar (iMIS icon, Insert Activity icon, etc.) appears several times and not all of them are functioning properly. How do I get rid of the extra CSI Toolbar(s) so that I only have one displayed and it is working correctly?
Resolution
If Microsoft Word is your default mail editor, you need to check its options.
Open Microsoft Word
Click on Tools on the Toolbar menu and select Templates and Add-Ins.
Click the Organizer button at the bottom of the screen.
Click on the Toolbars Tab
Check to make sure that no CSI Toolbar is listed. If any exist, select each one, click on the delete button, then close and restart OutlookTM.
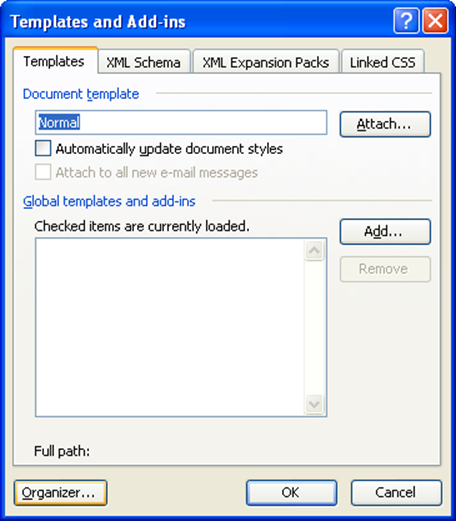
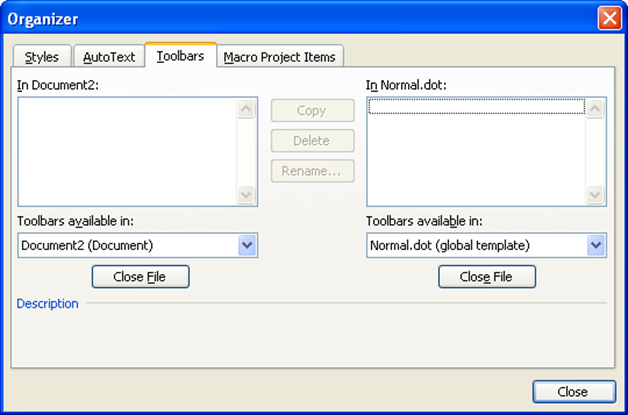
Click Close after removing any CSI Toolbar.
There was no endpoint listening at . . .
Issue
If you experience this error when logging into iEmail client: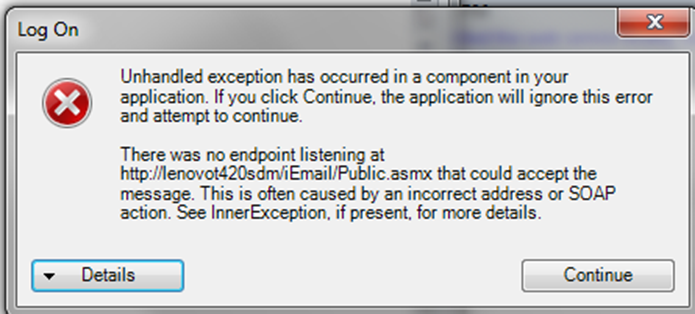
Resolution
Most likely, you have entered the wrong iEmail Web Service URL, or the Application Pool is set to Classic and/or .NET Framework is not correct.
Navigate to the Options menu and click on Connect to Web Service. Ensure that your Web Service URL is directed to the iEmail Web Service that you set up initially.
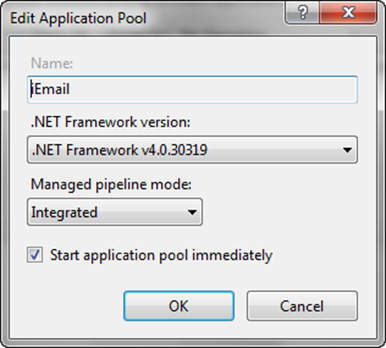
In IIS 7, you are able to set the .NET Framework version on your Application Pools.
Open IIS 7.
Click on Application Pools.
Right click on the name of the iEmail Web Service.
Select Basic Settings from the menu.
The selections should look as follows:
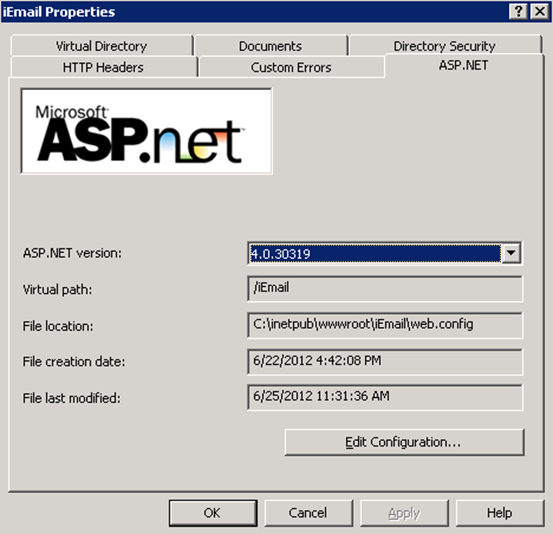
In IIS 6, the .NET Framework settings are website specific.
Open IIS 6.
Expand the folders under your server.
Navigate to the website that is your iEmail Web Service.
Right click on the site and select the Properties menu item.
Click on the ASP.NET tab and select the .NET 4.0 Framework. Click OK to accept.
How to manually register iEmail as an Outlook COM Add-In
Issue
After installing iEmail, the CSI Toolbar does not appear on the main Outlook windows.
When creating a new mail message, the iMIS button is not displayed.
Symptom
CSI Toolbar is not listed as a custom toolbar (from Tools > Customize… > Toolbars).
iEmail seems to be installed correctly: it is listed in the Add or Remove Programs and the installation folder has been created (C:\Program Files\Computer System Innovations\iEmail).
Resolution
The below steps assume that you have enough permissions on the workstation to perform all the mentioned operations.
If reinstalling the iEmail client (or using the Repair option) does not fix the issue, you may want to manually register iEmail as an Outlook COM Add-In. By default, using the setup program for iEmail will install the program for all users. But on some occasions, this seems to not work properly. Perform the following steps to resolve the issue:
Close and exit Outlook. Confirm with Windows Task Manager that the process outlook.exe is not running.
Open the Registry Editor:
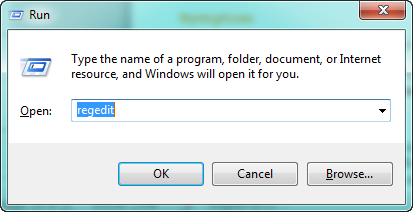
Locate and delete the keys:
HKEY_CURRENT_USER\Software\Microsoft\Office\Outlook\Addins\CSI.iEmail
HKEY_LOCAL_MACHINE\SOFTWARE\Microsoft\Office\Outlook\Addins\CSI.iEmail
To delete a key: Right-Click on the folder and select Delete.
Open Outlook
Open the COM Add-Ins window. Go to Tools > Options… > Other (tab) > Advanced Options… > COM Add-Ins…
In Outlook 2007, go to Tools > Trust Center… > Add-Ins > Manage: COM Add-ins > Go…
In Outlook 2010 and up, go to File > Options > Add-Ins.
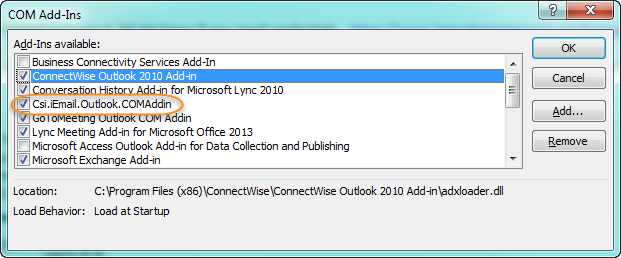
Verify the Csi.iEmail.Outlook.COMAddin checkbox is enabled
(Optional) If the Add-In is not listed, please create it.
Click Add…
Select the file: C:/Program Files/Computer System Innovations/iEmail/adxloader.dll (if 64-bit: adxloader64.dll) from the installation folders from the original zip file
6. Close all windows and return to Outlook; the CSI Tool bar will be present now
Implementation Troubleshooting
Disclaimer
iEmail V3 uses a Webservice as its data source. This provides significant advantages over V1 allowing you to use iEmail anywhere (No VPNs, no open ports). One significant challenge however is that iEmail V3 now needs to be installed by an IT Professional. The desktop client can still be installed by an end user with elevated rights, however, the server portion (the webservice) requires knowledge of Windows Server, IIS, and DNS entries.
If you are not experienced with this technology, please reach out to your IT provider before continuing.
Please note the manual has all the steps required to install iEmail however this guide is designed to help you troubleshoot implementation issues. The primary issue most people have is the ability to connect to their new iEmail webservice and the main reason for this is they don't know the correct URL. This guide will help you step by step identify what might be wrong with your implementation.
Confirm you have downloaded the latest version of iEmail from the ASI Product Download Site
If you are on iMIS 20, you must be on at least iEmail Version 2.1.0. Versions 2.0.11 and lower (including 2.0.10) will not work with iMIS 20.
Remember upgrading iEmail is a multi-step process:
Install the Webservices Deployment Tool on your Application/Web Server
Launch the Webservices Deployment tool and click the Update button
Install the appropriate Outlook Add in (32bit/64bit) on the client.
Confirm you installed the iEmail webservice on your iMIS application or web server
THIS STEP MUST BE DONE BEFORE IEMAIL CAN BE RUN ON YOUR DESKTOP!
Please see section "Step #3: Installing the iEmail V3 Web Services Deployment Program" for step by step instructions.
Confirm you have run the iEmail Web Services Deployment Tool
This tool is installed when you run the iEmail Webservices Deployment.msi which can be found in the Web Services folder of the iEmail zip file you downloaded from ASI.
This tool must be both installed and then run. See the iEmail V3 Installation Guide for step by step instructions. (See Step #2 – item #5 for how to run the tool in the iEmail V3 Installation Guide).
Run the iEmail Web Services Deployment tool and confirm you have correctly installed the Web Service
CORRECTLY INSTALLED & CONFIGURED | NOT CORRECT! |
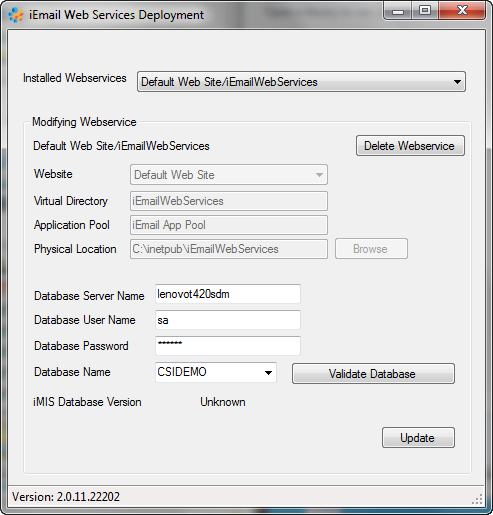 | 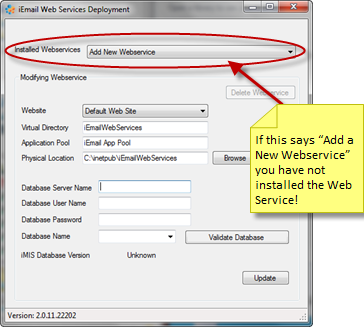 |
You should see a screen that looks like the one ABOVE – | If you have not configured a webservice, your screen will look like the one ABOVE. |
Confirm that your iEmail Webservice is alive and well from the server first!
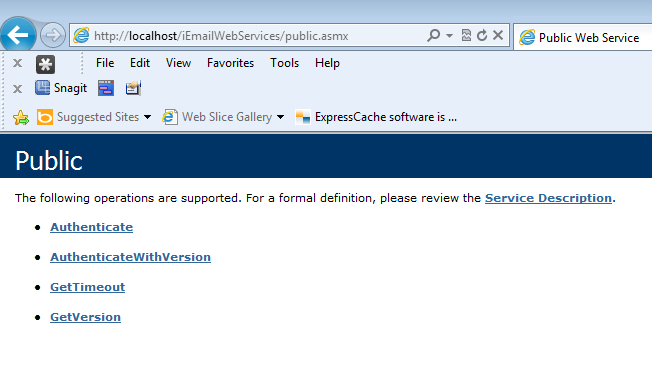
On the server, using a browser such as Internet Explorer, browse here: http://localhost/iEmailWebServices/public.asmx If that doesn't work, replace the http:// with https://
NOTE: You will replace the words, "iEmailWebServices" with what you had defined in the VirtualDirectory field in the iEmaiWebServices Deployment tool.
You should see a screen like this:
2. Now identify your server name
For a Local (non-hosted) server
Right mouse click on My Computer and go to Properties. Your server name is displayed there.
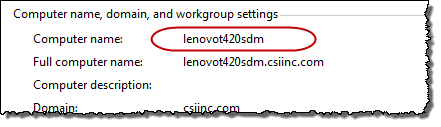
Confirm you can get to the Webservice on the server with this in place of localhost in the URL (from your browser on the server, just like in the step above):
e.g. http://lenovot420sdm/iEmailWebservices/Public.asmx
For a Hosted Server
You need to get this information from your hosting provider. They will/should provide you with a public IP that can be added to the DNS. So they may say "Your public IP is 99.20.10.5" and you can certainly use this. However you can also make a DNS entry for this such as "iemail.yourorgname.org". You can also try browsing to http://www.whatsmyip.org although that is not a guarantee of the correct IP (but is a nice start!). You "can" try to browse to the webservices from the server using this information. However sometimes a hosted server will not browse correctly to its own public IP.
But it does not hurt to try.
e.g. http://99.20.10.5/iEmailWebServices/Public.asmx
http://iemail.yourorgname.org/iEmailWebServices/Public.asmx
REMEMBER, if you have setup your iEmail WebService for SSL, these instructions will be different. In fact, you will test the above URLs with https instead of http.
Troubleshooting
If you are not able to browse to the Web Service, confirm it is setup correctly. From the server, open IIS and then under Web Sites > Default Web Site find your Webservice.
On the right hand side, click on the Public.asmx and then right mouse click and choose Browse.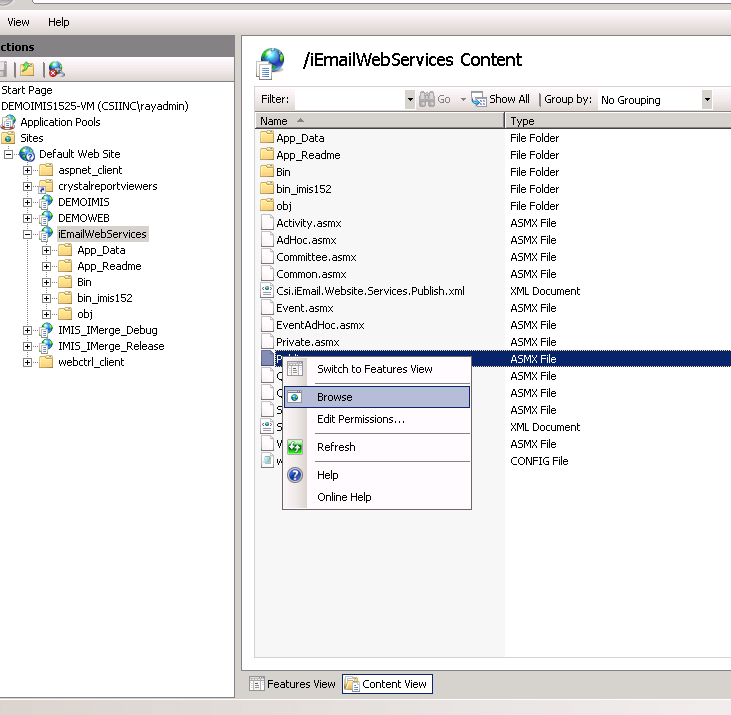
You should now see the screen shown below:
If you are not able to see the Public Webservices Screen, do not continue. The Webservices are not setup correctly!
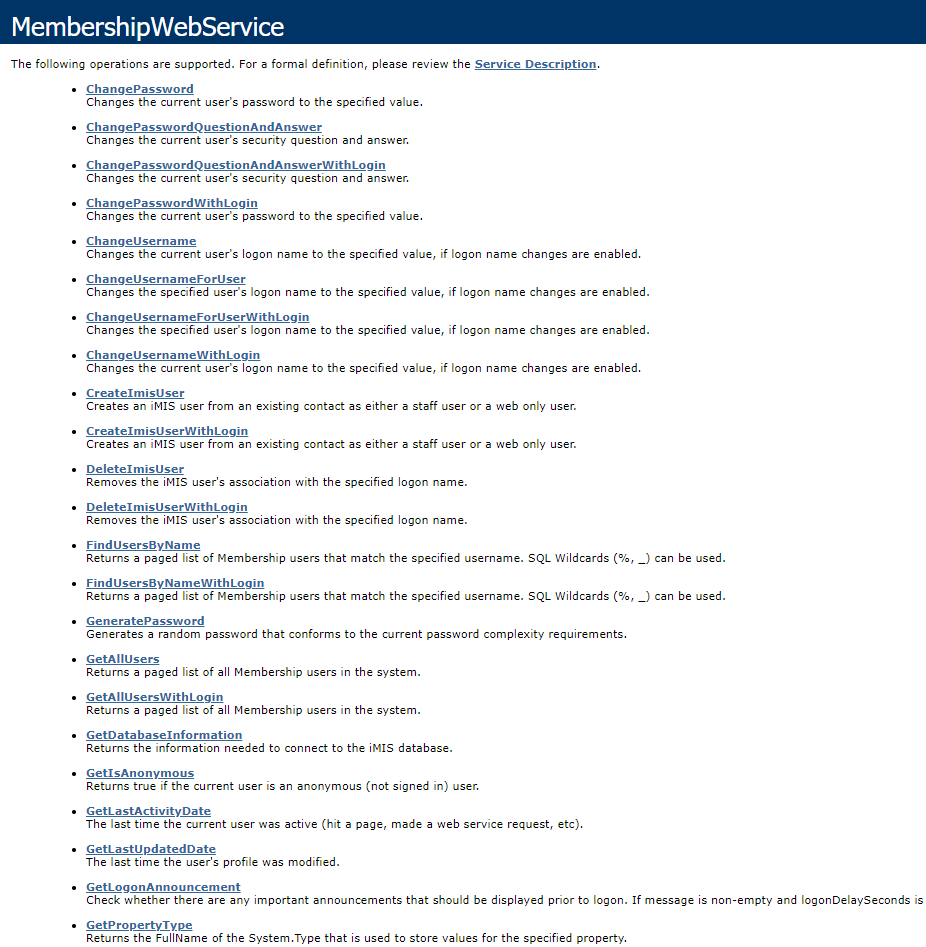
Confirm the iMIS Membership Webservices Load Correctly
To make sure iEmail will work without any issues, please make sure your iMIS membership webservice is functioning correctly. If it is not functioning correctly, you will receive an error similar to:
Unhandled exception has occurred in a component in your application. If you click Continue, the application will ignore this error and attempt to continue.

Server was unable to process request → The content type text/html; charset=utf-8 of the response message does not match the content type of the binding (text/html; charset=utf-8). If using a custom encoder, be sure that the IsContentTypeSupported method is implemented properly. The first 1024 bytes of the response were:

"<!DOCTYPE html>

<html>

<head>

<title> Object reference not set to an instance of an object </title>

<meta name = "viewport" content ="width=device-width"/>
You can verify the iMIS membership webservice is working correctly by navigating to https://imis.yourorg.org/iMIS/AsiCommon/Services/Membership/MembershipWebservice.asmx (don't forget to swap out imis.yourorg.org/iMIS with your company's staff site URL). It should load a page that looks like this:
To fix this issue:
Go onto your iMIS application server and open the iMIS web.config file (file will be located in C:\Program Files (x86)\ASI\iMIS0\Net by default; your path will most likely be different)
Search for the line that says <pages autoEventWireup="false" enableEventValidation="false" validateRequest="true" clientIDMode="AutoID">
Change the line to read <pages autoEventWireup="true" enableEventValidation="false" validateRequest="true" clientIDMode="AutoID"> (simply change autoEventWireup="false" to autoEventWireup="true")
Save the web.config file
Test your iMIS membership webservice URL again to make sure it looks like the screenshot above
Confirm you can access the iEmail Webservices from your workstation
Your URL is composed of
Your Server Name/IP
Your Virtual Directory
From a workstation (Where Outlook is installed), browse to the following URL:
http://ServerName/VirtualDirectory/Public.asmx
e.g. http://LENOVOT420SDM/iEmailWebServices/Public.asmx
After typing in the above URL (customized for your setup), you should get the Public Webservices page.
If you do not get this page, you can try using 'https' instead in the URL
e.g. https://LENOVOT420SDM/iEmailWebServices/Public.asmx
However, this would indicate that you configured the server for SSL.
IF YOU CAN NOT GET TO THE ABOVE PAGE FROM YOUR WORKSTATION, RECHECK YOUR ENTIRE INSTALLATION. IEMAIL WILL NOT WORK. NOTE: your actual URL will be the URL you tested successfully without /public.asmx.
Connection issues after upgrade to iMIS 2017
If after an upgrade to iMIS 2017, you find that your users suddenly cannot connect to iEmail, With the coming of iMIS 2017, there is some added security on the App Server, that directly impacts iEmail. This includes the use of SSL for URL's , and possible issues with 'rewrite rules' in IIS. There are a couple of places to check.
On the App Server, open the iEmail Web Services Deployment tool. Note the 'iMIS Web Server URL' field, and what exists there. VERY likely, this has to be changed. In the past, one would simply copy the same URL that is used in iMIS desktop. But for iMIS 2017, it is best to start over. You must end up with a URL that correctly gets to an iMIS login screen. Using something like 'http://<app server>/<database name>' should work. If not, try again using 'https'. Once you have a URL that correctly brings you to a log in screen, click UPDATE to redeploy to the Web Service. You should now be able to browse to Public.asmx from the server, by using the server name (i.e. [http://<AppServer>/iEmailWebServices/Public.asmx). If this works, you should be in good shape.
If the above step does not help, open up IIS on the App Server, drill down to Sites>Default Web Site. Check to see if there are specific Rewrite rules that have been set for IMIS – they may be being inherited by iEmailWebServices, causing issues. You will have to prevent this inheritance
If the URL in the iEmail Web Services Deployment Tool is not changed from http to https, you will receive the following error. Please update your URLs in the iEmail Web Service Deployment tool to use https instead of http if you encounter this error:
- CODE
Unhandled exception has occurred in a component in your application. If you click Continue, the application will ignore this error and attempt to continue.

Server was unable to process request → The content type text/html; charset=utf-8 of the response message does not match the content type of the binding (text/html; charset=utf-8). If using a custom encoder, be sure that the IsContentTypeSupported method is implemented properly. The first 1024 bytes of the response were:

<html>

<head><link rel="alternate" type="text/xml"

href="/iMIS/AsiCommon/Services/membership/MembershipWebservice.asmx?disco"/>

<style type="text/css">
Troubleshooting Desktop Connections
If you are able to browse to the URL of your webservices then there could be several issues.
You might have the wrong server name or IP address. Attempt to ping the server and see if you get a response. From a Command Prompt on the workstation, type PING <servername> where <servername> is the server name from your URL
(e.g. if your URL is http://LENOVOT420SDM/iEmailWebServices/Public.asmx then your server name is LENOVOT420SDM so you would type PING LENOVOT420SDM). You should get a reply like this:
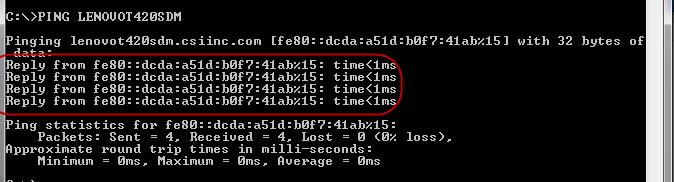
Note the server is replying. If instead you see something like this:

Then your server name is bad. You need to identify the correct public server name.
NOTE: You may NOT get a reply from your server if PING is disabled, but the key is that the server can be FOUND.
Your server might have a firewall rule setup blocking inbound traffic. You can try to TELNET into the Webservice (you may have to download TELNET). You can attempt to TELNET by going to a Command Prompt and then typing TELENT <servername> 80. The screen should go blank after you hit enter.

NOTE: If you are set up for SSL, you would TELNET to port 443

Confirm you have installed iEmail on your workstation
Remember, there is a 32bit version and a 64bit version and the version depends on the version of OUTLOOK you have installed, NOT the version of Windows. You can determine your version by going to help in Outllook (in Outlook 365, click File → Office Account → About Outlook) and noting in the pop up window if you have the 32bit or the 64bit version:
Remember, you MUST be out of Outlook when you install the iEmail Outlook client.'
If you have the wrong client version installed, you will receive the following error, referencing a 'Could not load 'C:\Program Files\Computer System Innovations\iEmail\redemption.dll'':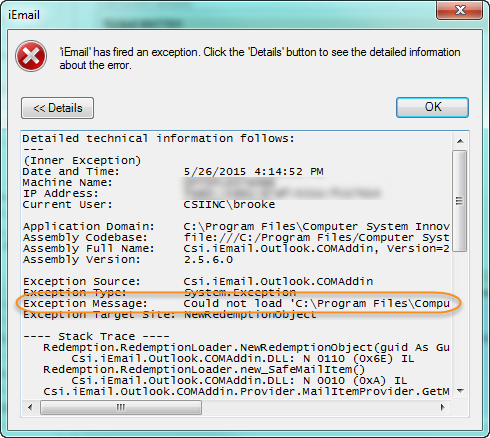
Login to iEmail
From Outlook, start a new email message. You should see the iMIS icon. If you don't then the install on the workstation has failed. Try un-installing the client and re-installing, confirming Outlook is indeed closed (you may need to go into task manager, show all tasks and terminate the Outlook.exe process). Also, confirm you installed the correct client (64bit vs. 32bit).
After clicking on the iMIS icon, you must log in to iEmail for the first time.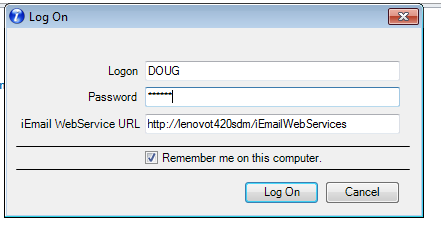
Your logon and password is the same that you use for iMIS.
The iEmail WebService URL is the same one you tested in step #3 earlier without /public.asmx added
So, if your working URL was http://LENOVOT420SDM/iEmailWebServices/Public.asmx you would enter http://LENOVOT420SDM/iEmailWebServices as the URL.
Click Logon and iEmail will launch.
Remember, you MUST remove /Public.asmx from the URL. So if your working URL was
http://lenovot420sdm/iEmailWebServices/public.asmx
your iEmail URL will be
http://lenovot420sdm/iEmailWebServices
Confirm you installed the iEmail (Intelligent Query Architect support) Web Services on your iMIS casual website
THIS STEP MUST BE DONE IN ORDER FOR THE INTELLIGENT QUERY ARCHITECT TAB TO WORK IN IEMAIL!
Please read the iEmail V3 Install Guide for step by step instructions.
Confirm you have run the iEmail (IQA) Web Services Deployment Tool
This tool is installed when you run the "iEmail Webservices Deployment IQA Setup.exe" which can be found in the "Web Services IQA" folder of the iEmail zip file you downloaded from ASI. This tool must be both installed and then run. See the iEmail V3 Installation Guide for step by step instructions. (See Step #3 for how to run the tool in the iEmail V3 Installation Guide).
Run the iEmail (IQA) Web Services Deployment tool and confirm you have correctly installed the Web Service
CORRECTLY INSTALLED & CONFIGURED | NOT CORRECT! |
 |  |
You should see a screen that looks like the one ABOVE | If you have not configured a webservice, your screen will look |
Confirm that your iEmail (IQA) Web Services is alive and well from the server first!
On the server, using a browser such as Internet Explorer, browse here: http://localhost/DEMOIMIS/iEmail/QueryDetails.asmx
NOTE: You will replace the words, "DEMOIMIS" with what you had defined in the VirtualDirectory field in the iEmaiWebServices Deployment for Intelligent Query Architect tool.
You should see a screen like this:
Now identify your server name
For a Local (non-hosted) server
Right mouse click on My Computer and go to Properties. Your server name is displayed there. 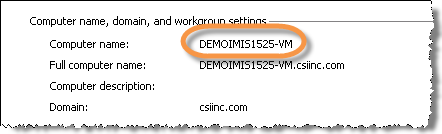
Confirm you can get to the Webservice on the server with this in place of localhost in the URL (from your browser on the server, just like in the step above) e.g. http://demoimis1525-vm/DEMOIMIS/iEmail/QueryDetails.asmx
Confirm you have configured the iEmail Web Services Deployment program with the iMIS Web Server URL
For the Intelligent Query Architect to work in the Address Book tab from iEmail, you need to install and setup the iEmail (IQA) Web Services and also configure the iEmail Web Services Deployment tool.
You need to set the iMIS Web Server URL with the same value in both programs: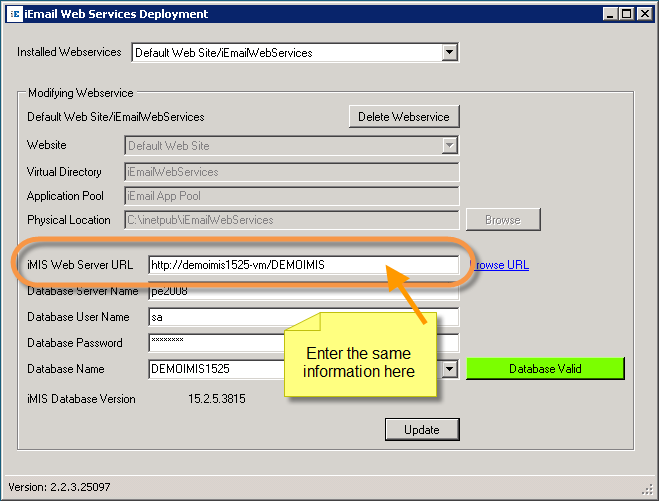
iEmail Release Notes
Version | Date | Notes |
|---|---|---|
3.2.7 | 7/18/2023 | Add-In Express loader files digital signature Outlook Redemption V6.4.0 |
3.2.5 | 1/19/2023 | Release new version of Outlook Redemption V6.3.0.6164 (CW 125249) |
3.2.4 | 6/30/2022 | Fix duplication of email addresses displayed when multiple email addresses are listed in the Email field. |
3.2.3 | 5/12/2022 |
|
3.1.30 | 5/3/2022 | Installer issue on Outlook 2013 64 bit |
3.1.29 | 9/2/2021 | Release new version of Outlook Redemption V6.0.0.6012 (CW 109993) |
3.1.27 | 5/12/2021 | Decrease user license expiration from 20 to 10 minutes (CW 105610) |
3.1.25 | 4/15/2021 | Update third-party libraries Outlook redemption v5.27. (CW 104812) |
3.1.22 | 2/23/2021 | Update third-party library Outlook Redemption to version 5.26. (CW 101842) Fix 500 error when adding or removing users in web services. Update third-party library Add-In Express to version 9.5. Setup/Zip reworked for ease of install |
3.1.16 | 1/14/2021 | Allow DELETE verb and disable WebDAV in web configuration. (CW 101159) |
3.1.15 | 1/11/2021 | Update third-party libraries Outlook Redemption. (CW 101641) |
3.1.11 | 7/24/2020 | Fix authentication issue with set cookie on login. (CW 96598) |
3.1.10 | 7/1/2020 | Fix login issues from deprecated preferences (CW 94561) |
3.1.9 | 6/18/2020 | Fix authentication token expiration validation and renewal. |
3.1.8 | 6/15/2020 | Close profile dialog window on view profile link button click (CW 95465) Update third-party libraries (Outlook Redemption). |
3.1.7 | 6/10/2020 | Remove “From:” in Recipients in Activity Setup |
3.1.6 | 6/5/2020 | Amend remove licensing call frequency (CW 95309) |
3.1.3 | 12/12/2019 |
|
3.1.0 | 8/23/2019 | Add support for multi-factor authentication with security code input (CW 87575) |
3.0.1 | 1/3/2019 | New major release (CW 80289) Interactions (CW 77077) |
2.5.41 | 10/31/2018 | Increase quota in use when reading XML data (CW 78837) |
2.5.40 | 10/10/2018 | Update third-party library to version 5.18 of Outlook Redemption (CW 77951) |
2.5.39 | 6/18/2018 | Add support for location information on insert appointment activity (CW 76191) |
2.5.38 | 5/18/2018 | Add support for meeting start date field mapping to transaction date field on inserting activity setup (CW 75330) |
2.5.37 | 3/29/2018 | Add new View Profile feature (CW 74209) |
2.5.35 | 2/21/2018 |
|
2.5.34 | 2/14/2018 | Fix client/server time zone issues when inserting activity (CW 73445) |
2.5.33 | 1/29/2018 | Fix support for TLS 1.2. (CW 73213) |
2.5.31 | 1/17/2018 |
|
2.5.30 | 10/19/2017 | Filter attachment files to only include by value type. (CW 71272) |
2.5.28 | 8/21/2017 | Update iEmail IQA Web Services installation (CW 67676) |
2.5.27 | 6/21/2017 | Fix issue with inaccurate attachments count down after saving as EML (CW 68746) |
2.5.26 | 6/19/2017 | Remove validating custom query services for iEmail to avoid false positive (CW 67676) |
2.5.24 | 5/4/2017 | Fix empty EML file attachment when sending email and inserting activity (CW 50678) |
2.5.23 | 3/6/2017 | Update third party library Outlook Redemption to version 5.12 (CW 65516) |
2.5.19 | 1/13/2017 | Add meeting fields information for mapping on Insert Activity (CW 58947) |
2.5.18 | 11/28/2016 |
|
2.5.16 | 10/14/2016 | Allowing saving of mail message as attachment (CW 63587) |
2.5.14 | 8/29/2016 |
|
2.5.13 | 6/21/2016 | Correct client-server version validation in web services (CW 61897) |
2.5.12 | 6/7/2016 | Update recipients listing code for appointments (CW 57774). |
2.5.11 | 4/18/2016 | Fix edition of allowed user edit activity for non-mapped fields (CW 60799). |
2.5.10 | 12/23/2015 | Fix setup launcher detection of Outlook 2016 64 bit (CW 54815). |
2.5.9 | 10/8/2015 | Correct email address resolution from contacts list having display as with parentheses (CW 50894). |
2.5.8 | 7/29/2015 | Correct compatibility issues with IQA web services installer (CW 49363). |
2.5.7 | 7/17/2015 | Update authentication matching query methods (CW 48945). |
2.5.6 | 5/13/2015 | Rewrite finding existing activity during insert to improve performance (CW 46768). |
2.5.5 | 3/23/2015 |
|
2.5.4 | 3/18/2015 | Fix possible issues with license key having expiration dates on non-US web servers (CW 46036). |
2.5.3 | 2/4/2015 | Add Select All option buttons in user interfaces (CW 45127). |
2.5.2 | 11/20/2014 | Enable multiple selection on recipients list in Insert Activity window (CW 43811). |
2.5.1 | 11/10/2014 | Fix Begin date sorting in Event tab (CW 43381). |
2.5.0 | 10/10/2014 | Ability to edit fields when inserting activities providing activity type is setup to allow edit (CW 42533). |
2.4.0 | 9/9/2014 | Ability to hide the Search tab and corresponding use of new access keyword IEM_SEARCH (CW 38783). |
2.3.10 | 8/18/2014 | Fix issue with user's mail address appending in "To" recipient when resending a message (CW 41259). |
2.3.9 | 7/11/2014 |
|
2.3.8 | 5/13/2014 | Fix Email Address format display when using Last First and First Name Last Name (CW 39807). |
2.3.7 | 4/8/2014 | Fix License Key error when disabling Remember Me option in Login window (CW 39157). |
2.3.6 | 3/25/2014 | Fix Control + A pressed keys to select all committee entries (CW 38844). |
2.3.5 | 2/18/2014 | Fix error "Value does not fall within the expected range" when using Insert Activity containing blank email addresses to resolve (CW 37551). |
2.3.4 | 12/3/2013 | Increase timeout setting for URLs validation in setup programs from 10 seconds to 60 seconds (CW 31863). |
2.3.3 | 11/13/2013 | Update Redemption to version 5.5 and Add-In Express to version 6.7 |
2.3.2 | 10/4/2013 | Update Web Services for IQA deployment program with examples and default selection |
2.3.1 | 10/1/2013 | Fix issue with IQA library versioning in Web Services deployment program |
2.3.0 | 9/30/2013 |
|
2.2.5 | 9/17/2013 |
|
2.2.3 | 8/8/2013 |
|
2.1.0 | 5/2/2013 | Add support for iMIS 20 (CW 32305) |
2.0.11 | 4/24/2013 |
|
2.0.10 | 12/17/2012 |
|
2.0.9 | 12/6/2012 | Update contact information for license key requests (CW 29663) |
2.0.8 | 11/8/2012 | Update Insert Activity interface for recipient default selection based on mail item location (CW 29285). |
2.0.7 | 10/9/2012 | Fix Insert Activity mapping field (From recipient and Sent On date) on draft mail message (CW 28452). |
2.0.6 | 9/24/2012 | Fix per-machine installation of client add-in (CW 28186). |
2.0.5 | Update default maximum recipient allowed values (CW 28089). | |
2.0.4 | 9/20/2012 | Initial public release |