iDocument is an application designed to assist technical staff with documenting their iMIS and database instances. It allows you to associate notes and other metadata with various entities in iMIS (i.e. Activities and IQAs), or objects in the database (i.e. Tables or Jobs). iDocument can also generate a documentation file containing all of the notes that have been entered, which you can then save as an .html file and include in a website.
iDocument System Requirements
The following system specifications are required to successfully run iDocument:
Windows 7 or higher or Windows Server 2008/2008R2/2012
iMIS 15.2 or higher
SQL Server 2008/2008R2/2012/2014
Microsoft .Net Framework 4.0
Browser Recommendation: Internet Explorer 9 or higher
UDP port 1434 must be open on the SQL server
Useful Terms
Entity Any "top-level" item in the left column (i.e. table, activity, job, or report).
Field Any "second-level" item in the right column (i.e. column or field).
Metadata Any user-editable information entered for an entity or field.
Installing iDocument
Note: It is best practice for all users to be on the same version of iDocument.
You will need your CSI Website User Name and password. If you do not have this information contact support@csiinc.com
Unzip the folder, and navigate to the unzipped folder.
Right mouse click on the Setup.exe and run as Administrator.
You will be prompted, asking if you want to allow the program to make changes to your computer. Click Yes.
The Setup Wizard will open. Click Next.
The license Agreement will display. Select "I accept..." and Click Next.
Verify the default installation folder. Click Install.
A screen will then show, displaying the progress of the install.
A screen will confirm that iDocument has been successfully installed. Click Finish.
iDocument Setup
iDocument Launch and Login
Launch iDocument from Start > All Programs > CSI Programs > iDocument
Log into iDocument using your iMIS user name and password.
Note: If this is your first time using iDocument, you may be prompted for a license key. If so, please enter the one CSI provided. If you need a new license key, please contact support@csiinc.com. If you are simply running iDocument in Trial Mode, select "Start in Trial Mode" and click OK.
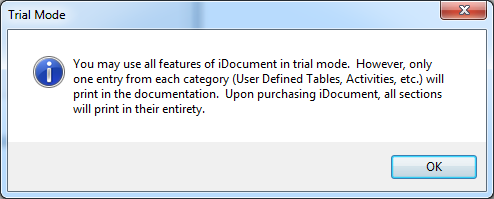
If you select Trial Mode, you will receive the warning below. Click OK to continue:
You may be prompted for your database SA credentials. If you do not wish to enter this information, some of the features of iDocument will be limited.
The first time you connect iDocument to a database, it must run an initialization script. To work, this script requires table creation rights on the "dbo" object for the iMIS SQL user. Click OK.
You are now ready to use iDocument.
About the License Key
The first time logging in to iDocument will no longer prompt you for a License Key as the product is designed to auto-license. If you get prompted for a License Key at any point during the installation process, please reach out to our Application Support at support@csiinc.com so we can help troubleshoot!
Using iDocument
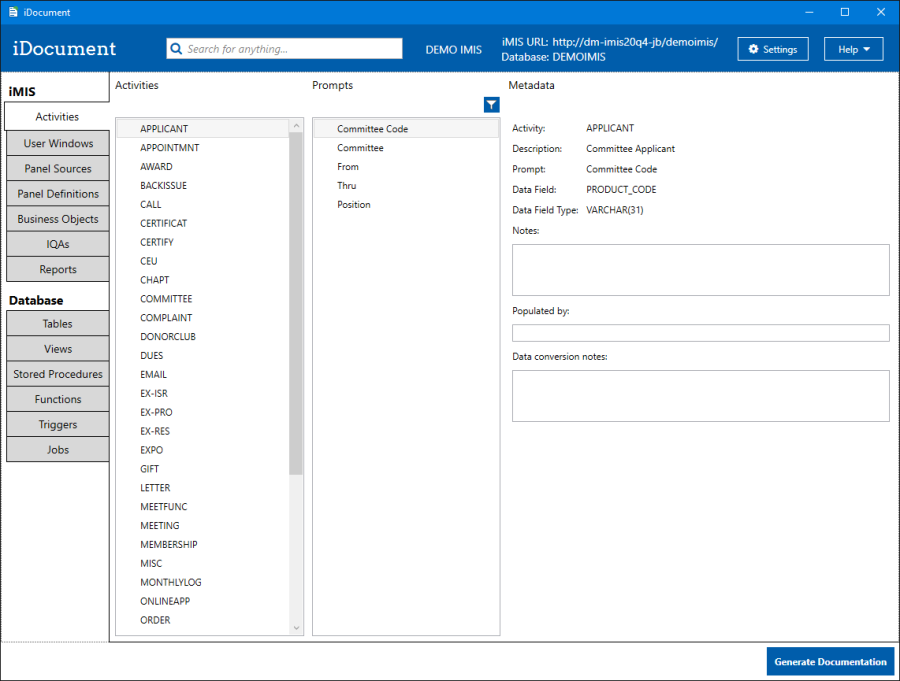
iDocument supports creating and storing notes ("metadata") against various iMIS and database-related entities.
Supported Documentation Areas
iDocument includes the following areas for documentation:
iMIS
Activities
View fields for each activity
For each field, view: iMIS Prompt, underlying data field and field type
User Windows
View fields included on each window
For each field, view: iMIS Prompt, underlying data field and field type, lookup table, source table and field
The icon will appear in the User Window list next to a window name if the window is a Panel Editor window.
Business Objects
Browse BO folders and view objects in each folder
For each business object, view object details including source tables, columns, and branch hierarchy
IQAs
Browse IQA folders and view queries in each folder
For each query, view query details including columns, sources, relationships, filters, sorts, and query options
Note: The IQA view filters out the $/WebFormZAttachments/ folder, and all its sub-folders.
Reports
View reports grouped by category and iMIS System
For each report, view the iMIS description for the report
Panel Sources
View panel sources created in RiSE Panel Editor interface
For each panel source, view the fields for that source and information about the field like its field type
Panel Definitions
View panel definitions, and view the panel layout as it appears in RiSE
Foe each field on the panel, view field information and the source object it references
Database
Tables
View columns on each table
Views*
View columns on each view
Stored Procedures*
View parameters on each stored procedure
Functions*
View parameters on each function
Jobs
View steps for each job
View last run information, step types, step commands, job state, associated schedule name
Triggers*
View all triggers active in the database, grouped by table or view name
For each trigger, view operations (Insert/Update/Delete), when the trigger occurs (On insert, or Instead of), and the source code for the trigger
View the source code for this object by clicking the "View Source" button after selecting an entity. A new window will open with the source code. On the window, you can select "Word Wrap" to wrap long lines of text, and "Striped View" to highlight every other line of code. Browsing Entities and Fields
To browse through each category, select a tab on the left side of the application to jump to that category. A list of top-level entities will load in the first list box. Click to view information about that entity. Note: Items with indicate that that entity (or one of its fields) contains metadata. Once an entity has been selected, the second list will populate with the entity's fields. When you have clicked on either an entity, or a field, the right-most column will contain information about the selected item, as well as fields for editing the metadata associated with that item. Note: Both top-level entities (such as tables or activities), and fields (such as columns) can have metadata associated with them. Be sure to note which item has been selected from both lists on the left. Tip: To select the parent entity after selecting a field (e.g. to select the parent table after one of its columns has been selected), simply click again on the table name in the list on the left.
Entering Notes and Other Metadata
Entering Notes
You can enter notes in the fields that are displayed in the column to the right.
Selecting either an entity or a field.
Enter your notes.
Notes are saved automatically.
Editing Notes
After making changes, if you would like to undo your changes and revert to the original notes…
Click Cancel.
You will be prompted to confirm the cancellation. Click Yes.
Tip: For faster editing/navigation:
PageUp: selects the previous field in the list
PageDown: selects the next field in the list
Ctrl+PageUp: selects the previous entity in the list
Ctrl+PageDown: selects the next entity in the list.
Remember: iDocument automatically saves your notes, so as soon as you navigate to the next or previous item, your notes will be saved.
Filtering Entities / Fields
You can filter each category independently by clicking on the blue Filter button just above the Field list box. The filter allows you to either:
Show all items: Show all items in the system.
Show only items with metadata: Show only items that have associated notes.
Additionally, the Report category has an additional filter. This is available as a checkbox above the entity list box when viewing the Report category.
Show All Reports: Shows all reports, not just custom reports. By default, only custom (non-system) reports are shown.
Generating Documentation
To generate documentation:
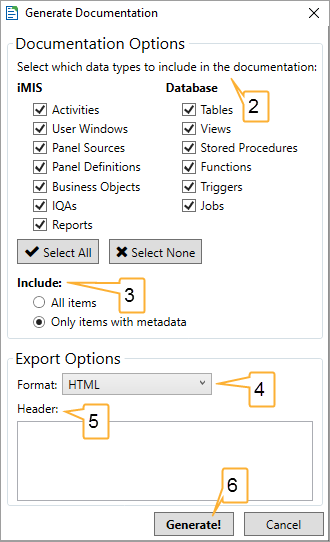
Click the blue "Generate Documentation" button in the lower-right corner of the application.
You will be presented with some options for generating your documentation.
First, select the categories/areas you would like to include.
Note: You must include at least one.
Select whether or not you would like to include all items, or only items with metadata.
All Items: Retrieves every item of that type from the system. So, if you select "Tables" and select "All Items", every table in the "dbo" object on the SQL server will be included.
Only items with metadata: Only retrieves an item if it contains metadata. Only applies to entities. For example, if you write notes on 2 prompts for an activity, that activity will be included in the documentation along with all of its prompts (not just those with documentation)
Select the type of export you would like to perform.
HTML: Generates an HTML document of the selected items.
PDF: Generates a PDF document of the selected items. Note, this option may take a few minutes to generate the documentation.
Word: By saving the document as a PDF, you can open through word to convert it to a Word documen
(Optional) Include text that will be included in the header of the document.
Click Generate.
Note: Depending on which options were selected, and your connection speed to the SQL server, this process may take some time.
Options
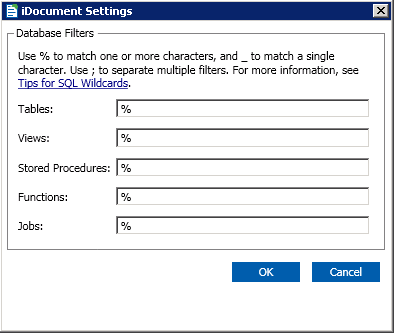
iDocument Settings
iDocument has user-configurable settings. These can be accessed by clicking Settings in the top-right corner of the application.
Database Filters
Filters can be independently applied to each of the five types of database entities. Filters support the use of wildcards. Use % to match one or more characters, and _ to match a single characters. Multiple filters can be applied. Use ; to separate multiple filters. Example: To filter out all tables except CSI tables, Name tables and User tables, you would use the filter: csi_%; Name%; User%;
HTML Output Options
There are some options available on the HTML document that is generated:
Copy to Clipboard: Copies the HTML document onto the clipboard, in order to be pasted into another rich text editor.
Save…: Opens a Save dialog box so that the generated document can be saved. Available file format options are .htm/.html (for viewing in a web browser), and *.txt (for viewing or modifying the HTML source).
iDocument Troubleshooting
If you have any issues with iDocument, please contact CSI Support at support@csiinc.com. Tickets are normally responded to within 1 to 2 business days after they are submitted.
iDocument Release Notes
Version
Date
Notes
2.13.2102
10/13/2020
Fixed PDF Output generation
2.13.2096
11/6/2019
International license update
2.13.2095
8/15/2019
Added menu item 'User Guide' that opens a browser tab to docs.csiinc.com/apps/idocument
Removed install of .pdf user guide. Replaced with .url document linking to docs.csiinc.com/apps/idocument
2.13.2094
4/8/2019
Fixed collation issue (CW 84602)
2.13.2079
1/10/2018
Updated licensing in CSI.Core. (CW 72484)
2.13.2078
05/19/2017
Developed handling for WPF type casting issues. (CW65119)
2.13.2074
3/28/2017
Fixed a crash due to empty Panel Definition (CW 65119)
Fixed a crash due to empty IQA definition (CW 65119)
Filtered out WebFormZAttachments folders from IQAs (CW 65119)
2.13.2023
11/15/2016
Added value list information to business object fields (CW 61804)
Added required marker on business object fields (CW 61804)
2.12.1982
11/7/2016
Fixed a crash when generating documentation (CW 63969)
Fixed a bug where search results would not jump to their item (CW 63969)
Added the ability to sort business objects by last modified date (CW 61805)
2.12.1945
8/9/2016
Fixed issues with orphaned user exceptions when login is not present (CW 54812)
2.12.1923
6/2/2016
Fixed an issue where some text boxes were rendering as dropdowns (CW 54771)
Added support for documenting RiSE panel sources (CW 51741)
Added support for documenting RiSE panel definitions (CW 51741)
Added support for documenting database triggers (CW 51740)
Added support for viewing the source code for views, stored procedures, functions, and triggers
2.11.1505
8/12/2015
Added application tracing (CW 49624)
2.11.1504
7/16/2015
Enhancements to login control and iMIS URL handling (CW 48242)
2.11.1502
6/29/2015
Added IQA details to Metadata display and documentation output. (CW 47157)
Added Business Object details to Metadata display and documentation output (CW 47157)
Fixed an issue where reports marked as "Hidden" in the database were displaying in iDocument
Fixed an issue where extra Business Object folders were displaying in iDocument (e.g. "Atom Panels") (CW 47468)
Added remote licensing capabilities
2.10.1145
4/8/2015
Added support for exporting the documentation to a PDF file (CW 40290)
Added the job schedule description (e.g. "Daily at 9:00 AM") to the job details area (CW 40567)
Added the description of the iMIS activity to the activity area (CW 45370)
Added the ability to copy and paste read-only metadata values (CW45372)
Added the ability to search through all entities, fields, and notes via a new search interface on the main window (CW 45373)
Added the option to synchronize user-defined window and related table notes. Can be enabled via the application's settings (CW 45386)
Fixed the main iDocument window and the HTML output window not remembering their window positions (CW 45397)
Fixed the HTML output window not automatically focusing the HTML view (CW 45397)
Cleaned up the entity output by moving the General Lookup table information to a separate "Reference" section at the bottom of the documentation (CW 45401)
Added a pre-populated list of any jobs that execute a particular stored procedure in the "Run By" field (CW 45400)
Added icons to the application buttons in the top-right corner of the main window
2.8.716
12/15/2014
Integrated Core Library into iDocument (CW 42484)
Improved iMIS login control
Standardized About dialog box
Fixed missing user-defined field prompt causing a crash (CW 43201)
Fixed custom tab field with SQL statement causing a crash (CW 43201)
2.7.635
9/4/2014
Fixed SQL elevated user bug (CW 41537)
Added splash screen on startup (CW 40287)
2.6.568
8/4/2014
Added additional information to Reports section (CW 41117)
Fixed SQL elevated user bug on first time startu
Due to a problem identified in the installer, the version number scheme is being altered
2.0.4
7/15/2014
Fixed incorrect last run time for jobs
2.0.3
7/11/2014
Added lookup table name to documentation on User Windows
2.0.2
6/26/2014
Fixed some information about jobs not loading (CW 40452)
2.0.1
5/27/2014
Added trial mode (CW 39895)
Fixed crash on exit on certain systems
2.0.0
4/17/2014
Initial release of iDocument
JavaScript errors detected
Please note, these errors can depend on your browser setup.
If this problem persists, please contact our support.