
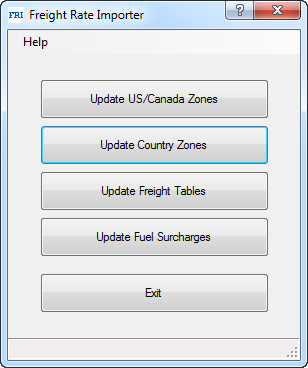
Freight Rate Importer

Overview
Freight Rate Importer is designed to take Zones and Rates from commercial shipping companies such as UPS, FedEx, USPS and upload them into iMIS. In addition, Freight Rate Importer has the ability to update Fuel Surcharges on the fly. Fuel surcharges can change monthly and it is important they stay up to date. Prior to Freight Rate Importer, you had to re-import your data monthly.
Basic System Requirements
The following system specifications are required to successfully run Freight Rate Importer:
Windows 7 or higher
SQL Server 2008 or higher
Microsoft .NET Framework version 3.5
iMIS 15.2 or higher
Installing Freight Rate Importer
Note: It is best practice for all users to be on the same version of Freight Rate Importer.
Download Freight Rate Importer from https://customer.csiinc.com/ to your workstation.
You will need your CSI Website User Name and password. If you do not have this information, contact support@csiinc.com
Unzip the folder, and navigate to the unzipped folder.
Right mouse click on the Setup.exe and run as administrator
The Setup Wizard will open. Click Next.
The license Agreement will display. Select "I accept..." and Click Next.
Verify the default installation folder. Click Next.
Click Install to start the installation. A screen will then show, displaying the progress of the install.
A screen will confirm that Freight Rate Importer has been successfully installed. Click Finish.
About the License Key
When you first log into FRI, the license process will attempt to register your license key automatically by calling back to CSI to get your iMIS information. If the information that CSI has on record is accurate then you will not be prompted with any license key information. It will update your license information automatically.
If the process cannot call CSI or the license key information does not check out with what CSI has on record, then you will be prompted to enter a license key manually. You will need to obtain this key by contacting CSI Support. After the license key has been validated and entered, you will be able to use FRI on your iMIS database. Since the license key is stored in your iMIS database, you will only need to enter this key once per database. Installing FRI on a new computer will not require you to re-enter your license key.
Note: Changing the "Licensed To:" name for iMIS will require a new license key. If the license key detects a change in this, it will follow the same process as above trying to call back to CSI to verify your product information. In most cases, if you are prompted for license information it is likely that CSI does not have your updated iMIS information. Contact CSI at support@csiinc.com with a screen shot of the current iMIS System Setup and a new key will be emailed to you.
Log into iMIS as an administrator (manager)
Click on File > System Setup in the top toolbar
Copy and send to support@csiinc.com
Setup iMIS with Zone Tables and Shipping Methods
A Zone Table is required for each ship method (normally) as well as for each country (although they will share the same names). Each shipping method requires a zone table.
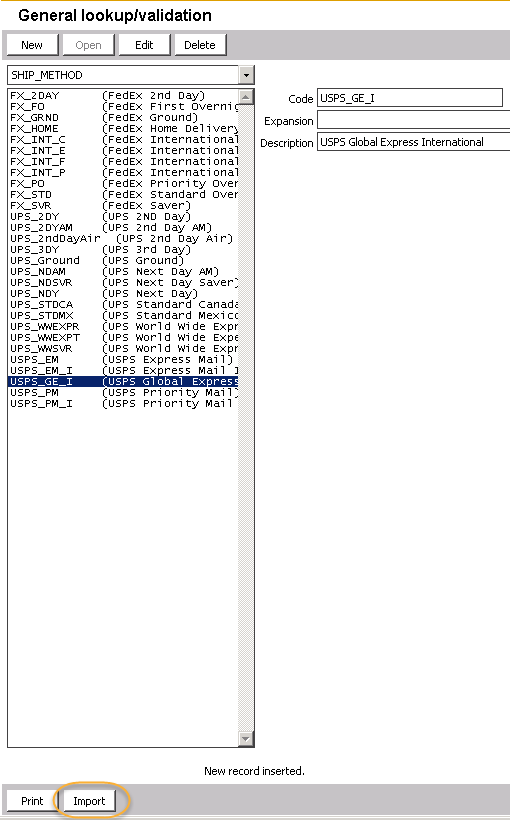
Create a General Lookup validation table called SHIP_METHOD
Note: Steps 2-6 are only necessary if table 'SHIP_METHOD' does not already exists in iMIS.
In iMIS, go to Customers>Setup Tables>General Lookup Validation
Click on the drop down arrow and select (New Table).
Type SHIP_METHOD as the table name.
Type in the desired ship methods. Do not put spaces in the codes. The following are sample codes you may wish to use (Note, only use the Ship Methods your organization uses!):
UPS_GRND UPS Ground
UPS_NDSVR UPS Next Day Saver
UPS_NDY UPS Next Day
UPS_2DY UPS 2ND Day
UPS_3DY UPS 3rd Day
UPS_NDAM UPS Next Day AM
UPS_2DYAM UPS 2nd Day AM
UPS_WWEXPR UPS World Wide Express
UPS_WWSVR UPS World Wide Express Saver
UPS_WWEXPT UPS World Wide Expedited
UPS_STDCA UPS Standard Canada
UPS_STDMX UPS Standard Mexico
FX_STD FedEx Standard Overnight
FX_2DAY FedEx 2nd Day
FX_SVR FedEx Saver
FX_GRND FedEx Ground
FX_INT_E FedEx International Economy
FX_INT_P FedEx International Priority
FX_INT_F FedEx International First
FX_INT_C FedEx International Canada
FX_HOME FedEx Home Delivery
FX_PO FedEx Priority Overnight
FX_FO FedEx First Overnight
USPS_PM USPS Priority Mail
USPS_EM USPS Express Mail
USPS_PM_I USPS Priority Mail International
USPS_EM_I USPS Express Mail International
USPS_GE_I USPS Global Express International
(The above codes are in SHIP_METHODS.txt which is part of the Rate Sheet Downloads that CSI makes available – you can alternatively import them into the General Lookup/Validation table (use the import button on the bottom of the SHIP_METHOD table). Please note, these are only suggestions and you may use your existing codes if you like or create other ones (e.g. instead of UPS_2DY, you might have UPS2D, it is totally up to you, however, you have a limit of 10 characters total).
6. Restart iMIS.
Setup Zone Tables
Zone tables may be set up in advance, but it is not necessary. Freight Rate Importer will create the necessary tables.
Download Latest Zone Charts from your shipper
The easiest way to find the zone charts specific to your shipping location is to use Google. For example:
download ups zones
download fedex zones
download usps zones


IMPORTANT: The web pages listed below are subject to change without notice!
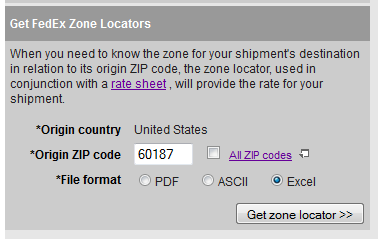
Enter the Zip Code of where the shipments will be originating.
Click on Download.
Save the file on your computer or network.
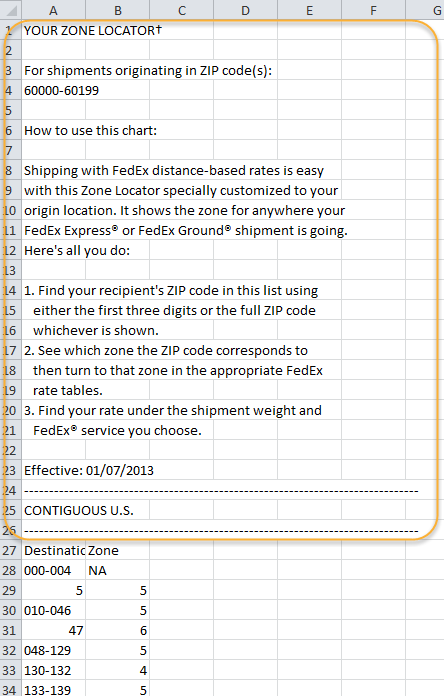
The file contains extraneous information that is not needed for FRI. Therefore, open the saved file with Excel and Remove the un-needed information (see steps 6 & 7 below). The following example uses UPS one charts.
Remove all lines above the headers of Dest. Zip | Ground | 3 Day Select | etc.
Delete these rows

The top of your spreadsheet should look like this now:

Now scroll to the bottom of the spreadsheet and remove all lines after the final zip code range (988-994).
Delete every row after 153 in this example

In the example above, rows 153- 208 had to be deleted. There should be only blank rows after your final row and it should look something like this.
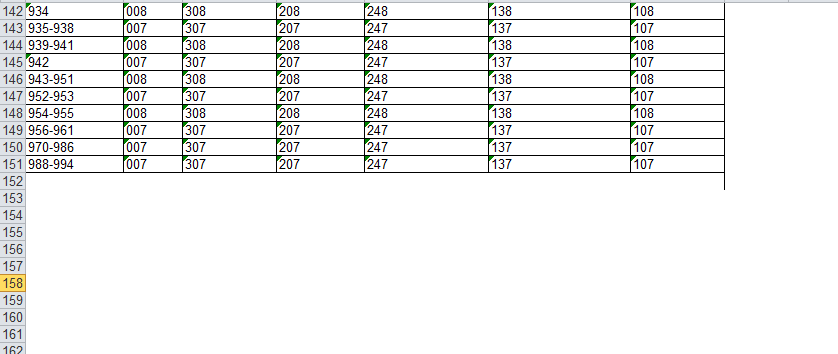
Save the file.
Repeat for your other shipping methods, note FedEx is similar (we recommend using Firefox for this).
Just as with the UPS example above, clean up all rows above the header.
Delete these rows
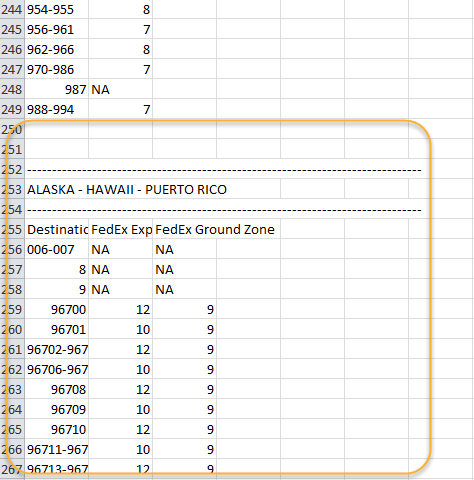
Also delete all rows after the final Zip Range.
Delete every row after 250 in this example


Obtain current shipping rates
The current shipping rates for FedEx, UPS, and USPS are available in Excel format on the CSI website with the product download at https://customer.csiinc.com/
The rates will be updated every year (typically after January 1).
Obtain Current Fuel Surcharge Rates
Make a note of the current Fuel Surcharge Rate while in the website of your freight provider. Once again, the fastest most reliable way to do this is to use Google. The example below is for UPS. Please remember each shipper has their own Fuel Surcharges. 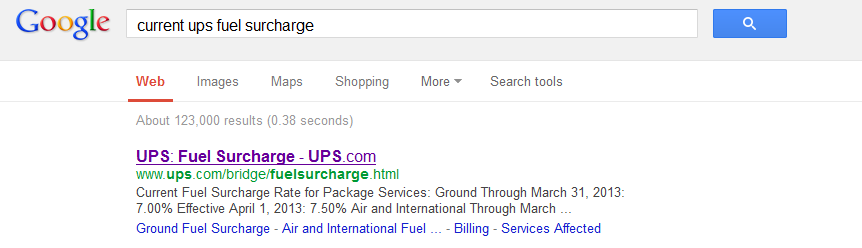

Running Freight Rate Importer
Click on the shortcut menu Freight Rate Importer under:Start > All Programs > CSI Programs
You will be prompted for an iMIS user name and password. Enter your credentials.
For 10.6, Select iMIS 10 – Data Source Name and then choose the DSN in the dropdown (it will match what iMIS has).
For iMIS 15, Choose iMIS 15 – Web Server URL and then select your IMIS 15 URL (it will match your login screen in iMIS).
Updating US_Canada Codes
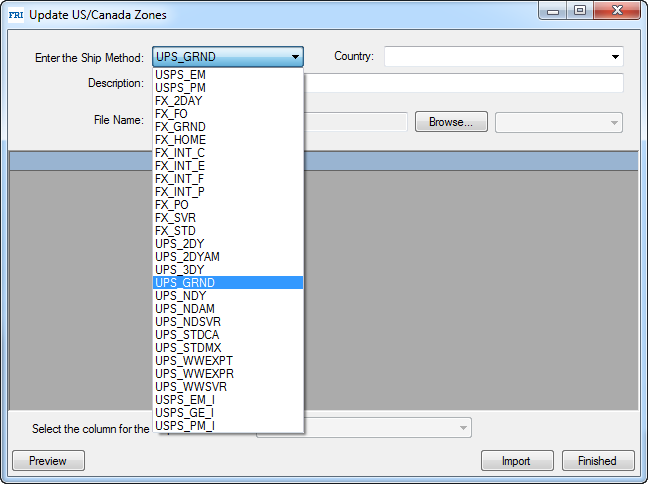
Click on the button Update US/Canada Zones from the main screen.
Select the Ship Method from the drop down menu
Select the Country (leave blank for US, otherwise Select Canada – these are the only two entries you would ever select here).
Enter a Description (optional).
Select the Browse button to find the Zone chart downloaded from your shipper's website (e.g. 600.xls)
Click Open to insert the table into Freight Rate Importer.
Note, if you receive an error at this point such as:
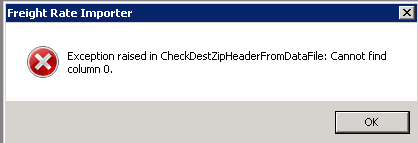
Then you have not cleaned up your Zone Chart that you downloaded. See the section titled Download Latest Zone Charts from your shipper.
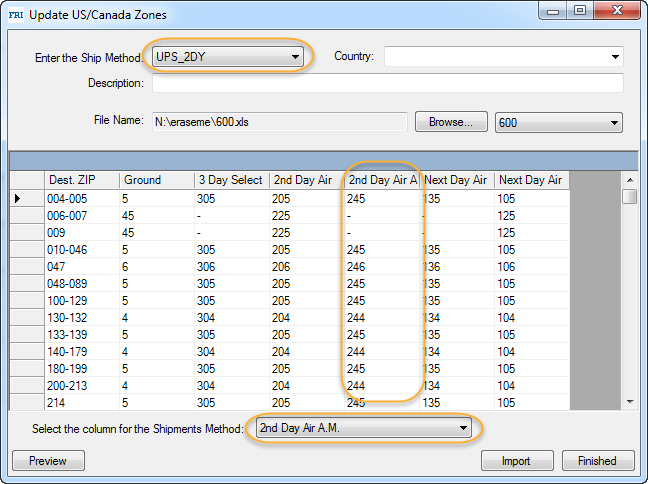
Select the column (on the bottom) that matches the Ship Method you are importing.
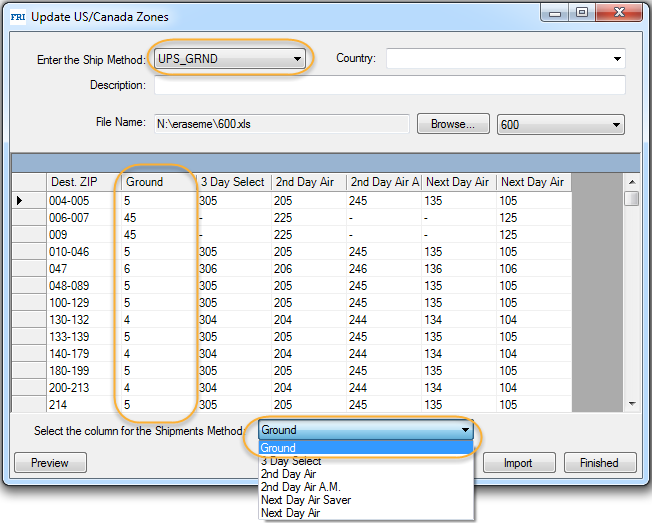
Note how we are selecting UPS_GRND as the Ship Method, then choosing the appropriate column from the spreadsheet, in this case Ground.
Click Import.
A message will display stating the number of zones to be added to the iMIS table. Click Yes.
A message will display stating the process has completed. Click OK.
Now repeat for each Ship Method (US Only) that your organization supports.
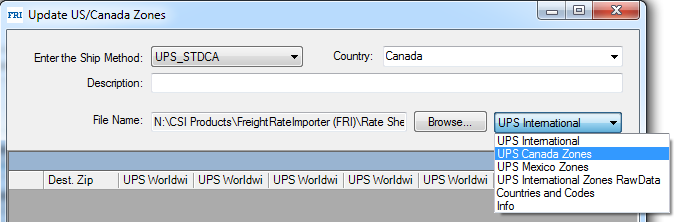
Stay in this screen to import the Canadian Zones (US Customers Only). Note that CSI does provide the Canadian Zones and they are based on the State you are shipping from. You can download these here: https://www.csiinc.com/dashboard. You will need to select the column specific to your state where the shipments will be originating from.

Select the Canadian Shipment Method
Select Canada as the Country
Browse to the UPS International Zones.xls provided by CSI (https://www.csiinc.com/dashboard)
Choose UPS Canada from the list of Worksheets
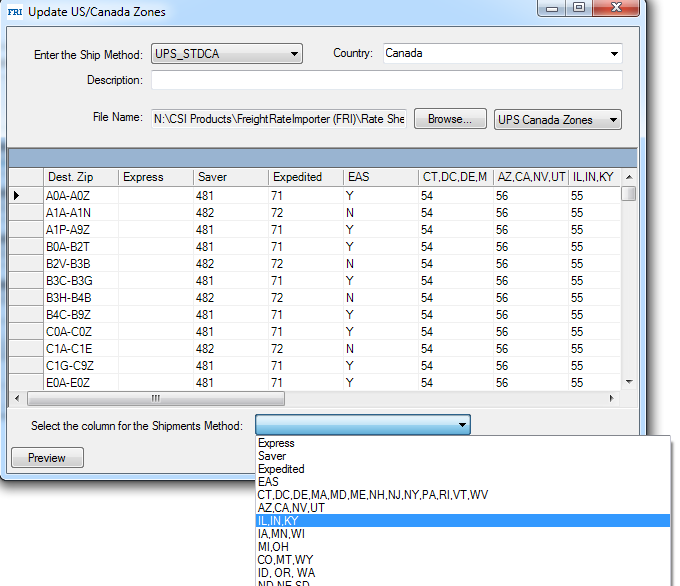
Select the appropriate column for your shipment method. In the example below, we are bringing in UPS Standard Canadian Rates so we choose the column that has our state in it. This will only apply for UPS Standard Shipping. Other Canadian shipping methods include UPS Saver Canada, UPS Expedited, and UPS Express. For these shipping methods, you will choose the appropriate column from the Spreadsheet as they are NOT based on the State you are shipping from.
Click Import.
Click Finished when done.
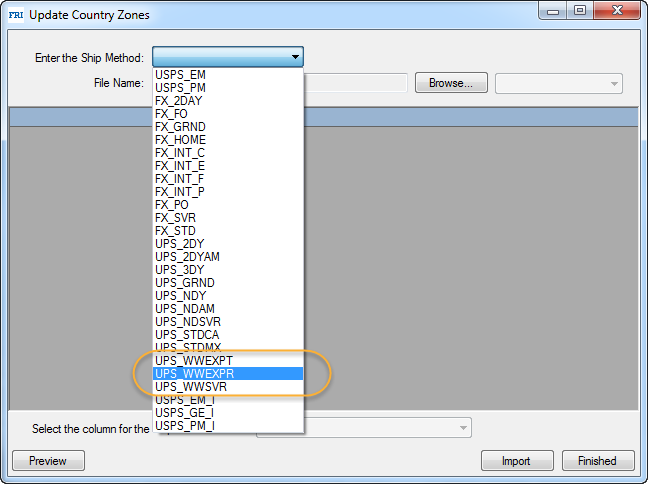
Updating Country Zones
Freight Rate Importer allows importing and updating zones for different countries in one operation. This is required if your organization ships outside of the United States.
Follow the instructions below to import country zones in mass:
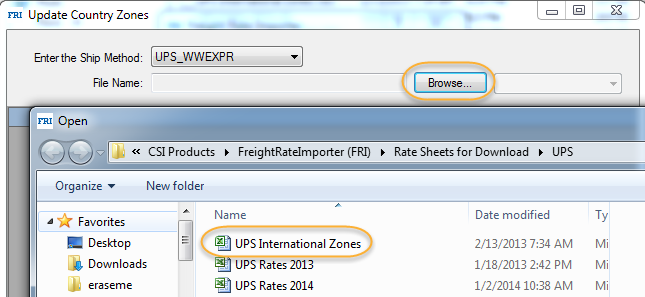
Click on the Update Country Zones button.
Select the International Ship Method from the drop down control.
Click on the Browse... button and select a file to import (use the CSI provided International Zones Table for UPS).
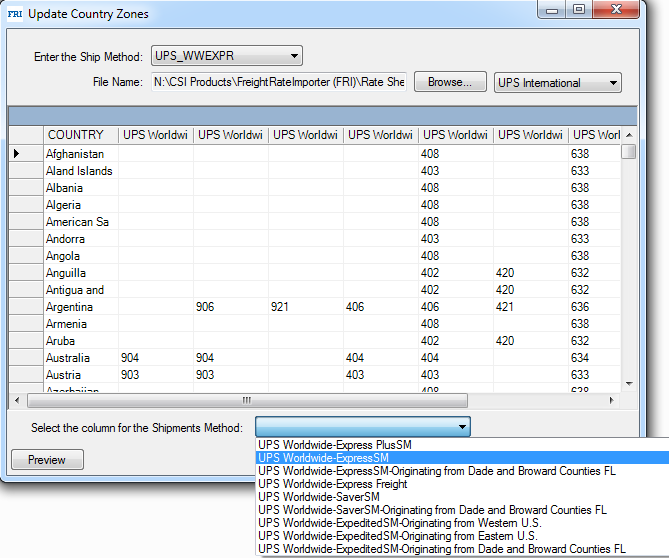
Select the appropriate Column to match the Ship Method. In the example below, we are importing the Worldwide Express Zones. If you are unsure of which shipping method your organization uses, please check with your shipping department. Also, note, there are specific entries if you are shipping from Dade and Broward Counties in Florida as well as for if you are located in the Western US or the Eastern US for UPS Worldwide Expedited shipping method. Check the UPS website to determine if you are in the East or West.
Optionally, click on the Preview button to validate how the data will be imported:
Click on the Import button when ready to import the country zones.
Click YES on the confirmation dialog to start the import.
A successful confirmation message will be displayed upon completion. Click OK.
Remember for Importing Expedited Rates, you must determine the appropriate origin for your State. This information can be obtained from the UPS website.
Click Finished when done with your International Zones.

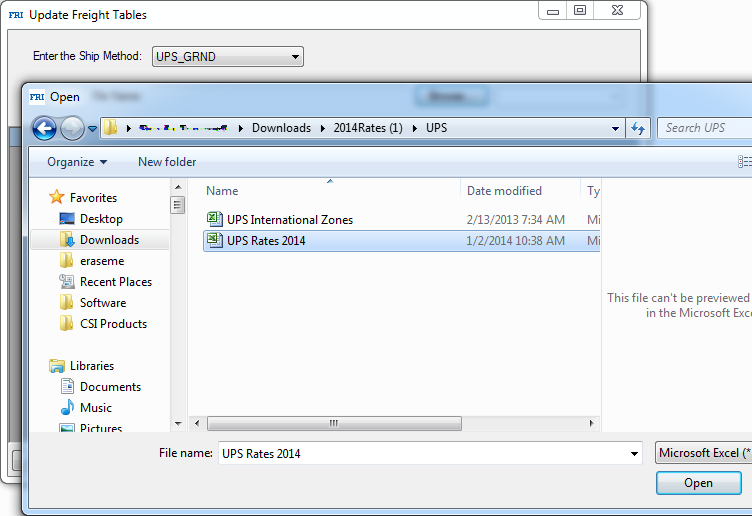
Updating Freight Tables
Click on the button Update Freight Tables from the main screen.
Select the Ship Method from the drop down.
Browse to the freight tables that were provided by CSI.
Choose the appropriate Worksheet for your Ship Method. In the example below we are bringing in UPS Ground and therefore are selecting the UPS Ground Worksheet.
Click Import.
A message will display stating the number of records which will be added to the iMIS Rate table. Click Yes.
Repeat for each additional Ship Method. Remember, change the Worksheet (located just to the right of the Browse button) each time.
Click Finished.
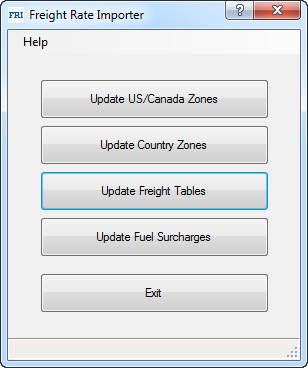
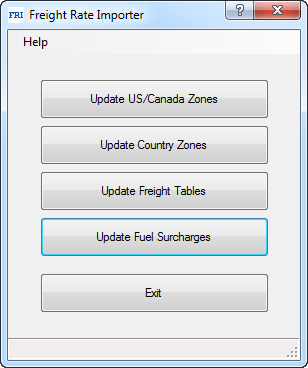
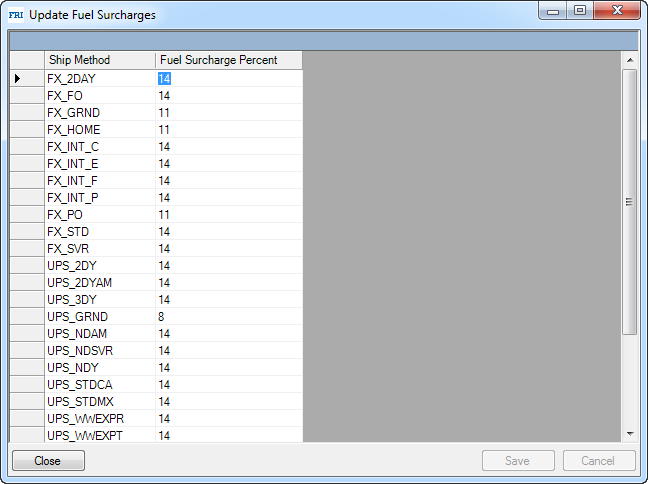
Updating Fuel Surcharges
Click on the button Update Fuel Surcharges from the main screen.
Enter the Fuel Surcharge Percent which you made note of from your shipper's website – note that International and Overnight Shipping will normally be higher than Ground US.
Click Save.
Once the initial setup has been completed you can choose to update the Freight Rate Tables, Zone Tables or Surcharges on an individual basis by selecting the appropriate button.
FRI Troubleshooting
If you have any issues with Freight Rate Importer, please contact CSI Support at support@csiinc.com. Tickets are normally responded to within 1 to 2 business days after they are submitted.
FRI Release Notes
Version | Date | Notes |
|---|---|---|
1.4.12 | 4/5/2023 | Updates for EMS on Prem (CW 127547) |
1.4.10 | 1/3/2020 | Fix issue with .NET version causing runtime error (CW 90451) |
1.4.9 | 11/6/2019 | International license update |
1.4.8 | 8/15/2019 |
|
1.4.6 | 1/10/2018 | Updated licensing in CSI.Core. (CW 72484) |
1.4.3 | 6/13/2016 | Add support for FIPS compliant algorithms (CW 61648) |
1.4.2 | 6/8/2016 | Output additional message on login failure (CW 61648) |
1.4.1 | 7/15/2015 | Enhancements to login control and iMIS URL handling (CW 48242) |
1.4.0 | 6/30/2015 | Fix bug with Login control not accepting valid URL (CW 48242) |
1.3.9 | 5/4/2015 | Enhancements to Licensing, Login and About dialog windows (CW 46313) |
1.3.8 | 8/18/2014 |
|
1.3.7 | 6/6/2014 | Fix freight rates import adjusting values based on existing fuel surcharges (CW 39977) |
1.3.6 | 6/3/2014 | Fix database version not being updated when the program updates |
1.3.5 | 8/9/2013 | Fix the issue of login control Web Server URL (remove "/cs" or "/cs2") for iMIS 20 |
1.3.3 | 7/17/2013 |
|
1.3.2 | 6/5/2013 | Fix issues with loading of shipping methods (CW 32802) |
1.3.1 | 5/22/2013 | Integrate the new version of Login control |
1.3.0 | 5/2/2013 | Update query to retrieve list of available shipping methods (CW 1048) |
1.2.12 | 4/17/2013 | User interface updates (CW 31240) |
1.2.11 | 2/1/2013 | Correct registry path for user's preferences (CW 30410) |
1.2.10 | 1/4/2013 |
|
1.2.9 | 6/12/2012 | Correct license issues. (CW 26358) |
1.2.8 | 5/16/2012 | Enhance parsing of XLS and XLSX files (CW 25912) |
1.2.7 | Change file parsers to use "Koogra Excel BIFF/XLSX Reader Library" and a "Fast CSV Reader (LumenWorks.Framework.IO.Csv)" (CW 21019) | |
1.2.6 | Fix Excel rates file appending an "F" character to numerical column names (CW 20664) | |
1.2.5 | Fix error missing @SHIP_METHOD parameter | |
1.2.4 |
| |
1.2.3 | Update CSIUtil.DLL to version 1.1 | |
1.2.2 | Fix truncation issue on shipping method field when importing zone | |
1.2.1 | Support of Zone range header (for example: Zone 9-11) | |
1.2.0 | New login interface | |
1.1.5 |
| |
1.1.4 | Fix issue when updating the Fuel Surcharge rate | |
1.1.3 | Miscellaneous updates | |
1.1.2 |
|