
Activity Importer Plus

Overview
Activity Importer is a utility that allows the user to import activities into iMIS databases.
Basic System Requirements
The following system specifications are required to successfully run Activity Importer +:
Windows 7 or higher
SQL Server 2008/2008R2/2012/2014
.NET 3.5
iMIS 15.2 and higher
UDP 1434 must be open on the SQL Server
Note: For newer PC's that have .NET 4.6 (or higher) installed, they MAY not include the necessary .NET 3.5. The correct way to download necessary .NET versions:
Enable the .NET Framework 3.5 in Control Panel
Press the Windows key Windows on your keyboard, type "Windows Features", and press Enter. The Turn Windows features on or off dialog box appears.
Select the .NET Framework 3.5 (includes .NET 2.0 and 3.0) check box, select OK, and reboot your computer if prompted.
Installing Activity Importer Plus
Note: It is best practice for all users to be on the same version of Activity Importer Plus.
Download Activity Importer from https://customer.csiinc.com/ to your workstation.
You will need your CSI Website User Name and password. If you do not have this information contact support@csiinc.com.
Unzip the folder, and navigate to the unzipped folder.
For Windows 7/2008 and above, right mouse click on the Setup.exe and run as Administrator.
The Setup Wizard will open. Click Next.
The license agreement will display. Select "I accept…" and click Next.
Verify the default installation folder. Click Next.
Click Install to start the installation. A screen will then show, displaying the progress of the install.
A screen will confirm that Activity Importer has been successfully installed. Click Finish.
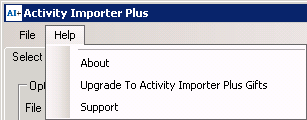
NOTE: If you are upgrading Activity Importer Plus to Activity Importer Plus Gifts, you will need to enter your new license key. This can be done through the main AI+ File Load screen. Navigate to Help > Upgrade To Activity Importer Plus Gifts.
About the License Key
When you first log into AI+, the license process will attempt to register your license key automatically by calling back to CSI to get your iMIS information. If the information that CSI has on record is accurate then you will not be prompted with any license key information. It will update your license information automatically.
If the process cannot call CSI or the license key information does not check out with what CSI has on record, then you will be prompted to enter a license key manually. You will need to obtain this key by contacting CSI Support. After the license key has been validated and entered, you will be able to use AI+ on your iMIS database. Since the license key is stored in your iMIS database, you will only need to enter this key once per database. Installing AI+ on a new computer will not require you to re-enter your license key.
Note: Changing the "Licensed To:" name for iMIS will require a new license key. If the license key detects a change in this, it will follow the same process as above trying to call back to CSI to verify your product information. In most cases, if you are prompted for license information it is likely that CSI does not have your updated iMIS information. Contact CSI at support@csiinc.com with a screen shot of the current iMIS System Setup and a new key will be emailed to you.
Log into iMIS as an administrator (manager)
Click on File > System Setup in the top toolbar
Copy and send to support@csiinc.com
About Access Keywords
Activity Importer requires that the Access Keywords "CSIACTIVTYIMPORT" or "AI+" exist for each user that wants to use Activity Importer. However, if the user logs in as MANAGER!SA they are automatically allowed to use Activity Importer even if the keyword is not present.
Adding Access Keywords to iMIS
iMIS 15
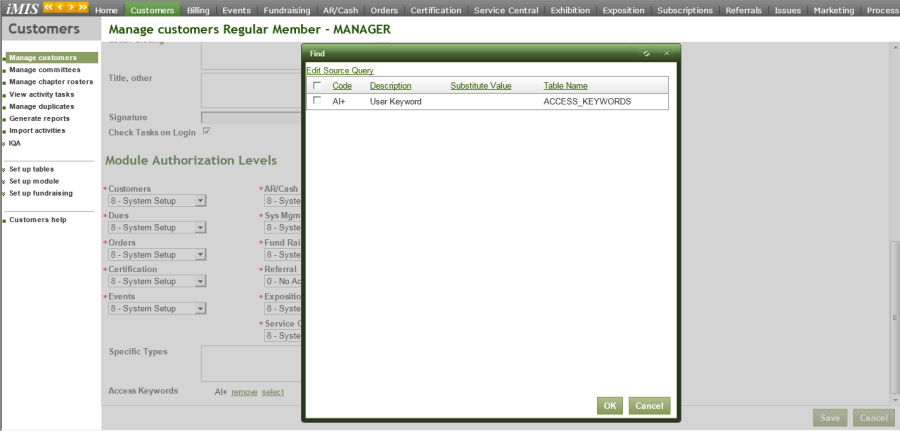
If the access keyword CSIACTIVTYIMPORT or AI+ is not in the General Lookup Validation Table of the Customers module, you will need to add it to ACCESS_KEYWORDS in the General Lookup Validation Table.
Log into iMIS with the MANAGER login (or another iMIS account that has the SysAdmin role assigned to it)
Go to Customers > Set Up Tables > General Lookup Validation
If the ACCESS_KEYWORDS table is not listed in the drop down list, scroll to the bottom of the list and select New Table and enter ACCESS_KEYWORDS then click Save.
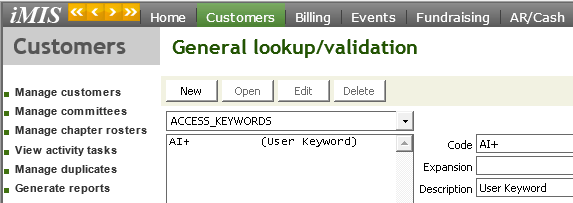
Select ACCESS_KEYWORDS from the drop down list. Click New.
In Code type CSIACTIVITYIMPORT or AI+.
In Description type User Keyword.
Click Save and exit iMIS.
iMIS Staff Site
If the access keyword AI+ is not in the General Lookup Validation Table of the Customers module, you will need to add it to ACCESS_KEYWORDS in the General Lookup Validation Table.
Log into iMIS using the MANAGER login (or another iMIS account that has the SysAdmin role assigned to it)
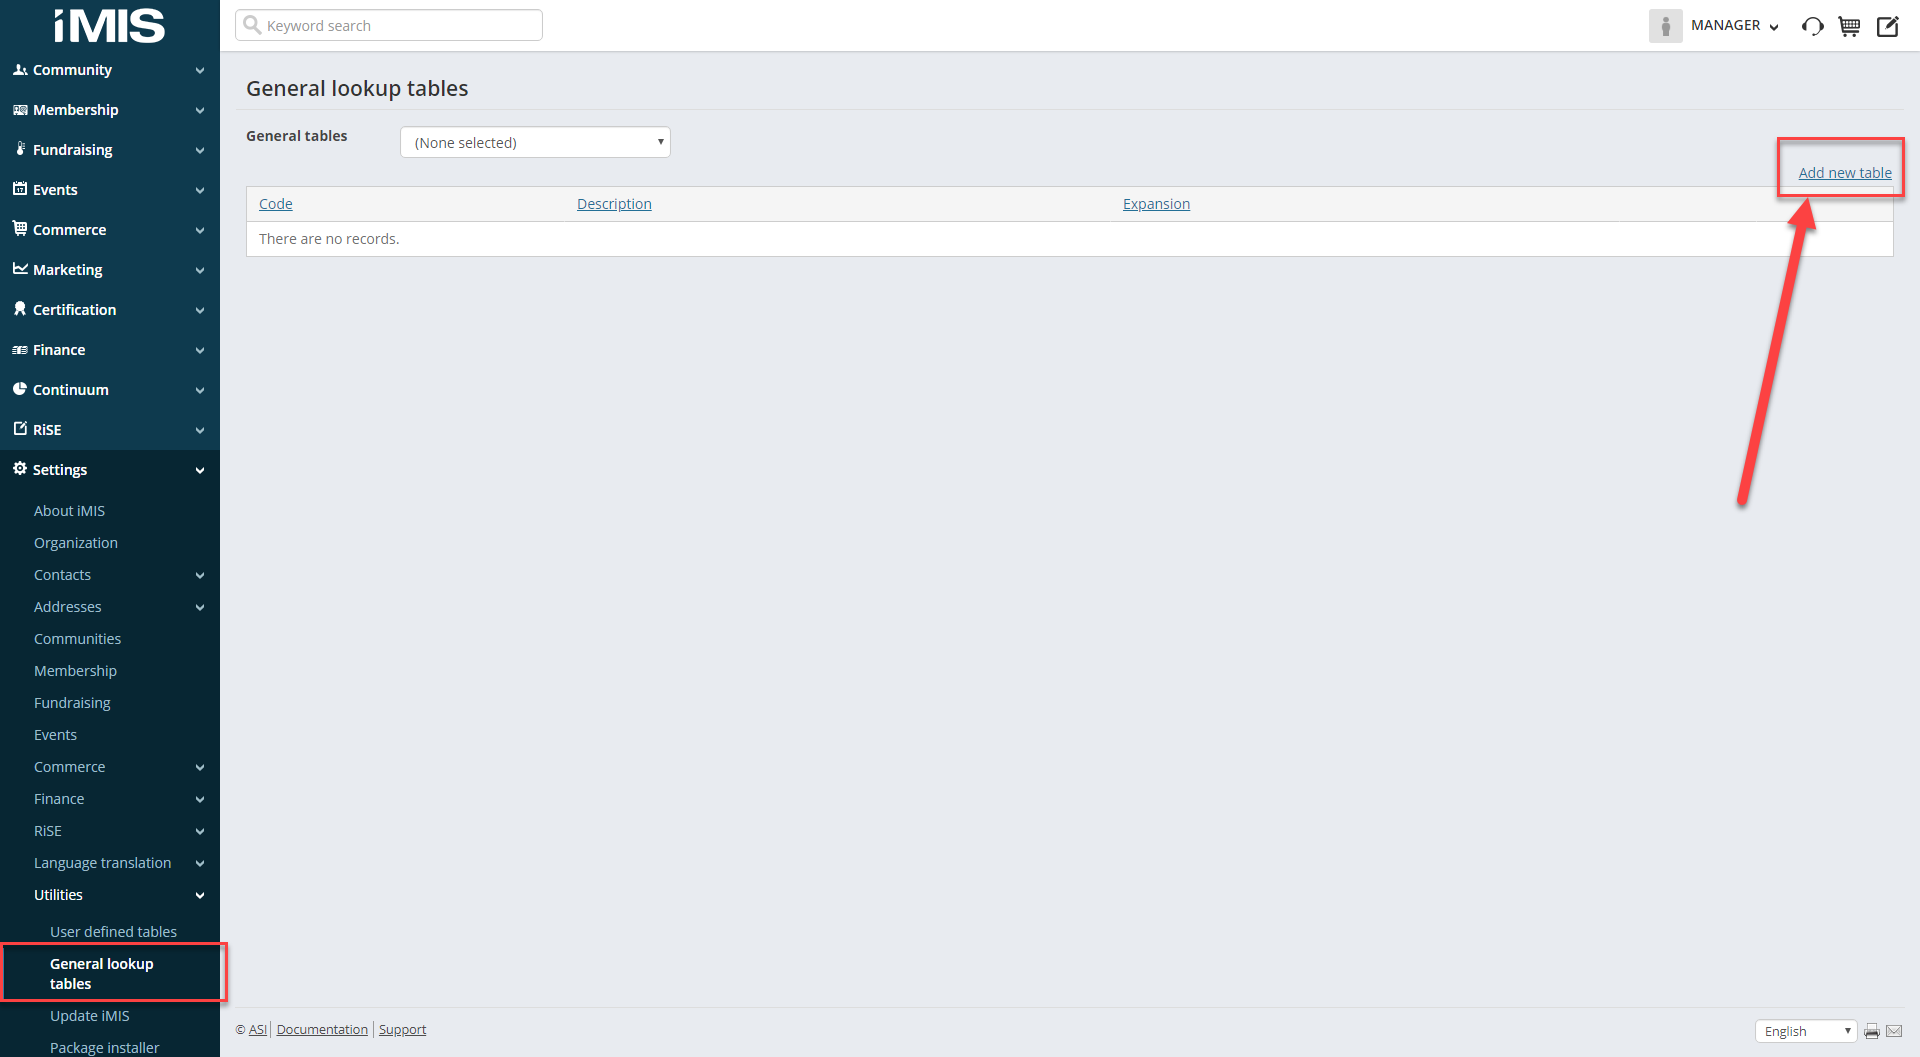
Go to Settings>Utilities>General lookup tables > Add new table (Make sure the drop down box in the 'General Tables' is showing ('None selected)'.
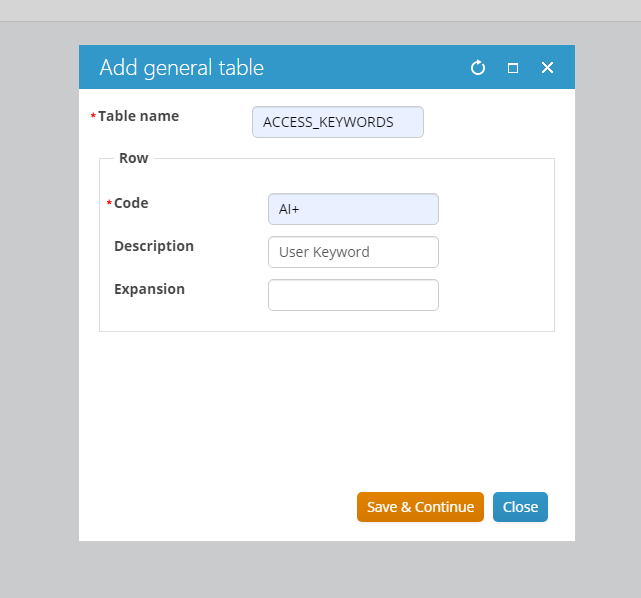
In Table name type ACCESS_KEYWORDS.
In Code type AI+.
In Description type User Keyword.
Click Save & Continue.
Adding Access Keywords to the User Login
iMIS 15
1. Log into iMIS with MANAGER (or another iMIS account that has the SysAdmin role assigned to it)
2. Go to the Customers tab
3. Select the User Name you want to allow Access to Activity Importer, and click User Credentials
4. Add the access keyword CSIACTIVITYIMPORT or AI+, by expanding Staff Access and clicking select next to Access Keywords.
5. Check CSIACTIVITYIMPORT or AI+.
6. Click OK then click Save.
iMIS Staff Site
Log into iMIS with MANAGER (or another iMIS account that has the SysAdmin role assigned to it)
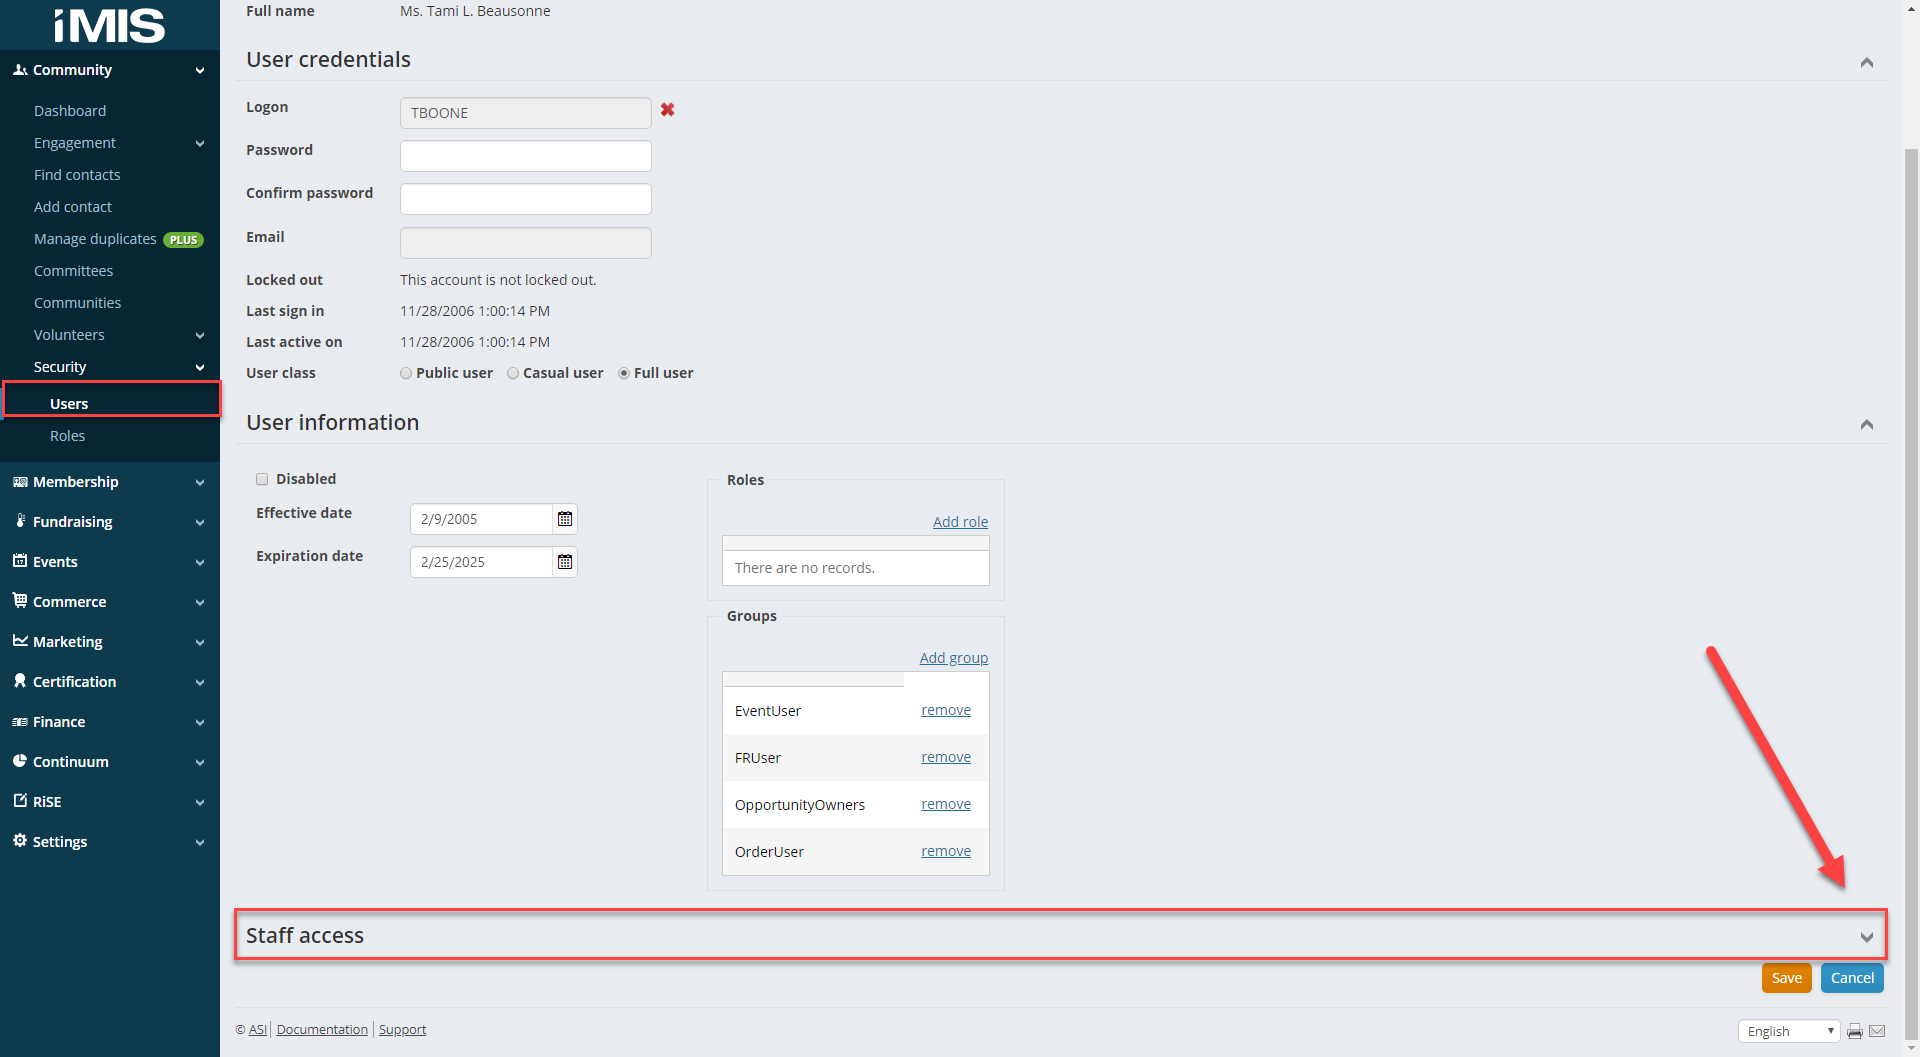
Go to Community > Security > Users
Type in the search criteria for User you are looking to update.
Select the Logon Name of the user you want to allow Access to Activity Importer.
Scroll down to Staff access and hit the arrow on the right to expand the section
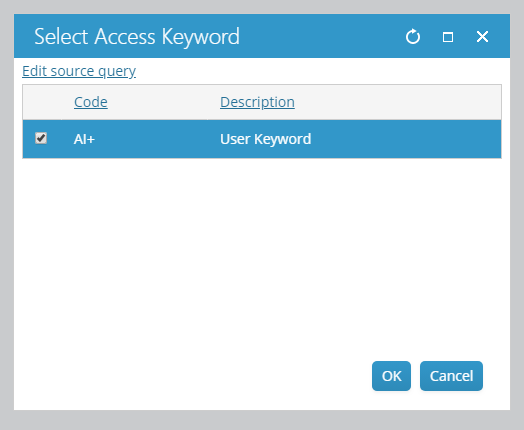
Scroll to the bottom and select Add access keyword
Check AI+.
Click OK then click Save.

About IQA Support
After the login and password have been verified, Activity Importer Plus will try to look to determine if IQA is enables within iMIS. In order to support IQA within Activity Importer Plus, you will need to install the iEmail Web Services. If you do not so this, when you click on the Select an IQA query tab, you will receive an error.
NOTE: If you have iEmail 2.0 (or higher) installed already, you do not need to install the IQA Web Services for AI+.
To install iEmail Web Services for IQA support:
Install the iEmail Webservices Deployment IQA Setup on your iMIS Web Server by running the file iEmail Webservices Deployment IQA Setup.exe from the folder "Web Services IQA" found in the compressed zip file. Walk through the setup wizard until completed.

2. After installing the application, run iEmail Webservices Deployment IQA application. This application will create your iEmail Webservices for IQA for you!
You can find this by navigating to the install location that was defined during installation.
3. The application should appear as below. Fill in the iMIS Physical Location and the iMIS Web Server URL for your organization. Then hit Install. You should get a message box that says the Web Service was successfully created. You can now close this application. The iMIS webserver URL will be populated by the URL in Step 1.
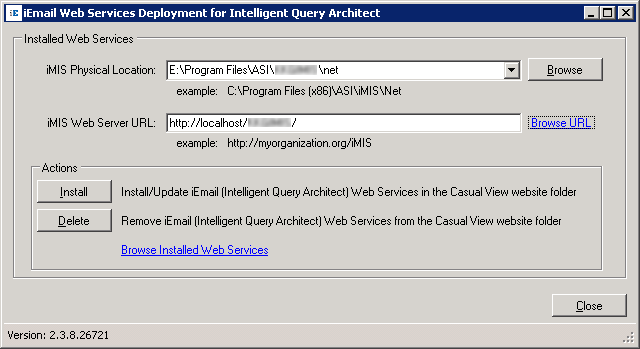
Locate your iMIS web server
4. The IQA Query tab should then be available
Log In
Once the program is installed, a shortcut will be created on the Microsoft Start menu.
Click Start > All Programs > CSI Programs > Activity Importer + > Activity Importer +
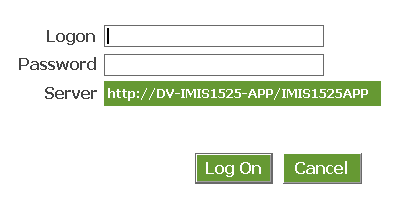
Log in using your iMIS login and password. The web server represents your iMIS 15 (and above) application server location.
You will be prompted for a user name and password. Use your iMIS user name and password. If you are unable to log on, contact your system administrator. They can add the access keyword to your login.
Select your version of iMIS from the Connection drop down menu:
If you use iMIS 10.x, choose iMIS 10 – Data Source Name then choose the ODBC name for your database from the DSN
If you use iMIS 15.x, choose iMIS 15 – Web Server URL then select or type the URL for your iMIS web server in the Web Server URL section.
Click Log On
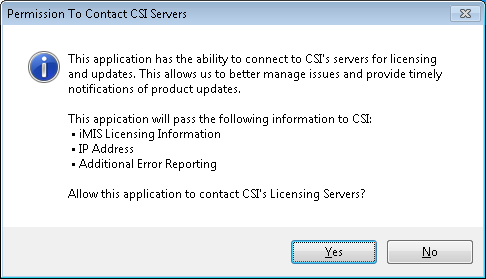
After you login, you may be prompted by the window below. If this is the case, please read through and click Yes.
Importing From a Document
IMPORTANT: You are encouraged to use a flat file such as Comma Separated Value text files. This is considered a best practice. However, if you are using a spreadsheet, note that formulas will not be recognized by AI+.
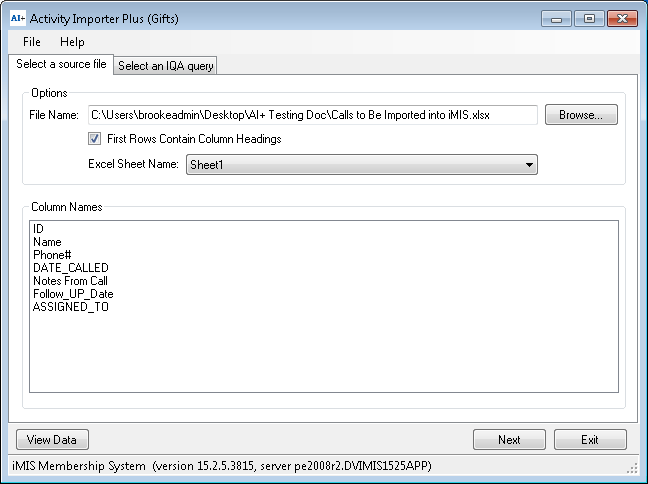
Choose the "Select a source file" tab and click Browse to find the document you are going to import.
Check First Rows Contain Column Headings, if applicable.
Select the desired Excel Sheet Name from the drop down menu, if your document has more than one sheet.
The column headings will display in the Column Names area.
If desired, you can see all of the data in your document by clicking the View Data button.
Click Next to continue:
5. Select the desired Activity Type and the corresponding activity type fields will display. In the example below, the corresponding CALL activity fields are displayed.
The data/column headings from your document will be available in the drop down menu on each field.
You can either select the desired data to import for each field, or type in a value. When data is selected, the field will highlight green; if a value is typed, the field will highlight yellow.
6. Select the desired data for each field.
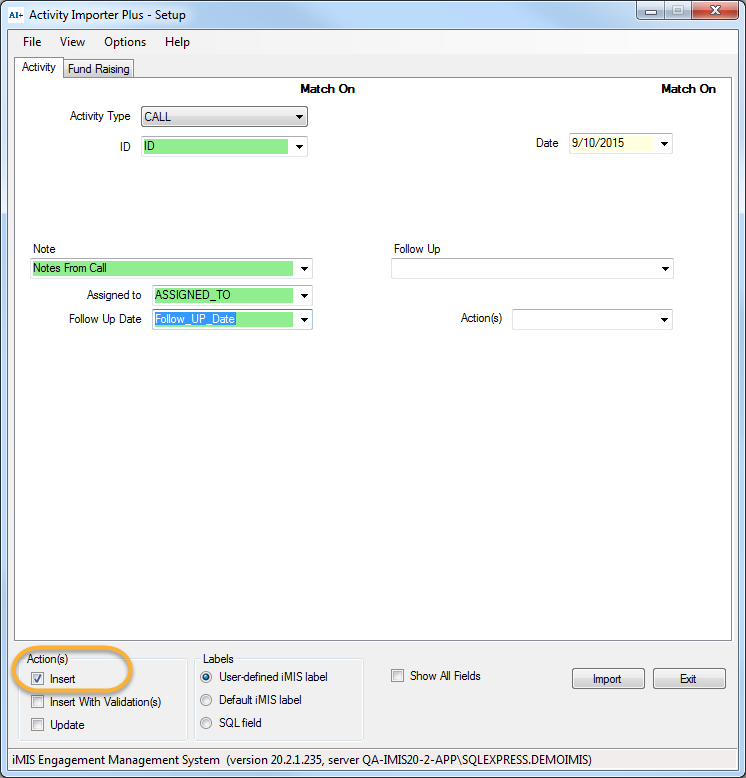
7. Depending on the type of Action(s) selected additional checkboxes labeled Match On will display next to each mapping field. If there is no option(s) selected, the Import button will be disabled.
NOTE: To import activities, you MUST map the ID field. To update, you MUST map ID and have at least one Match On field
Selecting the Insert action only will not display the Match On checkboxes.
In this mode Activity Importer Plus will always create new activity record(s).
Selecting the Insert With Validation(s) action will show the Match On checkboxes.
In this mode Activity Importer Plus will validate existing activities do not exist based on the criteria selected, i.e. Match On checkboxes.
Selecting the Update action will also display the Match On checkboxes.
The Update checkbox option determines the import process will do an UPDATE statement.
So this mode needs Match On checkboxes to find existing records to update.
When the Insert and Update actions are both selected, Activity Importer Plus will first try to update existing activity records, and if none is found the program will actually create an activity record.
8. For each field where you select the Match On box, Activity Importer will compare that field to existing activities for each iMIS ID in the document. If there are any existing activities where the data from those selected fields match, Activity Importer will not create a duplicate activity. You can select any combination of available fields on each activity for verification.
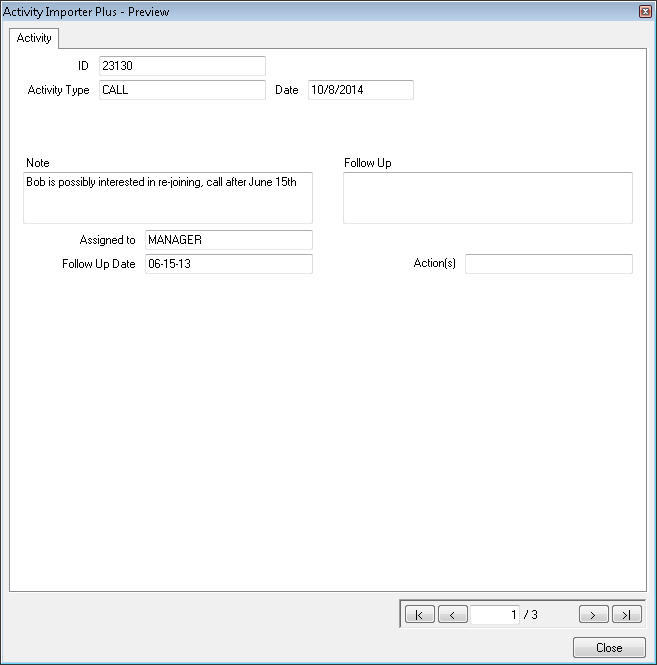
9. Before clicking Import, you can preview the activities that will be created. Select View > Preview Activity. This opens a window that replicates what the activity detail will look like when viewed in iMIS. You can cycle through each of the activities by using the left and right arrow buttons in the lower right corner of the Preview window. Click Close to return to your import setup.
10. The following options are available by clicking the Options menu item:
Do not prompt warning when selecting iMIS activity type – turn on/off warning message displayed when changing activity type.
Blank Value Text: - the text within an import file's field to be considered a valid blank entry.
(Gift Activity Type) Create new batch for each import – if selected, a new batch will be created for each import. Otherwise, the most recent open batch for the current day, if one exists, will be used.
(Gift Activity Type) Update batch control count/amount – if selected, the batch control count and amount will be updated with the count and amount of the import. Otherwise, the batch control count and amount will not be updated.
11. When you are done setting up your activity, click Import.
12. A dialogue box may pop up saying that the data to import could not be validated. This generally means that you are attempting to import a value that is not compatible with the field type. For example, you may have mistakenly entered text in a date field, or chose the wrong data field from your import document.
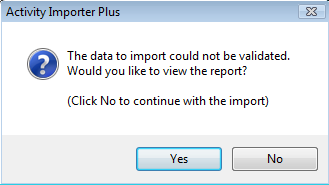
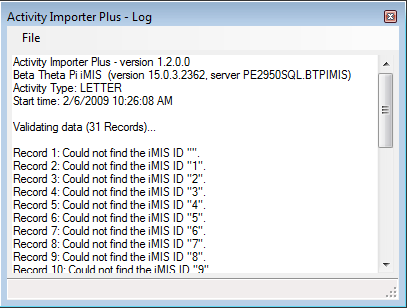
If you click Yes, the import will not be performed and the Log window will open and display the errors and field names for your review.
If you click No, the import will process using the information you specified during setup. If the error is on the ID field, no records will be imported and you will be prompted to view the Log.
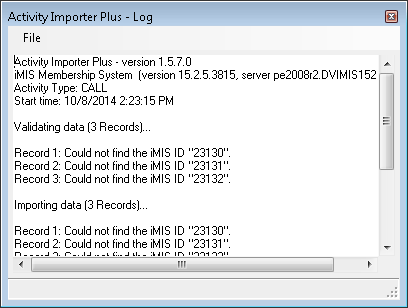
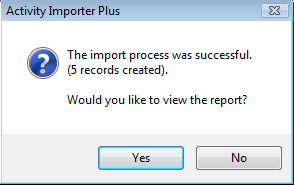
13. With a successful import, you will receive a dialog box that shows the number of records created. If you click Yes you can view the Log for the import.

14. Once the import is complete, you will be returned to the initial Activity Importer Plus screen. You may choose a new document and import more activities or click Exit.
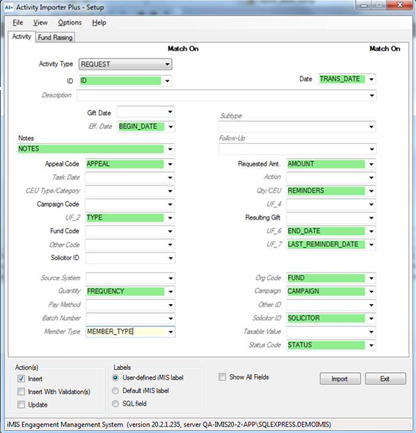
Importing REQUESTS
Please use the following mapping when importing REQUESTS. Please note, not all fields are supported (e.g., Recurring Request and Next Date).
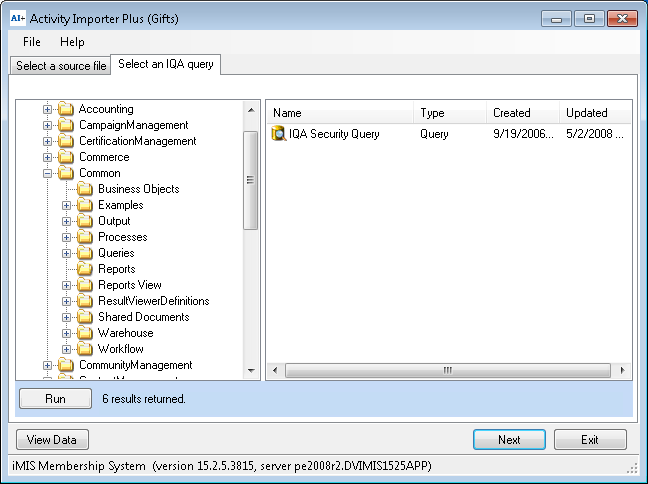
Importing From an IQA Query
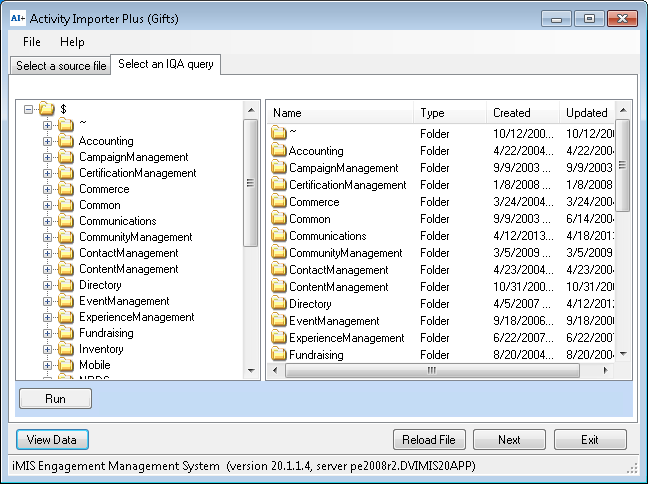
Choose the "Select an IQA query" tab and browse to the folder with the IQA query you want to use.
Double click on the desired IQA query. This will open the Intelligent Query Architect window.
You will default to the "Run" tab. However, you can review all of the settings for the chosen IQA query on the "Definition" and "Results tabs. If you wish to edit any of these, you must do so through the IQA interface in iMIS.
There are two buttons on the "Run" tab: Save and Close
Close allows you go back to the main IQA screen of AI+.
Save will load the results of the IQA into AI+ so you can begin setting up the activity field mapping.
After clicking Save, click Next.
4. Now you will see the same activity setup window that was used to import from a document. All of the same instructions apply
5. Select the desired Activity Type and the corresponding activity type fields will display. In the example below, the corresponding LETTER activity fields are displayed. The data/column headings from your document will be available in the drop down menu on each field. You can either select the desired data to import for each field, or type in a value. When data is selected the field will highlight green; if a value is typed the field will highlight yellow.
6. Select the desired data for each field. For each field where you select the Match On box, Activity Importer will compare that field to existing activities for each iMIS ID in the document. If there are any existing activities where the data from those selected fields match, Activity Importer will not create a duplicate activity. You can select any combination of available fields on each activity for verification.
7. Before clicking Import, you can preview the activities that will be created. Select View > PreviewActivity. This opens a window that replicates what the activity detail will look like when viewed in iMIS.
8. You can cycle through each of the activities by using the left and right arrow buttons in the lower right corner of the Preview window. Click Close to return to your import setup.
9. When you are done setting up your activity click Import.
10. A dialogue box may pop up saying that the data to import could not be validated. This generally means that you are attempting to import a value that is not compatible with the field type. For example, you may have mistakenly entered text in a date field, or chose the wrong data field from your import document.

11. If you click Yes, the import will not be performed and the Log window will open and display the errors and field names for your review.
12. If you click No, the import will process using the information you specified during setup. If the error is on the ID field, no records will be imported and you will be prompted to view the Log.
13. With a successful import, you will receive a dialog box that shows the number of records created. If you click Yes you can view the Log for the import.
14. Once the import is complete, you will be returned to the initial Activity Importer Plus screen. You may choose a new document and import more activities or click Exit.
Importing Gifts
Importing Gifts assumes you have purchased and installed the Import Gift license.
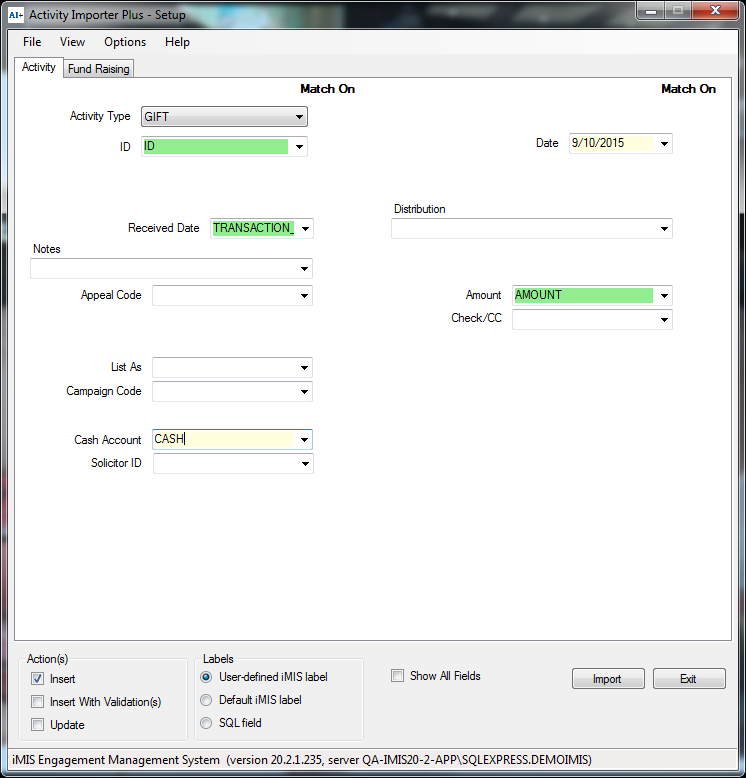
Select GIFT from the Activity Type dropdown list. You must have at a minimum the following fields:
ID – IMIS ID of donor
Received Date – Date the gift was received
Product Code – Distribution Code
Amount – Amount of the gift
Acct – Cash Account Code
Now you will see the same activity setup window that is used for other activity types. All of the same instructions apply
The import Gifts process takes longer than a normal Activity Import because it must perform additional operations in IMIS.
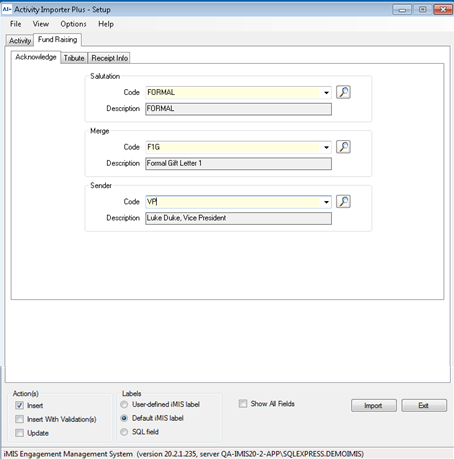
5. The fundraising tab will be selectable on Gift activity type.
6. The options available are the "Acknowledge", "Tribute", and "Receipt Info" tabs.
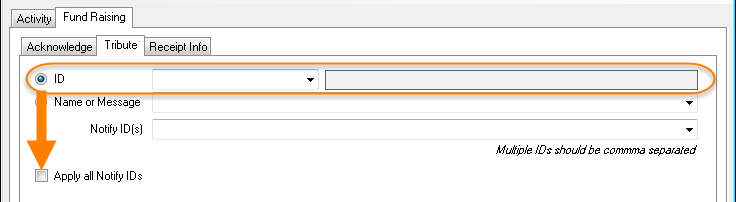
Similar to the configuration in iMIS the option Apply all Notify IDs is only available when the ID radio button option is selected:
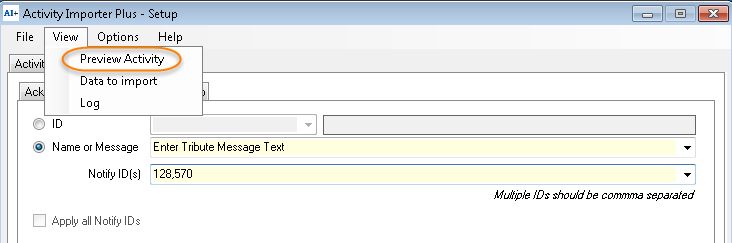
When selecting the radio button option "Name of Message" the "Apply all Notify IDs" checkbox will automatically be disabled and the textbox field to enter the tribute information will be available as well as the textbox for the "Notify ID(s)".

Notice the "Notify ID(s)" text field can be left blank. It can also be an iMIS ID or a list of iMIS IDs separated by commas. The value can be coming from one of the file columns or entered manually (which will put the same value for all activities imported).
You can use the Preview Activity menu option to sample the result of the selection made on the Tribute options:
Setup Gift Receipt Number
Starting from version 1.4.4, Activity Importer allows setting gift receipt number.
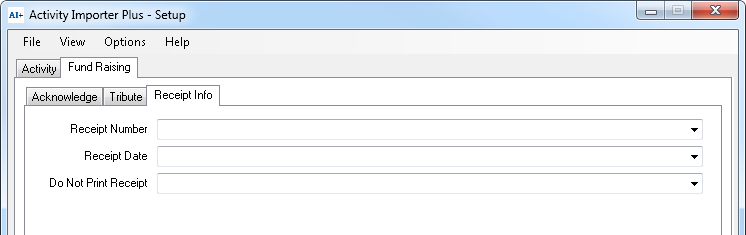
The Receipt Date field can be left blank, in which case the program will use the Gift Transaction Date for the Gift Receipt Date Issued.
Upon selecting a Receipt Number, the Do Not Print Receipt option will automatically be set with the constant value of "1."
Valid values for the Do Not Print Receipt option are either "1"or "0"because the destination field (Trans.DO_NOT_RECEIPT) is set with a SQL type of "tiny int."
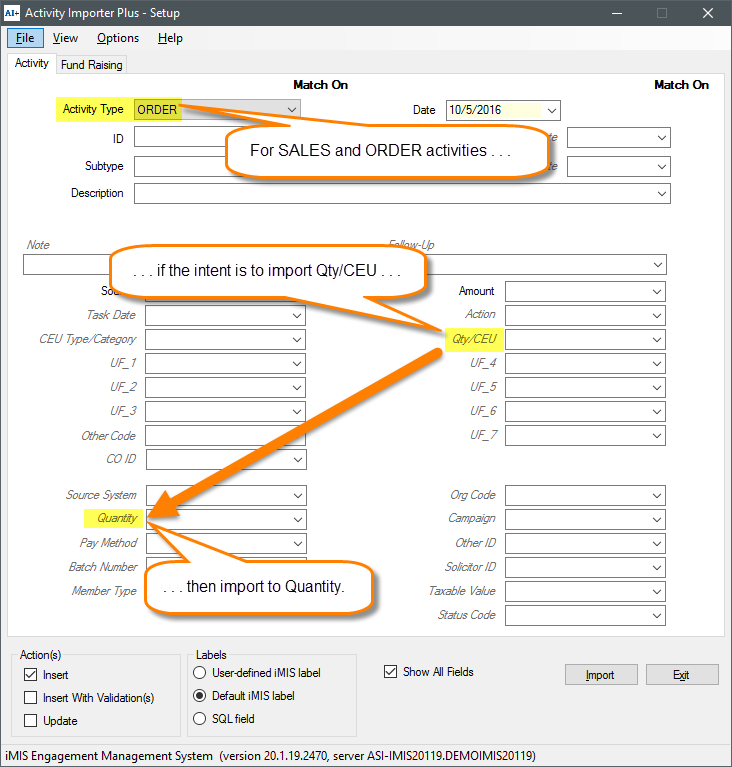
Importing SALES and ORDER Activities
There are special considerations when importing SALES and ORDER activities.
From the ASI "Activity types window" documentation:
Note: For SALES and ORDER activity types, the system stores the values entered in the Qty/CEU field in Activity.QUANTITY. For all other activity types, the system stores the value entered in the Qty/CEU field in Activity.UNITS.
Therefore, to match the behavior of iMIS when importing SALES and ORDER activities, data which normally would be imported to Qty/CEU ("Default iMIS" label mode) should instead be mapped to Quantity("Default iMIS label" mode).
Troubleshooting Activity Importer
User is unable to log on into Activity Importer
Activity Importer does not require an Authorization Level of 4 in Customers. It only requires that the Access Keyword CSIACTIVITYIMPORT or AI+ be in place for the user. (See About Access Keywords)
If you have any issues with Activity Importer Plus, please contact CSI Support at support@csiinc.com. Tickets are normally responded to within 1 to 2 business days after they are submitted.
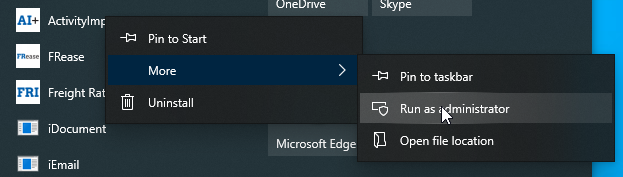
Upon opening a newly installed version of Activity Importer, you may be required to enter your SQL admin login/password so that the program may update SQL objects. In this instance, you should run the product as admin. Right click the product, click More, then click "Run as administrator".
Release Notes
Version | Date | Notes |
|---|---|---|
1.9.1 | 1/8/2025 | Amend script csi_sp_ConvertGiftToInvoice (CW 147236) not setting AR_ACCOUNT on Invoice record during GIFT imports. |
1.8.0 | 11/1/2023 | Bug in the csi_sp_GiftImporterUpdateBatch script. Violation of PRIMARY KET ‘PK_Trans_SoftCredit’ - When writing gifts, AI+ will write into custom tables suchas csi_GiftImportTrans. When done, it should remove those records. If these records are left you will run into this issue. This issue has since been fixed. (CW 134267) |
1.7.0 | 12/13/2021 | Compatibility for iMIS EMS on premise |
1.6.3 | 10/11/2021 | Correct display message (The import process failed) when import is successful. (CW 111131) |
1.6.1 | 6/7/2021 | Allow support for importing larger imports (more than 5k records) of activity records. (CW 106257) |
1.5.43 | 11/5/2019 | Recompile to pull in changes to licensing core (CW 41982) |
1.5.41 | 4/16/2019 | Remove List As – “L:” from Import of Gifts. Needed in older version of iMIS. Not needed now. (CW 78696) |
1.5.40 | 12/19/2018 | Update handling of Notes and Follow-up fields longer than 255 characters (CW 79675) |
1.5.39 | 1/18/2018 | Updated CSI.Core (CW 72484) |
1.5.38 | 8/11/2017 | Update handling of blank values in spreadsheets. (CW 69411) |
1.5.37 | 5/23/2017 | Fix issue with time handling for transaction dates in stored procedures. (CW 67481) |
1.5.35 | 2/28/2017 | Add soft credit ID tab to fund raising to allow soft credits to be imported along with gifts. (CW 65825) |
1.5.31 | 12/1/2016 | Fix issue with handling NULL or blank dates. (CW 64661) |
1.5.30 | 09/28/2016 |
|
1.5.29 | 09/06/2016 | Fix labels for UNITS and QUANTITY fields. (CW63263) |
1.5.28 | 07/15/2016 | Fix UI to match setup with preview (CW 54784) |
1.5.27 | 4/11/2016 | Fix issue with license prompt. (CW 59148) |
1.5.26 | 3/28/2016 | Fix issue with iMIS 20 causing amount to double when importing gifts. (CW 59357) |
1.5.25 | 1/18/2016 | Fix retrieving user info when missing Name_Security data (CW 52466) |
1.5.24 | 11/25/2015 |
|
1.5.23 | 11/6/2015 | Fix SQL field label. (CW 51832) |
1.5.22 | 9/2/2015 | Additional label options available. (CW 47235) |
1.5.21 | 7/30/2015 | Fix loading issue with Intelligent Query Architect support (CW 49221) |
1.5.20 | 7/22/2015 | Fix connection issue with DSNs (iMIS 10.6) (CW 49072) |
1.5.19 | 7/15/2015 |
|
1.5.18 | 7/8/2015 | Fix bug with Login control not accepting valid URL (CW 48242) |
1.5.17 | 5/14/2015 | Enhancements to product login and licensing and fix JIT debugger error (CW 46312) |
1.5.12 | 3/9/2015 | Fix bug with Gift Licensing error message (CW 45762) |
1.5.11 | 2/12/2014 |
|
1.5.9 | 12/8/2014 | Minor installation program update (CW #43919) |
1.5.8 | 11/5/2014 | Update login control and IQA initizalization. Fix issues with casual users not able to login (CW #43150) |
1.5.7 | 9/30/2014 | Fix Show All checkbox not working (CW #41026) |
1.5.6 | 9/23/2014 | Fix XLS file support (CW #41026) |
1.5.5 | 9/3/2014 | Fix international date import bug (CW #32915) |
1.5.4 | 7/22/2014 |
|
1.5.3 | 5/27/2014 | Provide additional information message on issue connecting to IQA web servcies (CW 38860) |
1.5.2 | 5/14/2014 | Add diagnostic windows when missing iEmail Web Services version 2 (CW 38860) |
1.5.0 | 3/31/2014 | Update IQA support to work with iEmail Web Services version 2 (CW 38860) |
1.4.5 | 3/18/2014 |
|
1.4.3 | 12/11/2013 | Implement new option settings used with gift importing to:
|
1.4.2 | 12/9/2013 | Fix issue of batch amounts and counts not being incremented correctly on additional gift imports (CW 33281) |
1.4.1 | 11/18/2013 | Add usage information label for multiple Notify IDs (CW 35752) |
1.4.0 | 10/29/2013 | Add support for mapping to Notify IDs (CW 35752) |
1.3.13 | 8/9/2013 | Fix the issue of login control Web Server URL (remove "/cs" or "/cs2") for iMIS 20 |
1.3.11 | 8/2/2013 | Include and register csi.IQANavCtrl.ocx |
1.3.10 | 7/11/2013 | Apply Login Control support for iMIS 20 |
1.3.9 | 6/4/2013 | Integrate with new Login Control |
1.3.8 | 5/1/2013 | Fix import validation on blank text field for date fields (CW #29579) |
1.3.7 | 4/4/2013 |
|
1.3.6 | 12/10/2012 | Add support for Activity updates (versus inserts) (CW 29190) |
1.3.5 | 11/21/2012 |
|
1.3.4 | 10/29/2012 |
|
1.3.3 | Update for better warning box. No Yes/No answer for a warning message | |
1.3.1 | Update to Gift importer to only allow gift install for iMIS 15.1.3 and higher | |
1.3.0 | Add new reload button to reload file (CW 24315) | |
1.2.9 |
| |
1.2.8 |
| |
1.2.7 |
| |
1.2.6 |
| |
1.2.5 | Add Primary Key Constraint as an option | |
1.2.4 | Update CSIUtil.DLL library file to allow custom connection string | |
1.2.3 |
| |
1.2.2 | Fix support for iMIS version 15.1 | |
1.2.1 | Add support for NULL parameters | |
1.2.0 |
| |
1.0.15 | Add support for iMIS Intelligent Query Architect as data source | |
1.0.14 | Fix issue when loading Excel file containing spaces in worksheet name | |
1.0.13 | Fix potential login issue with iMIS 15 | |
1.0.12 | Support for iMIS 15 | |
1.0.11 | Miscellaneous fix | |
1.0.10 | Miscellaneous changes | |
1.0.9 |
| |
1.0.8 | Fix Activity Field used for the prompt Qty/CEU depending on the Activity Type | |
1.0.7 | Add new Access Keyword "AI+" |