
Creating a Power BI Data Warehouse Workflow
Overview
This guide explains how to create a lightweight data mart or warehouse-esque solution for storing historical iMIS data in Azure Blob Storage, and then connecting Power BI to report on that data.
This guide does not cover:
Data warehousing concepts like cubes, dimensions, or facts
Official Data Warehousing solutions, such as Azure SQL Data Warehouse, Azure Data Lake / OneLake, AWS Redshift, etc.
Detailed Power BI queries or other reporting techniques for visualizing historical data
Prerequisites
In order to follow along with this article, you'll need:
Microsoft Power Automate
The iMIS Connector by CSI
Microsoft Power BI
A Microsoft Azure Storage Account (with blob access)
Setup
Create IQAs to Expose Data
Create as many IQAs as you need to expose your data. These IQAs will be run on a schedule, so the data in the IQAs should be a snapshot of the data you want to report on over time.
In the sample below, we have two datasets - a count of contacts by member type, and an order total by the order category.
These are just samples - you can expose whatever data you'd like, and also run the workflow as often as you'd like! You can have daily, weekly, quarterly, or even hourly data if you so choose!
Create a Scheduled Workflow
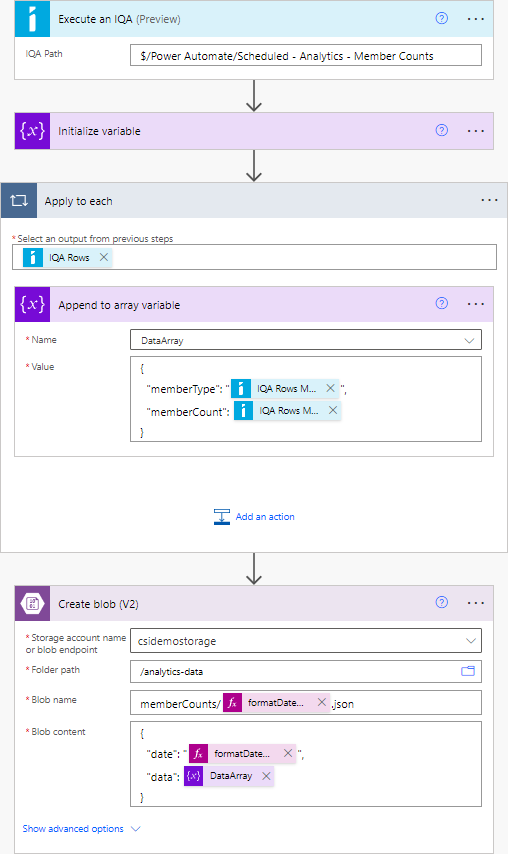
In Power Automate, create a scheduled workflow and define when and how often you'd like the data you defined to be snapshotted.
In our example above, I've chosen "Start on: 5/1/2023 at 1:00 AM" and "Repeat Every 1 Day".
Here's the basic outline of the workflow:
(Trigger) On a schedule
Execute an IQA
Initialize a variable (Type: array)
For each record in the IQA results:
Append a JSON object to the array variable
Create a blob in Azure Storage with the path: <data category>/<current date>.json (e.g. memberCounts/2023-05-12.json)
Create the Report
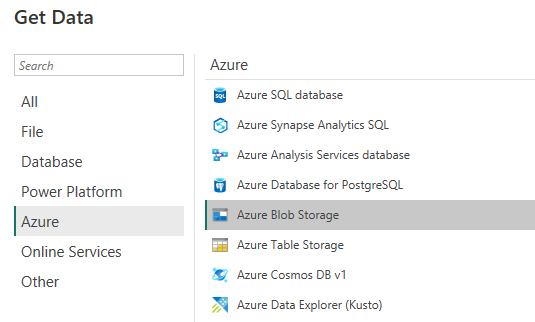
In Power BI, click "Get Data". In the data source selection window, under Azure, select Azure Blob Storage.
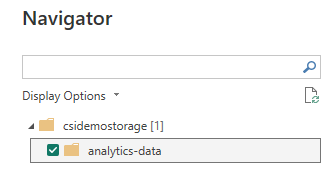
Authenticate using your preferred method. On the Navigator screen, select the blob container that contains your JSON data files:
Click Transform Data.
You'll see a list of your files (assuming that you've run the Power Automate flow at least once). We can tell Power BI to extract the contents of the files themselves, not just the list of files.
To do this, find the Content column, right-click, and select Transform > JSON.
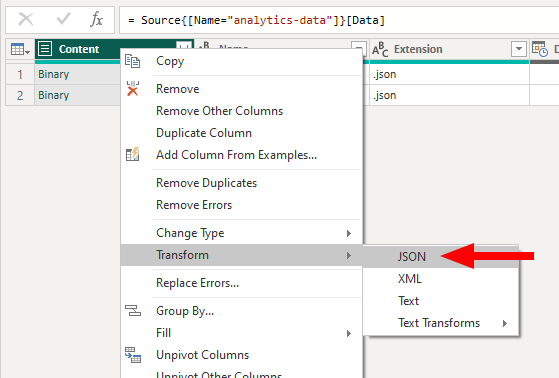
You'll notice that the column has changed from Binary to Record.
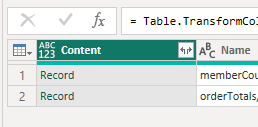
We can now tell Power BI to expand this column and incorporate the data into the dataset. Click the small <> icon alongside the Content column, and click OK on the popup (we want to include all properties).
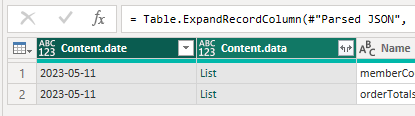
Depending on how you have structured your data, you'll see some additional columns. If you have a nested array, you'll see an object of type List. This list can be expanded so that, instead of one row representing one file, a row can represent one item in the list. (Similar to database denormalization.)
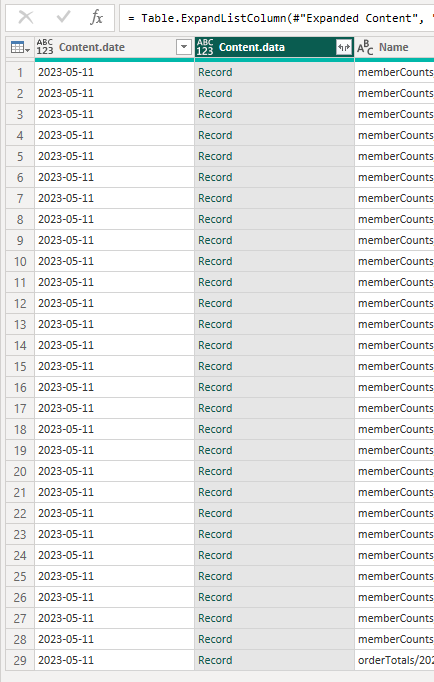
Click the small <> icon alongside your List column, and select Expand to new rows.
Almost there! We just need to tell Power BI that we want to expand this Record column into multiple individual columns. Click the small <> icon again and click OK.
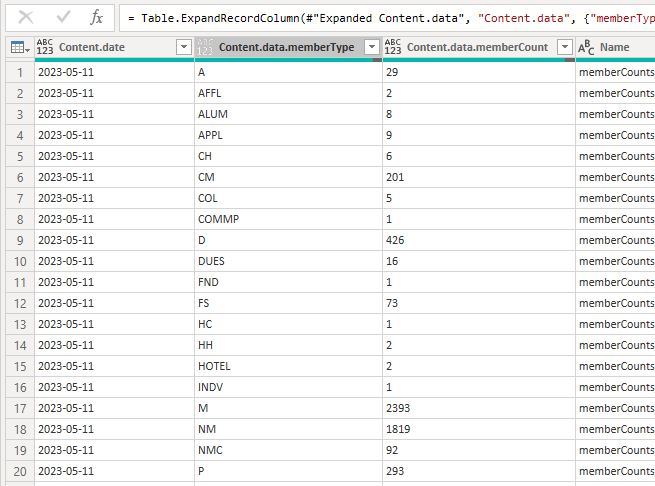
Hooray! We have our data in a usable format!
You can now proceed to rename or delete columns, change their type, or otherwise perform any other necessary M query operations on your data, and click Close & Apply to begin reporting!
Schema Warning
If your JSON objects have different property names within them (e.g. you don't have a well-defined schema that can be represented within a table), Power BI may not be able to extract all of the information in each object. We recommend that all of your objects contain the same property names (within a given dataset).
It is possible to work with schema-less data in Power BI, however that is outside the scope of this article.