
Workflow
Overview
The concept of workflow in ICE is used to define types of transactions that can be performed and the business rules around those transactions. Transactions can be membership transactions, committee transactions, or forms processing. Workflow also dictates approvals and how the data from transactions are written back to iMIS.
Workflow rules are the business engine that powers ICE. Once you have determined your workflow rule, you must define the following:
Product Definition
Workflow Qualifiers
Workflow Approvers
Invoice Rules
Additional Information
Activity mapping
Settings » Configuration
The workflow configuration sets the constants for values related to workflow. Workflow configuration is used to define the name of the approval groups, default behavior for approvals, and default settings for new members that are created in ICE. 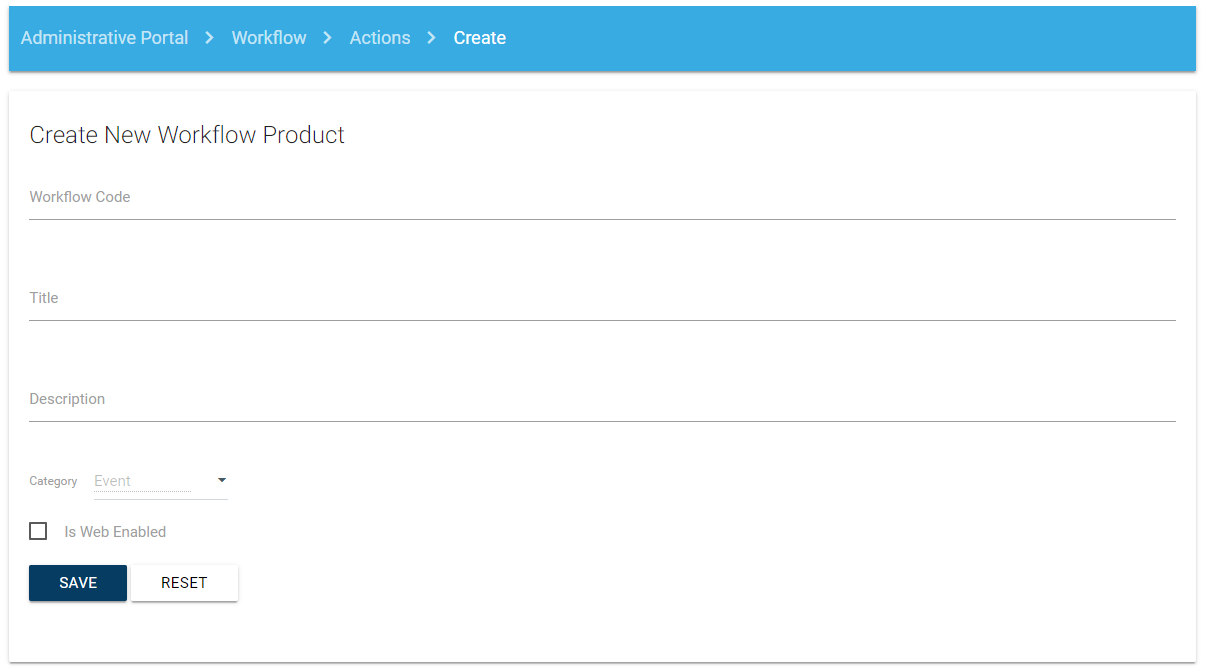
Settings » Approver Groups
Approver Groups are used to define the approval matrix that a workflow product will follow. There may be up to five approver groups. Each approver group may have different roles for each type of workflow product. For each approval group there will either be a list of contact people who fall into the approval group or a SQL statement that defines the group. The approvers are only allowed to Approve or Deny the action. An email can be sent to the appropriate individual, which would be defined in the Notifications section in ICE. 
Actions » Create
Workflow products are the codes used to define each type of activity that a member can complete within ICE. Workflow products generally have a one-to-one relationship to a change in membership status. The title of the membership action will appear in lists for members to choose from, so it should represent the common term for the change in membership standing (Join, Initiate, Graduate, etc.). Workflow products also apply to changes in leadership and forms processing (with each form representing a workflow product) and is considered the header record for what the transaction can be set to.
To create a new Workflow Product:
Select Workflow > Actions > Create
If there is a workflow action that is similar to the new one you need to create, you can select to Clone the action.
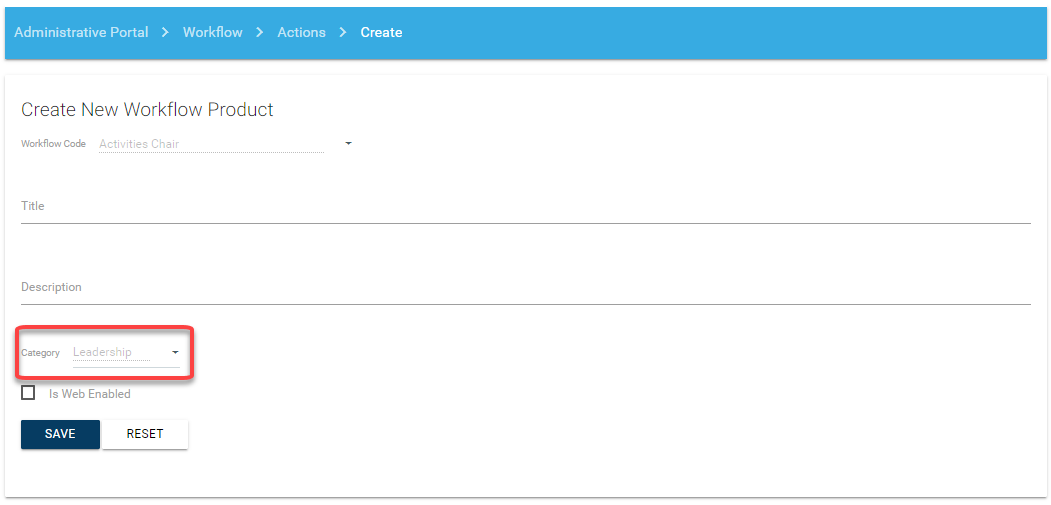
Select a Category
Leadership actions will populate the position codes from the iMIS database
Enter a Code: no spaces, 30 characters, cannot be modified
Best Practice
CSI recommends using a standard naming convention (PREFIX_Activity) to support search capability and consistency. Use the predefined prefixes in your codes: MEM = Membership actions, LEAD = Leadership actions. The code should match the activity or product code in iMIS, such as MEM_INITIATE.Enter a Title: displays in ICE, 30 characters
Enter a Description: displays in ICE, 255 characters
Select Web Enabled checkbox if the action will be used in ICE (workflow actions can be set up in ICE to create a workflow process for iMIS)
Click Save.
Membership workflow product example:
Leadership workflow product example:
Workflow Qualifiers
Workflow qualifiers are used to limit those members who qualify for each member transaction, essentially acting as filters. The qualifiers are defined by which product they apply to, a demographic, and then the value of the demographic. A single workflow product can have unlimited qualifiers and each qualifier MUST be added for the filter to be applied. Qualifiers must be defined before they can be displayed. An example is that a member cannot be initiated unless they are a new member in good standing, or alumnae members may not serve in collegiate leadership roles.
To set up a Workflow Qualifier:
Click Add new qualifier.
Select the Demographic Name from the drop down. These values are defined in the Demographics section.
Enter the Value (code) that the rule will validate against to perform the action. These values are defined in iMIS.
Click Insert to save the change.
Qualifiers work as "AND" relationships for demographics that are different. If the demographic is the same, it will treat the qualifier as an "OR" relationship. For example, the following qualifiers will apply to any member with a member type of 'COL' or 'NEW' and their status must be 'A'. 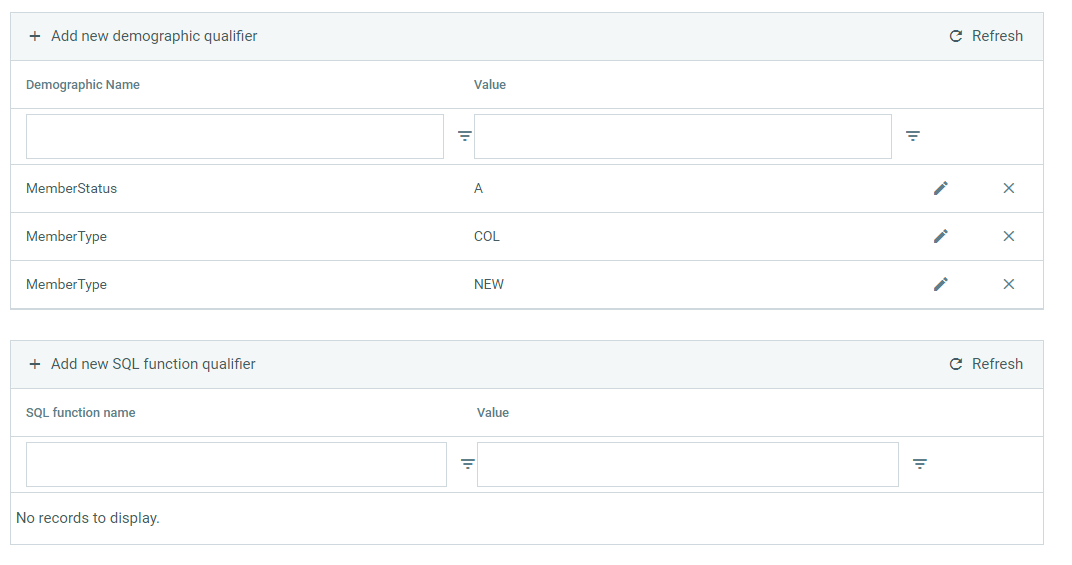
Approval Group Requirement
The approval group requirement determines which workflow products will be subject to approval.
To add approval step:
Click Add new record
Select Approver Group name from dropdown
Level: Approver Group number
Required Count: number of approvals required per Approver Group
Example: Required Count of 2 requires 2 users within the approver group to approve the transaction.

Best Practice
CSI recommends using an approval step for actions that truly require manual intervention before the action is completed. If the approval step is used for review purposes only and the action will never be denied, CSI recommends utilizing reporting to review data post submittal and follow up if needed. This recommendation is to reduce the amount of manual intervention required as much as possible.
Invoice Rules
Invoice rules determine the pricing to be applied for each workflow product. Generally this applies only to a membership action. The sale product codes map to the corresponding code in iMIS. Pricing is defaulted from iMIS unless a price is specified in ICE (we recommend that prices should not be overridden). Pricing can also be configured on a variable basis using a SQL statement. Each charge needs to be indicated as either a charge or credit. Certain product prices will be displayed in the transaction summary window as a running tab for the member/chapter to verify as they are working in the Chapter portal.
To set up an Invoice Rule:
Click Add new record
Select the Sale Product Code (product) from the drop down. These values are defined in iMIS.
Enter the Price or leave blank to allow iMIS to assign the value.
Enter a SQL statement to assign variable pricing.
Select the Billing Type from the drop down.
Charge: use this to charge the member
Credit: use this to credit the member (if the pricing in iMIS is not negative)
Do Not Bill: use this to define a rule that does not bill the member/chapter
Click Insert to save the information
Note: To assign a value to a product not in the iMIS product table, you would need to set up a gen table, then reference that table in your set up in the Additional Information Module.
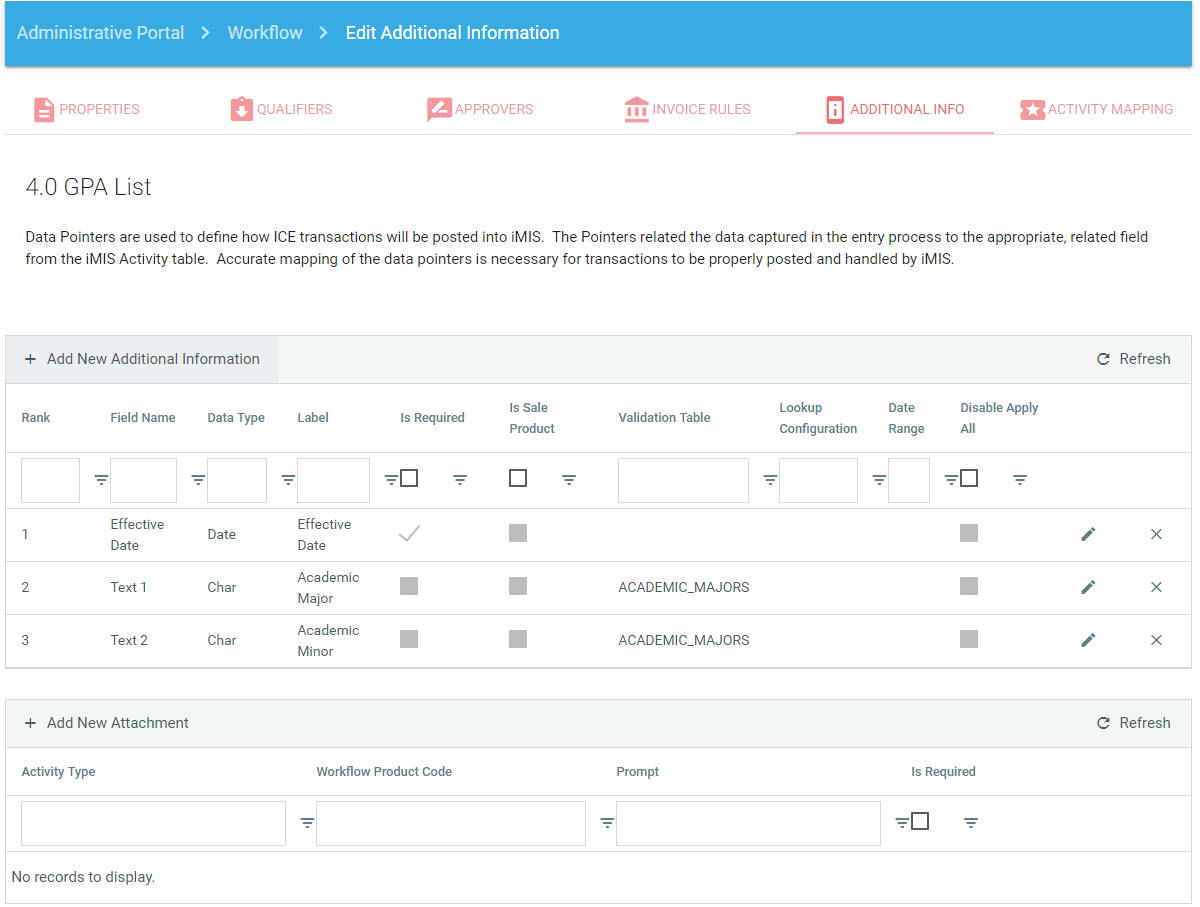
Additional Information and File Upload
Additional information allows you to complete the data gathering process for membership actions. These are fields where you want the user to enter key data regarding the transaction they are processing. Examples include effective date, member number, additional information, and attachments. The only field a user is required to enter on a leadership transaction is the effective date.
In order for a user to view an attachment that was added during the workflow action, they must have the ViewAttachments security permission.
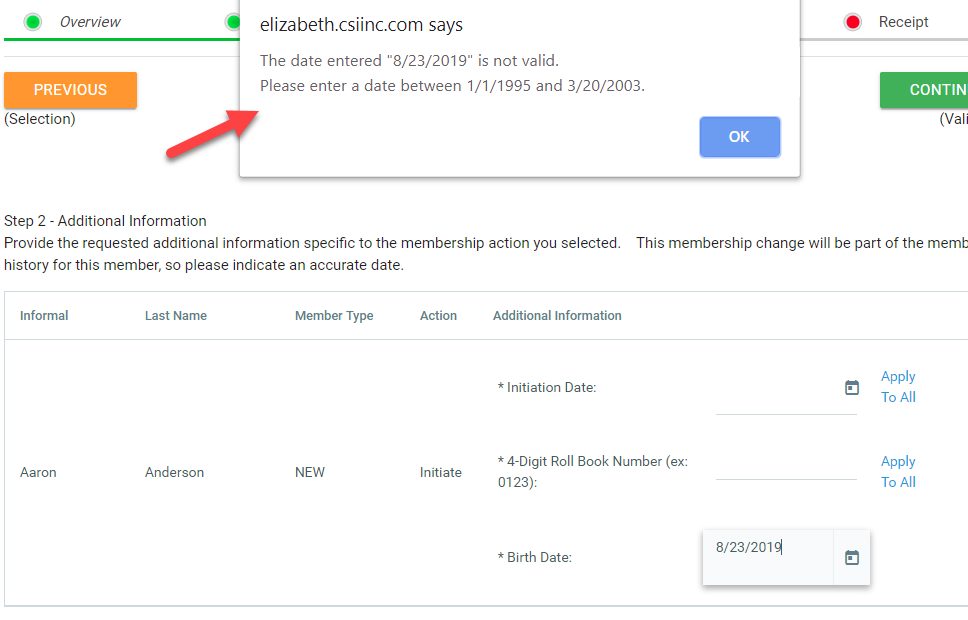
To add a date validation, enter the parameter for the acceptable number of days that will create the range of dates. Effective Date field validation will only give a warning message. For other date fields, the user will not be able to continue until an acceptable date has been entered. In the below example, the date entered for birth date must be between 6000 and 9000 days in the past (i.e. 16 to 24 years ago). 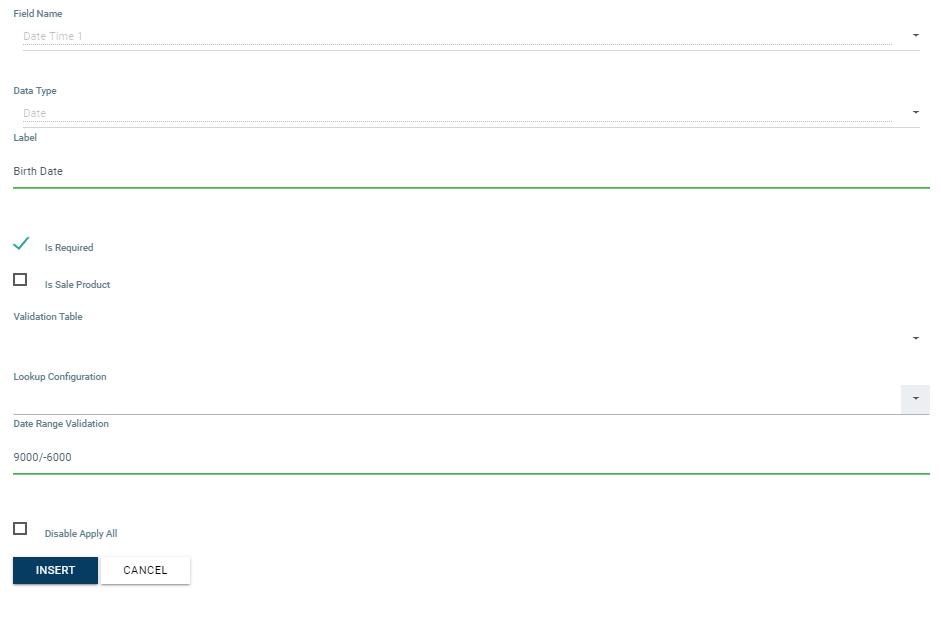
If the date is out of range, a message will appear to show date is invalid and inform the user of the approved date range. After clicking OK on the message, the date will be cleared for the user to re-enter the correct date.
To set up Additional Information - define the following fields:
Field Name | Description | Value |
|---|---|---|
Field Name | Drop down list of available fields in iMIS for each transaction | Field Name options: Effective Date, Transaction Date, Var1,2,3, Text 1,2,3, Integer 1,2,3, etc. |
Data Type | Drop down list that specifies the format of the data being entered | Data Type options: Char, Int, Money, Number, Checkbox, Date, Time, DateTime |
Label | This will be displayed to the member when filling out the form. | User defined |
Is Required | User defined field to determine whether the information will be required (check) or not required (unchecked) | Checkbox |
Is Sale Product | Used to tell iMIS that the code can be used to generate a sales order. | Checkbox |
Validation Table | Allows the value to be pulled from a drop down list stored in an iMIS General Table. Make sure this table exists in iMIS to ensure integration and expected results. | Gen table name |
Field Name Cross Reference for Additional Information:
Data Type | Fields Name to Use |
|---|---|
Date | Effective Date, Transaction Date, or DateTime |
Description | Var 1, 2, or 3 |
Text | Text 1, 2, or 3 |
Integer | Integer 1, 2, or 3 |
Money | Float 1, 2, or 3 |
Number | Float 1, 2, or 3 |
Checkbox | Boolean 1, 2, or 3 |
Any | SQL Variant 1 - 6 |
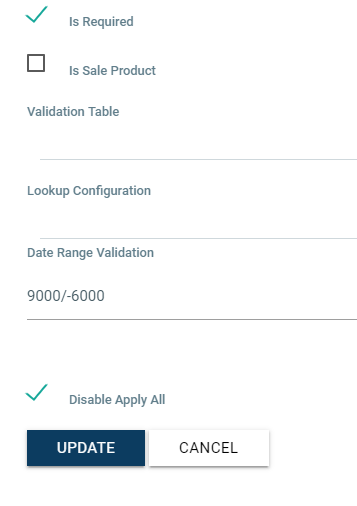
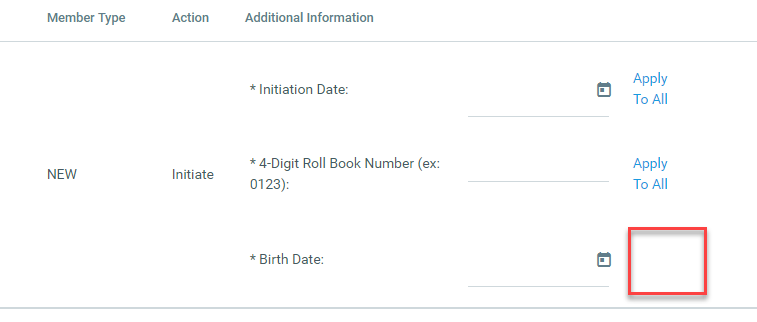
Disable Apply To All option:
You may specify to not provide the Apply to All option for the Additional Information fields in cases where you prefer the user individually complete the field for each member selected.
For fields that you do not want to show Apply to All, select edit and check the box to “Disable Apply All” and select Update.
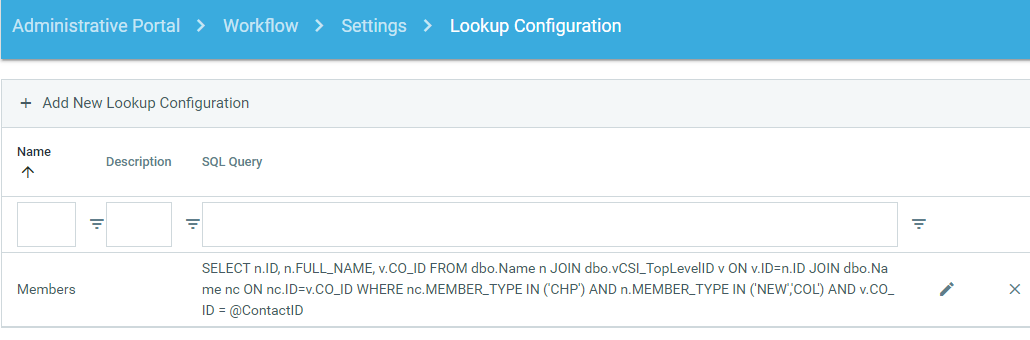
Lookup Configuration lists:
Lookup validation tables can now be used within workflow actions as well as forms. Lookup validation tables are created in ICE Admin under Workflow > Settings > Lookup Configuration. These tables provide a way to add a SQL query to dynamically display a drop down list without having to create a General Lookup Validation table in iMIS. This is best used for lists that frequently change, i.e. member list, chapter list, etc. The ability to use this feature for forms was added in version 4.9.
In ICE Admin, go to Workflow > Settings > Lookup Configuration
Select Add New Lookup Configuration
Note: The SQL statement needs to return 2 values in the following order:
The CODE value
The DESCRIPTION value
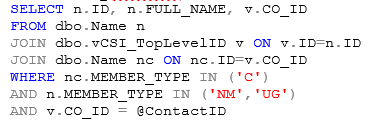
Example SQL to produce list of current active chapters

Example SQL to produce list of member names: If the list should be unique to the chapter, add a parameter for Chapter ID = @contactid (same process for reports).
You can also use @UserID to represent the current authenticated user ID.
Use Validate feature to confirm SQL query
To setup File Attachments for Workflow actions:
Click Add New Attachment
Define the prompt for the file and if it is required.
Define the Activity Type that will be generated per action.
The @File_URL is the field that will define the link to where the file can be accessed after it has been uploaded.
Note: For users to be able to view the attachment in ICE, they must have the ViewAttachments security permission. See the Security user guide for additional information. 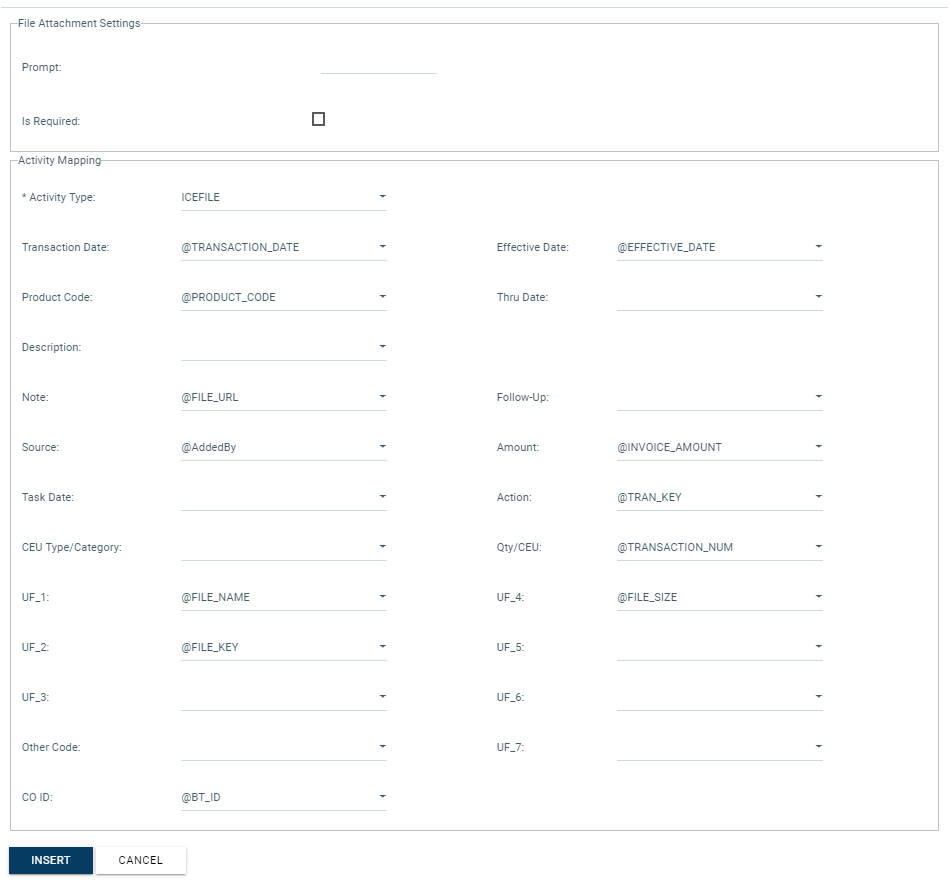
The default file size limit in ICE is 4MB. If the default file size needs to be modified, go to Workflow > Settings > Configuration > Ice.Workflow.AttachmentUploadMaxFileSize (in KB).
Activity Mapping
Once a workflow item is processed through the system, it will then be written to the iMIS activity table, with the exception of forms, which go directly to a user defined table. Activity mapping uses the data stored about the transaction (including values the system has defined automatically) and maps those values where appropriate to an activity. Activities are also written in sequence, for example, an officer should be removed from office before the new one is appointed.
The fields on the activity mapping table match directly to the structure of the activity table in iMIS. Most entries to the activity mapping table should correlate to an entry made in iMIS using the regular user interface to validate the mapping.
Default mapping is defined when a leadership action is created. Each leadership Workflow Product requires two activity mappings. One will end the term for the person that currently holds the position, and the other will create a new committee activity for the person being added to the position.
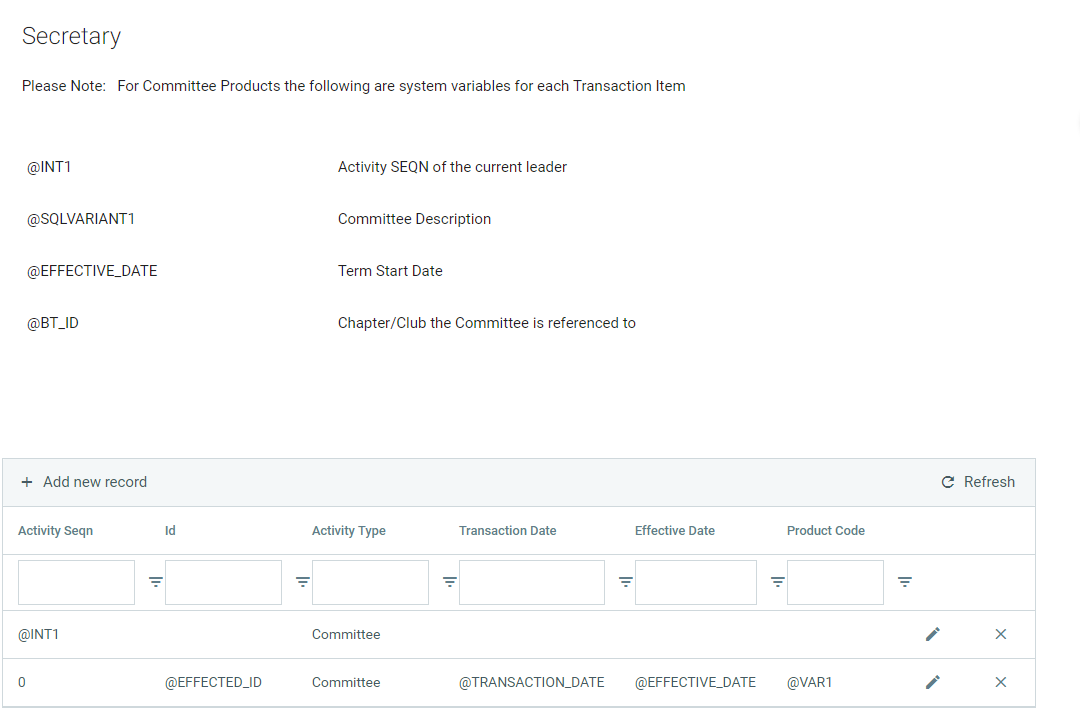
Activity Mapping to end the current position:

Activity Mapping to add new person to position:

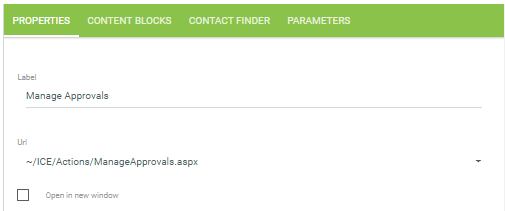
Manage Approvals
To manage workflow actions with approval requirements, a sitemap menu option must be added using the manage approvals URL.
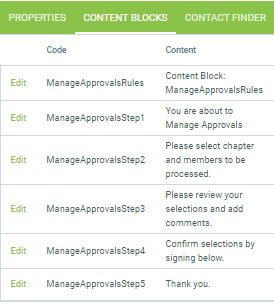
Instructions for each step of the approval process can be added using the applicable content blocks that can be easily located within the sitemap configuration.
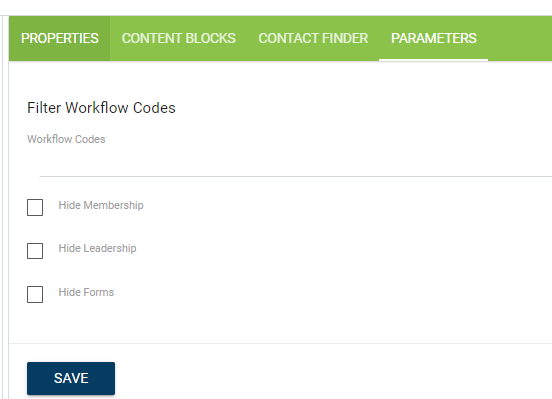
On the parameters tab of the sitemap node, you have the ability to specify workflow action codes in cases where you only want specific actions to appear on this manage approvals page. You can also decide to hide specific types of workflow actions rather than specifying the workflow action codes.
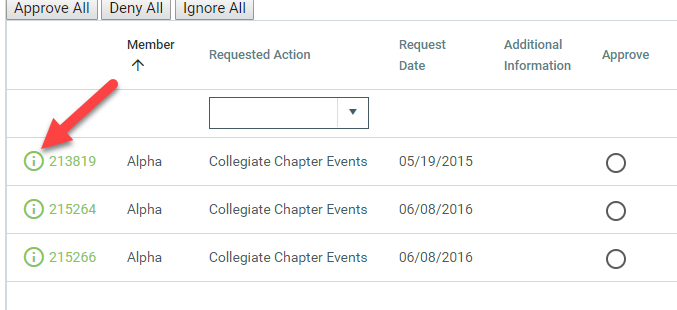
To manage an approval:
Go to the manage approvals menu option
Click continue
Select the chapter on the left side that has approval required actions
Select the type of action to approved:
Form
Leadership
Membership
You may sort or filter the members in the approval list by clicking on the requested action column heading to sort alphabetically or select the filter icon to identify which types of requested actions you would like to review.
By clicking on the information icon, you may do several actions:
Add Internal Notes: this may be used to update an action that is not ready for approval or denial
Edit Form Data: information submitted via an ICE form can be edited at the approval stage if desired
Edit Additional Information: information selected as additional information can also be edited
Membership Updates
ICE allows you to configure the updates to records that the workflow action should make once the transaction is completed.
To add a membership update:
Go to Workflow > Review > Manage Membership Actions
Click Add new Record
Select the table where the field to be updated is located
Select the field to be updated
Enter the value or statement in the SQL query field to designate how the field should be updated.

Additional Setup for Leadership Workflow
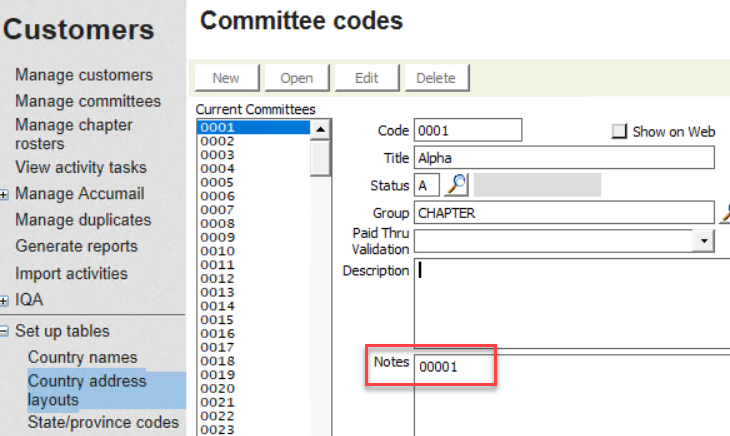
Committee Code
For committees that are linked to a chapter type record, the Notes field of the committee code should have the iMIS ID of the chapter type record. This value supplies the GROUP_ID field within the view: vcsi_ICE_CommitteeRoleSimple.
Example: Alpha Chapter - iMIS ID 00001
Committee Groups
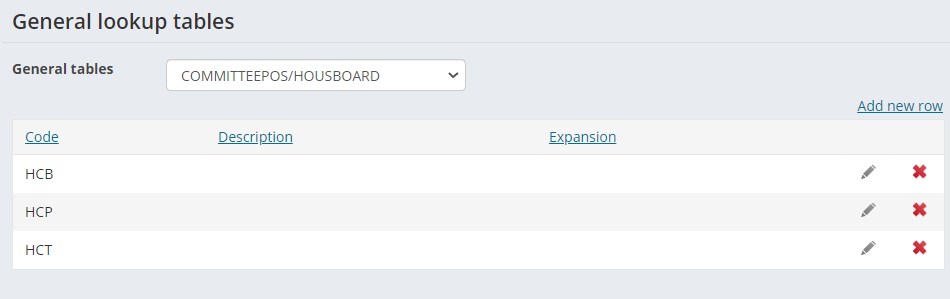
Use these steps to define the Committee Groups that you want to manage by creating General lookup/validation tables in iMIS. Before beginning, determine what group you would like to manage, and the specific ACTION_CODE (position codes) for each committee position in that group.
Create a lookup table in iMIS for the committee group you want to manage.
Name the table COMMITTEEPOS/ICEgroupname such as:
COMMITTEEPOS/CHAPOFFICERS: for collegiate officer positions
COMMITTEEPOS/ADVISORS: for collegiate chapter advisors positions
COMMITTEEPOS/HOUSBOARD: for house corporation board positions
COMMITTEEPOS/ALUMCHAP: for alumnae chapter officer positions
Add values to the table for the ACTION_CODE of each position that you want available in ICE
You only need to populate the CODE field in the lookup table
Sitemap Configuration
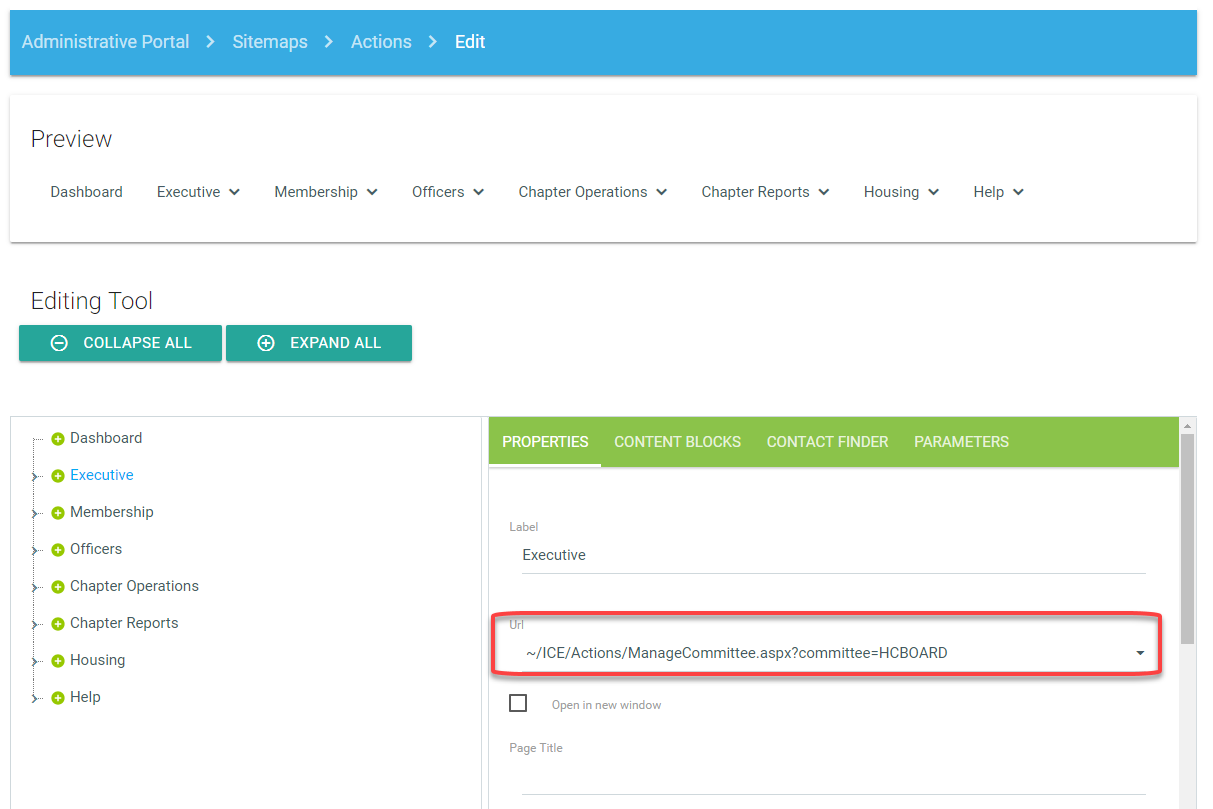
The final step is to add a link for the new manage committee functionality to the applicable sitemap.
Go to Sitemaps > Manage > Edit
Select to Edit the applicable Sitemap
Add a new Sitemap Node in the desired menu area or select a current menu item
Select the manage committee URL and add the committee group name created above after the equal sign.
Example: ~/ICE/Actions/ManageCommittee.aspx?committee=HCBOARD
Click Save
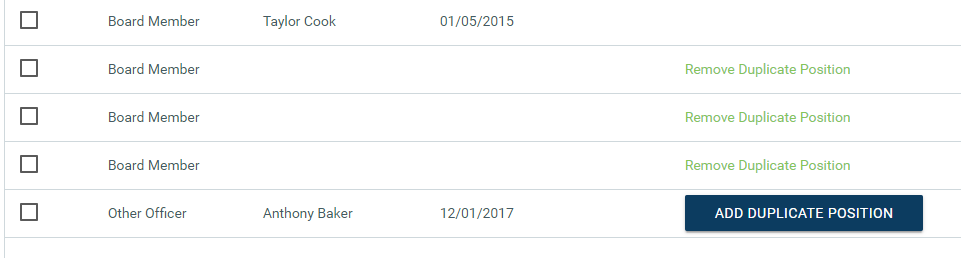
To allow chapters to create a duplicate position for cases when more than on member is serving with the same position title, select the parameters tab.
For each position that you would like to allow to be duplicated, select Edit and modify the number to specify how many times the position can be duplicated. (1 = one duplicate, 2 = 2 duplicates, etc.)
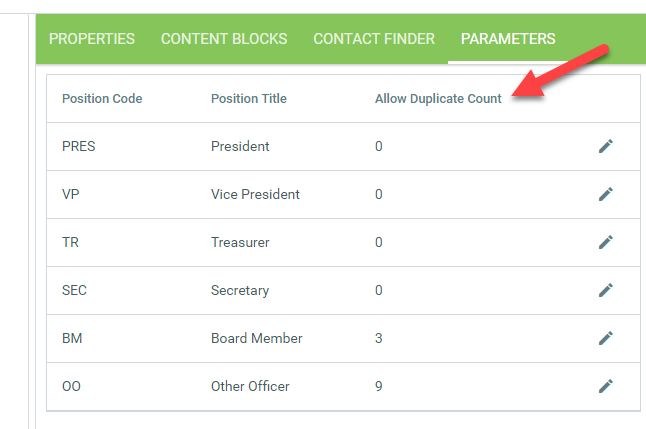
When the user goes to update their officer roster, they will see a Add Duplicate Position option. When this is selected, a new row is created with the same position title that can be selected to add a member to the position.

The duplicate position will remain but can also be removed by the chapter by selecting Remove Duplication Position. If the position can be duplicated more than once, the Add Duplicate Position option will continue to appear until the limit has been met. The Remove option only appears if there is not a member currently in the duplicate role.
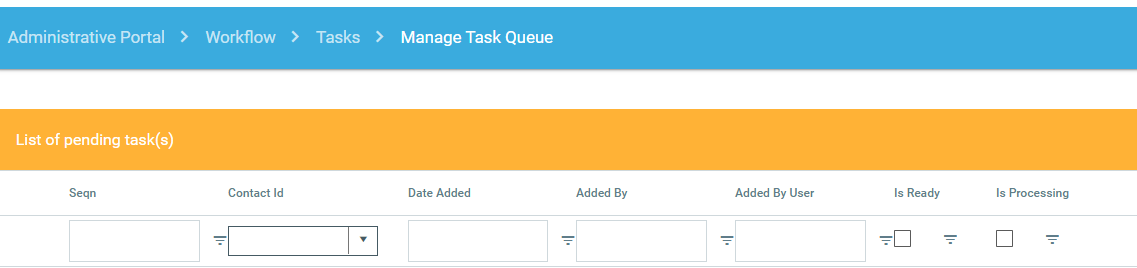
Manage Task Queue
When users start to add new members but do not complete the 5 step process, the transactions remain pending on the Add New Member page.
BEST PRACTICE: Review the Task Queue once a month to clear out any transactions that are over a month old. This will keep your task queue clean for easier troubleshooting.
Go to ICE Admin > Workflow > Tasks > Manage Task Queue. You can user the filter fields to find a specific transaction.
Contact ID indicates the chapter’s iMIS ID.
Added By identifies the user’s iMIS ID that started to add the new members.
If the user that started the process still has access in ICE, use the login as feature (Security > Tasks > Login As) to log in as the user and go to the Add New Member page. You will see a delete option for each transaction in the area identified below.

When the user no longer has access to ICE, use the delete option within ICE Admin > Workflow > Tasks > Manage Task Queue
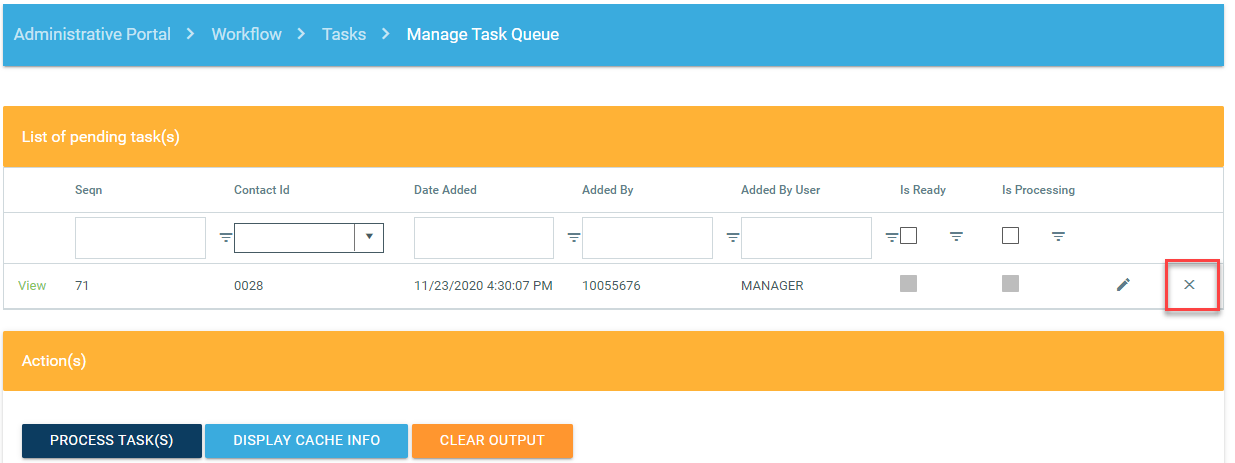
After deleting each transaction, you can visit chapter’s Add New Member page to confirm the transactions have disappeared.