Reports
Local Mode vs Server Mode
There are 2 ways of setting up reports within ICE: Local mode or Server mode. By viewing the URL, you can determine the mode in which current reports are set up.
In ICE Admin Sitemap setup,
Local mode: SSRS reports are Uploaded to ICE
URL looks like: ~/ICE/Analysis/Analysis.aspx?rcode=
Report processing occurs on client's PC (eases the load off your sql server since all the processing is done on the local machine; however, performance will vary by machine)
SSRS reports are saved on a server that is accessible by ICE. All SSRS reports have to be uploaded to ICE.
Reports are rendered with Telerik control (with limited SSRS functionality)
The following functionality is not available with local mode:
Multi-value parameters (checkbox lists)
Default date parameters (must select via calendar control)
Linked / sub reports
Layout of parameters will be different from Server mode.
Server mode: A link will be created to the SSRS report on your Reporting Server. (Available in version 4.5 and higher)
URL looks like: ~/ICE/Analysis/ReportViewer.aspx?rdl=
Report processing occurs on your reporting server (increased speed compared to local mode)
SSRS reports are uploaded to the reporting server.
Allows you to run the reports in SSRS or ICE.
Allows you to leverage all SSRS options including the following:
Ability to use report caching or snapshots to speed up report performance.
Subscriptions can be set up to distribute reports on a schedule.
Reports can also be managed via Report Manager.
Much easier/faster to deploy reports directly from BIDS to the Report Server and to locate and manage reports since all reports can be in one location on your server.
(If client runs SQL Enterprise) Data-driven Subscriptions (i.e., mail merge with SSRS)
Layout of parameters will be different from Local mode.
Reports are rendered with Microsoft Report Viewer.
Parameters
Both modes (Local and Server) must have a @contactid parameter in order to display chapter-specific data. If this report is not chapter-specific, the parameter is not required.
If this report is intended to display chapter-specific data based on a user's login, a parameter named @contactid must be added to the report. ICE will pass the chapter's iMIS ID to filter the report. You must have Microsoft Visual Studio to create, edit, and/or upload your SSRS reports. This example is from Microsoft Visual Studio 2005 and Microsoft Visual Studio 2008. Please remember SSRS variables are case-sensitive and should have no spaces or special characters other than an underscore. SSRS will automatically create the parameter for you when you enter it into the dataset.
Example Query
SELECT a.PRODUCT_CODE
, CASE WHEN a.PAY_METHOD = 'WEB%' THEN 'WEB'
WHEN a.PAY_METHOD = 'CC' THEN 'CC'
ELSE 'NON-WEB' END AS WEB
, n.ID
, CASE WHEN n.FULL_NAME <> '' THEN n.FULL_NAME
ELSE n.COMPANY END AS Full_Name_Company
, na.FULL_ADDRESS
, na.CITY
, na.ZIP
, n.EMAIL
, a.EFFECTIVE_DATE
, a.AMOUNT
, a.NOTE
, a.DESCRIPTION
FROM (Activity a
INNER JOIN Name n ON a.ID=n.ID)
INNER JOIN Name_Address na ON n.MAIL_ADDRESS_NUM=na.ADDRESS_NUM
INNER JOIN Name nc ON nc.ID = n.CO_ID
WHERE
a.PRODUCT_CODE = 'BUYSTUFF'
AND (a.ACTIVITY_TYPE='GIFT' OR a.ACTIVITY_TYPE='SALES')
AND a.Transaction_Date between @Begin_Date and @End_Date
AND nc.ID in (@contactid)
ORDER BY a.DESCRIPTION, a.PRODUCT_CODE
In this case SSRS automatically created 3 parameters.
Begin_Date
End_Date
contactid
The following 3 parameters in SSRS are 3 different parameters, even if they are spelled the same. SSRS treats them as 3 different parameters because they are all have different upper and lower cases.
ContactId
contactID
contactid
SQL 2005 parameter
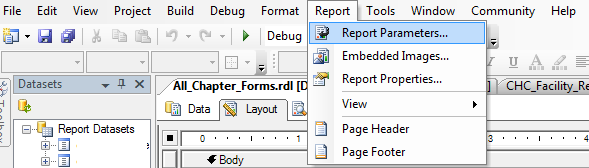
To edit the parameter in 2005:
Microsoft Visual Studio 2005
Click on Data or Layout tab first.
Go to Report > Report Parameters
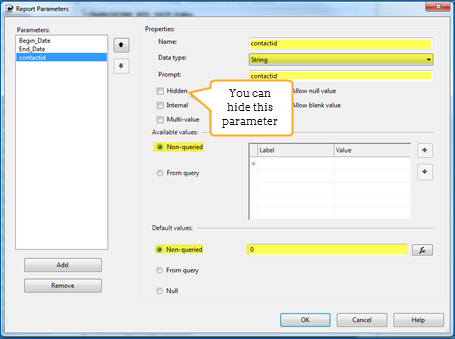
Provide the contactid with a default value of 0.
Microsoft Visual Studio 2005
Once you selected the Report Parameters
Click on the contactid parameter.
In the Default values area
Select Non-queried
Enter in the number 0.
The parameter should be a data type of string.
Click OK
SQL 2008 parameter
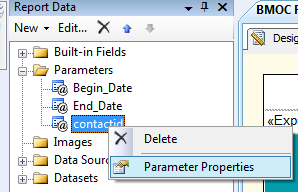
To edit the parameter in 2008 – current versions:
Microsoft Visual Studio 2008 – 2012
Right click on the parameter contactid
Select Parameter Properties
The parameter should be a data type of Text.
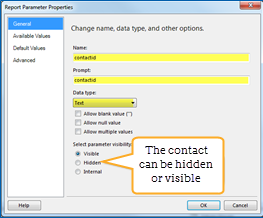
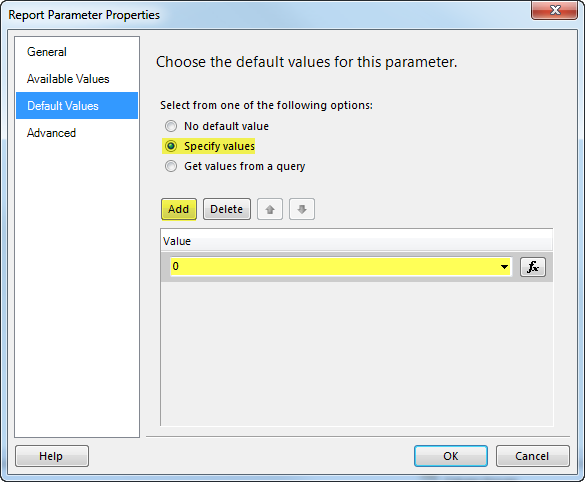
Provide the contactid with a default value of 0.
Next select Default Values
Click on Specify values
Click Add
Enter the number 0.
Click OK
Uploading Local Mode Reports
To upload a new or revised report:
Choose Upload from the Reports menu.
Click Select, choose the main report you want to upload from the file browser
The first file uploaded here must be the main report. The file extension for the main report is always *.RDL. Any sub-reports will need to be uploaded after this report with the extension of *.RDLC.
Text entered in the Title field will populate in the header area of the report you are uploading.
Click Open
The Description is used for internal documentation and will populate in the Description column of the Manage Reports section on the ICE Admin page.
Once the report has been uploaded, you will need to add it to the Sitemap to make it available in a menu.
Each time a local mode report is edited, it must be re-uploaded into ICE.
Configuration for Server Mode Reports
Report Server Connection to ICE
If you have the ability to link ICE directly to your SSRS reporting environment, it is encouraged to improve performance. This section is for creating the connection from ICE to the SSRS report server.
For Server Mode to function, ICE must be able to connect to the SSRS Report Server URL.
On the web server hosting ICE, open a web browser.
Navigate to the Report Server URL (e.g. http://servername/reportserver)
Note: The Report Server URL is different than the Report Manager URL (e.g. http://servername/reports)
If you do not know your Report Server URL, please do the following
Log into your SQL Server
Click Start – All Programs – Microsoft SQL Server 2008 – Configuration Tools – Reporting Services Configuration Manager
Select Web Service URL from left menu
See Report Server Web Service URL
If the Report Server URL is not accessible, please contact a network administrator. There are likely firewall or permission settings which need to be addressed.
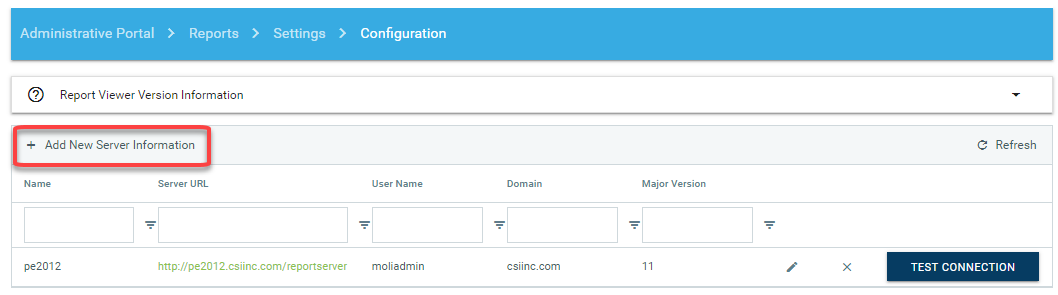
Click on Reports > Settings > Configuration.
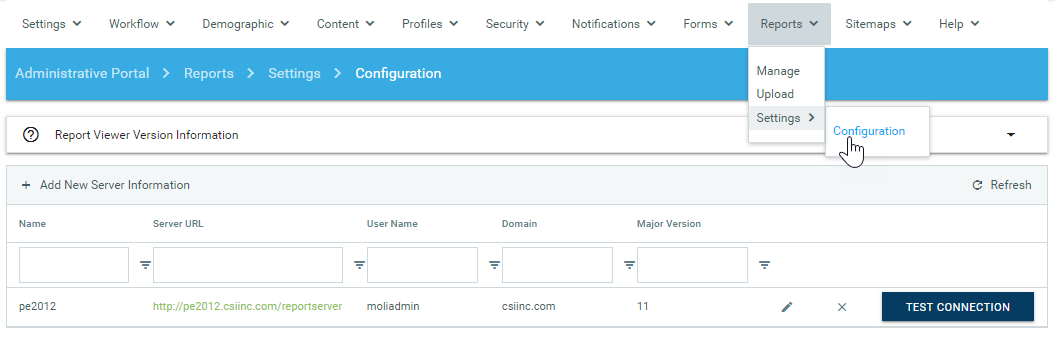
Click on Add New Server Information to create a connection to your SSRS server.
Enter your information to setup the connection to your SSRS server.
Name: This is used in ICE only to identify the server configuration. We recommend this be generic such as "ICEReports"
Server URL: URL in Reporting Services Configuration Manager
User Name: Login with access to your Report Server (not an iMIS login)
Password: Password for the login with access to your Report Server (not an iMIS login)
Domain: Network domain
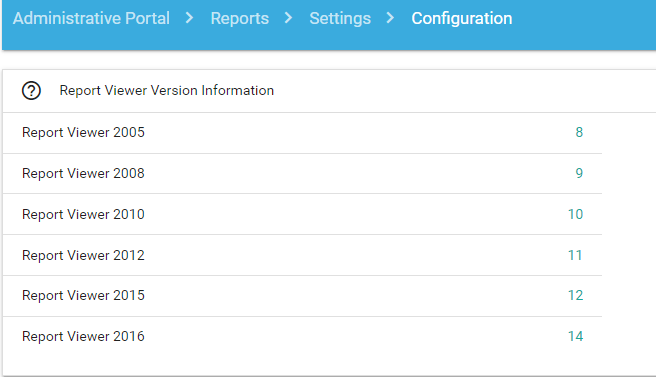
Major Version - see Report Viewer Version Information
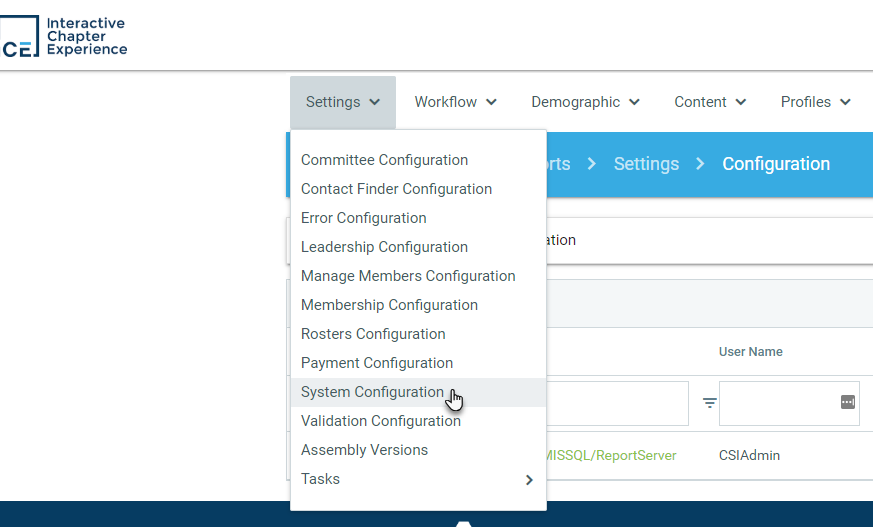
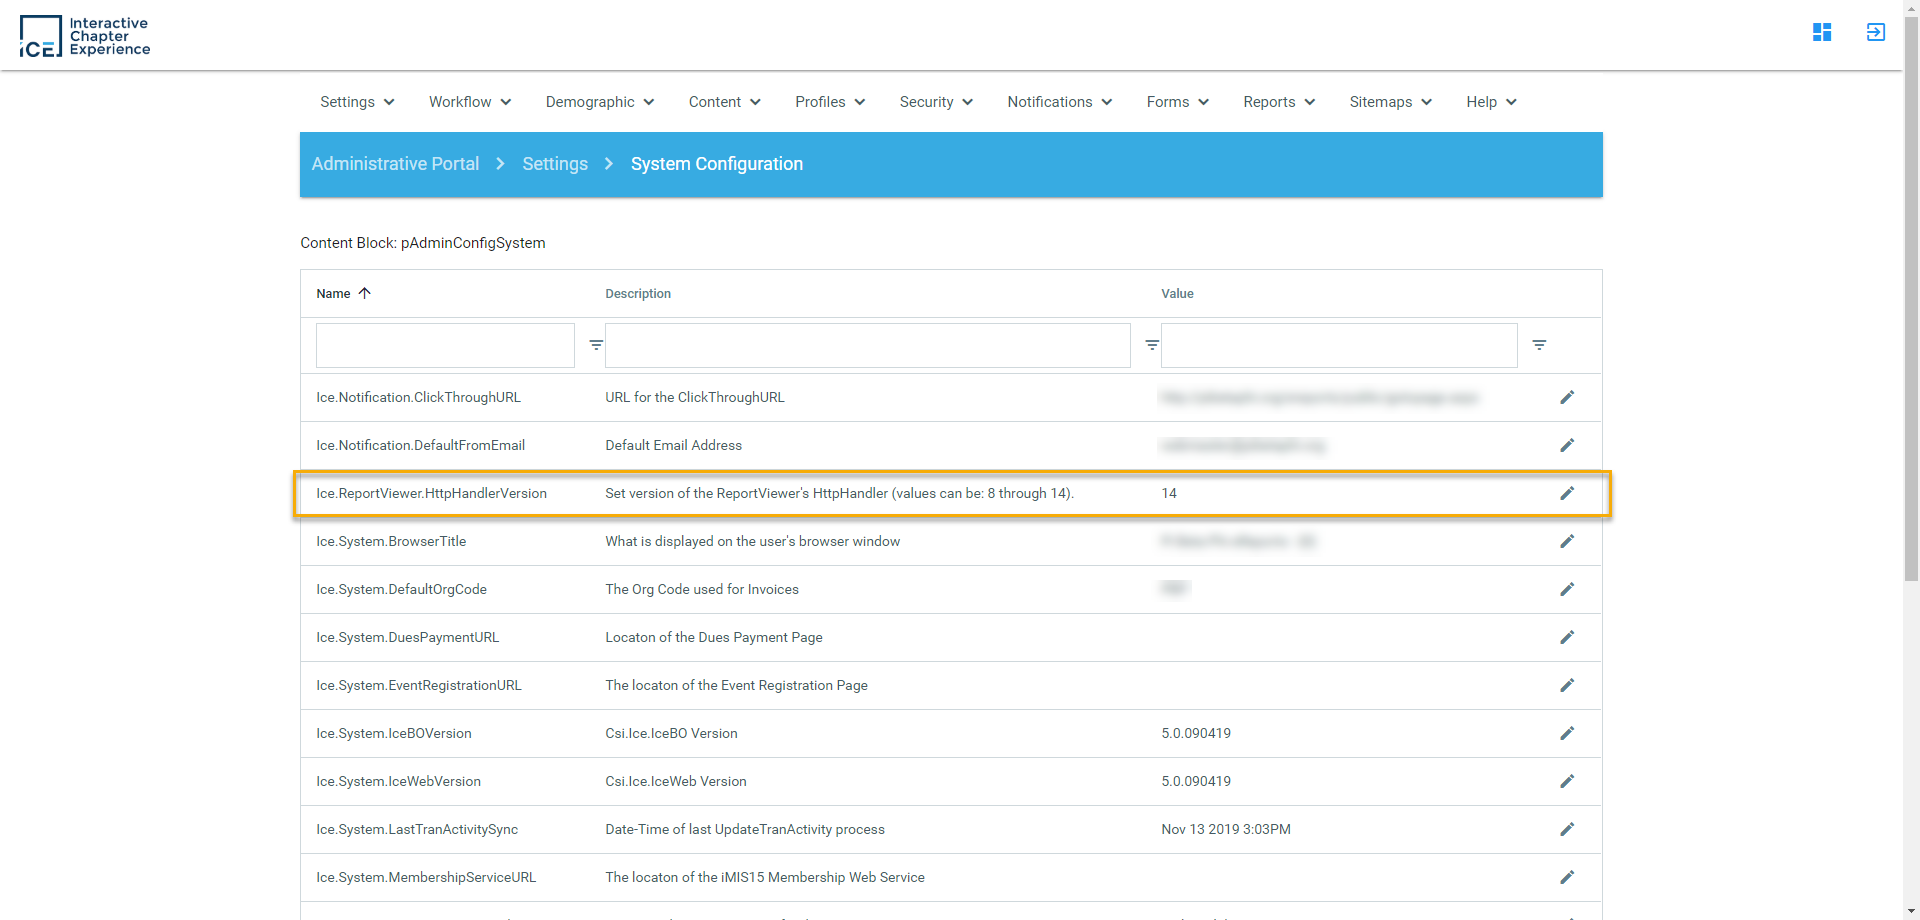
In ICE Admin, click on Settings > System Configuration.
Choose edit (pencil icon) to update the value of the following attribute: Ice.ReportViewer.HttpHandlerVersion
Ensure this is the same value as entered in step 5j above.
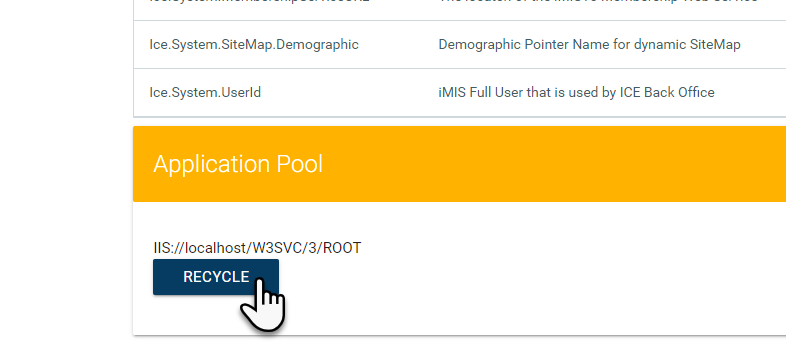
Scroll to bottom of page under Application Pool and click Recycle
Report Manager Settings
Note: These steps must be done in Microsoft Visual Studio. All reports will have to be uploaded to your SSRS – Report Manager website before you can link the report from ICE.
Open the project within SSRS. The project will have either a .rptproj or. sln file extension. Either of these files can be opened with Microsoft Visual Studio.
Right click on the main solution name – in this case the project is called 'SSRS Reports'
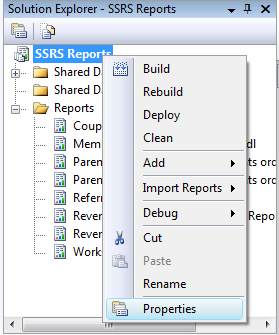
Click Properties
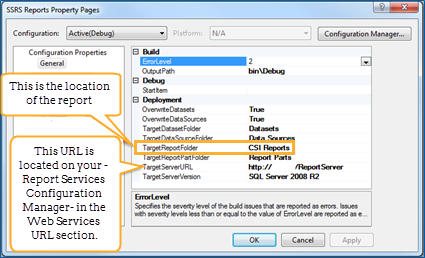
For this project, the reports will be uploaded to a folder named CSI Reports
When you create a report or update a report, you need to deploy the report for updates to appear in ICE.
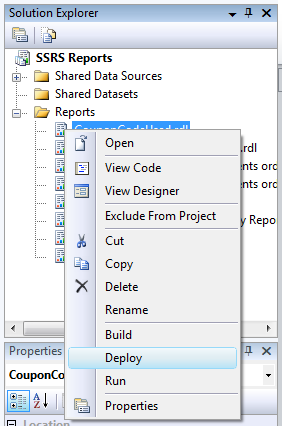
Locate your report in Microsoft Visual Studio
Right click on the report
Click Deploy
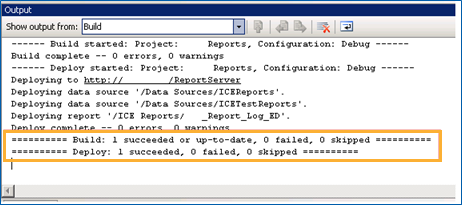
This is the result you should see in your Output window. If you do not see this, please troubleshoot your report until it is deployed successfully.
Once your report has been deployed, go to your SSRS report manager site to find the report – http://servername/Reports/
If you do not know your Report Server URL, please do the following
Log into your SQL Server
Click Start – All Programs – Microsoft SQL Server 2008 – Configuration Tools – Reporting Services Configuration Manager
Select Report Manager URL from left menu
See URL
Adding Reports to Sitemap in ICE
Both Local and Server mode reports must be added to the sitemap in ICE to be visible to users.
Go to Sitemaps > Actions > Edit
Select a sitemap to Edit
Select the menu option or add a new node for the desired location of the report
Edit the properties on the right side of the Editing Tool window:
The URL determines if this will be a Local or Server mode.
Example: File name is Membership_Pending_Transactions.rdl
The URL should be either
Local mode: ~/ICE/Analysis/Analysis.aspx?rcode=Membership_Pending_Transactions
Server mode: ~/ICE/Analysis/ReportViewer.aspx?rdl=MembershipPendingTransactions
The URL should ALWAYS be unique for both Local and Server mode. With Server mode, the URL does not have to match the SSRS file name but in Local mode it has to match the file name without the extension.
URL for Server Mode reports
Copy the link of the SSRS report in Report Manager
If this was the link to your report:
http://sql2012/Reports/Pages/Report.aspx?ItemPath=%2fICE+Reports%2fStuff_Report_Log_ED
Copy the part of the URL after "=" and paste that portion into the parameter tab of the ICE sitemap: %2fICE+Reports%2fStuff_Report_Log_ED
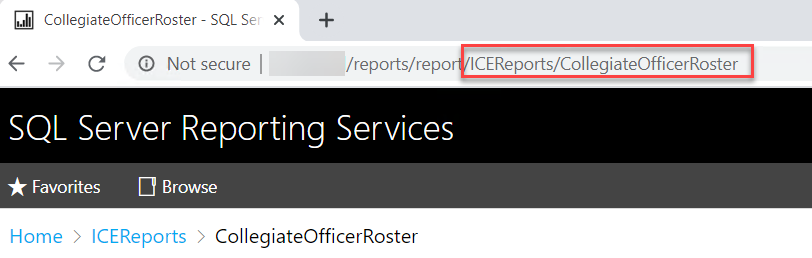
If you are using SQL 2016 or newer version, the URL in Report Manager will look different.
If this was the link to your report:
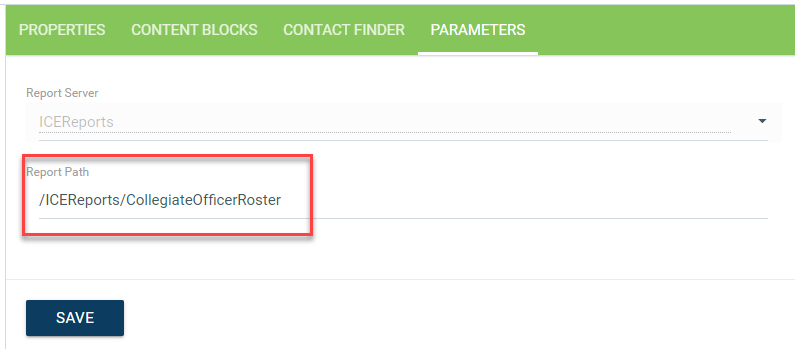
http://sql2016/Reports/report/ICEReports/UnclaimedNewMembers
Copy the part of the URL after "report" and paste that portion into the parameter tab of the ICE sitemap: /ICEReports/CollegiateOfficerRoster
Return to ICE Admin > Edit Sitemap > Edit menu item
Click on the Parameters tab.
Select the Report Server in the dropdown box you created in the section on Server mode Configuration.
Paste the URL of the SSRS report that you copied into the Report Path
Click 'Save'.