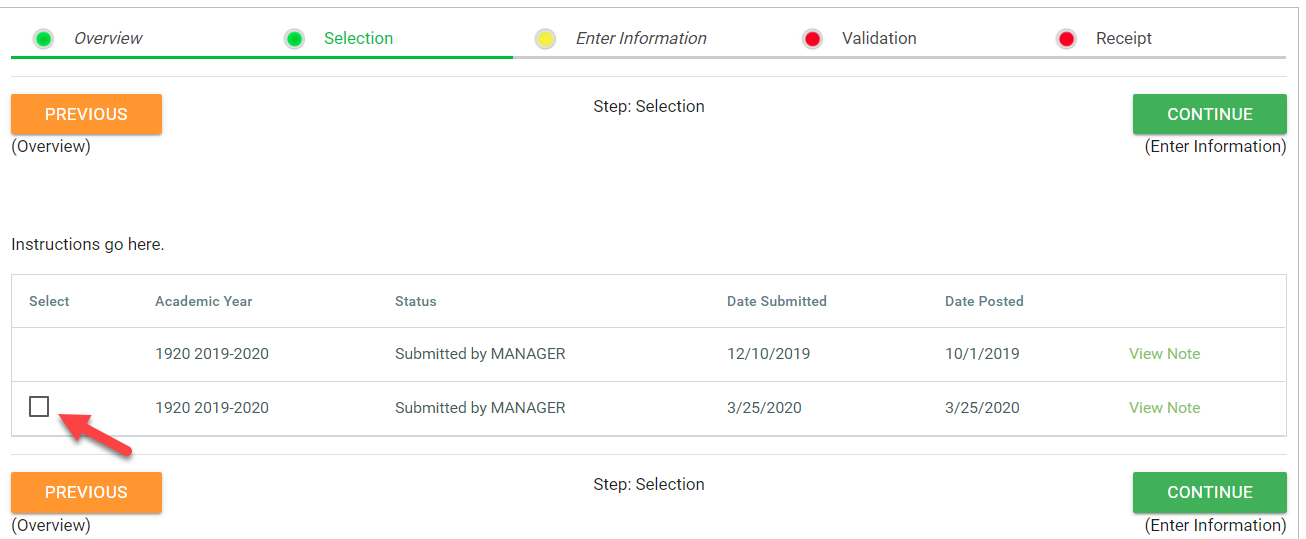
ICE 5.1 Testing Plans
Overview
The following article outlines testing plans for new features added to the ICE product in version 5.1 released in February 2020.
Configurable Add New Member
This new feature allows the ICE Admin to create multiple add new member pages.
- Your current add new member page will NOT be affected by this update. You may decide to convert your current add new member page to use this new form option if desired so that you have more control of the page and can make updates without CSI assistance.
- Create new workflow action (Workflow > Actions > Create (or clone)) that will be used for the add new member page (or you can use a current workflow action)
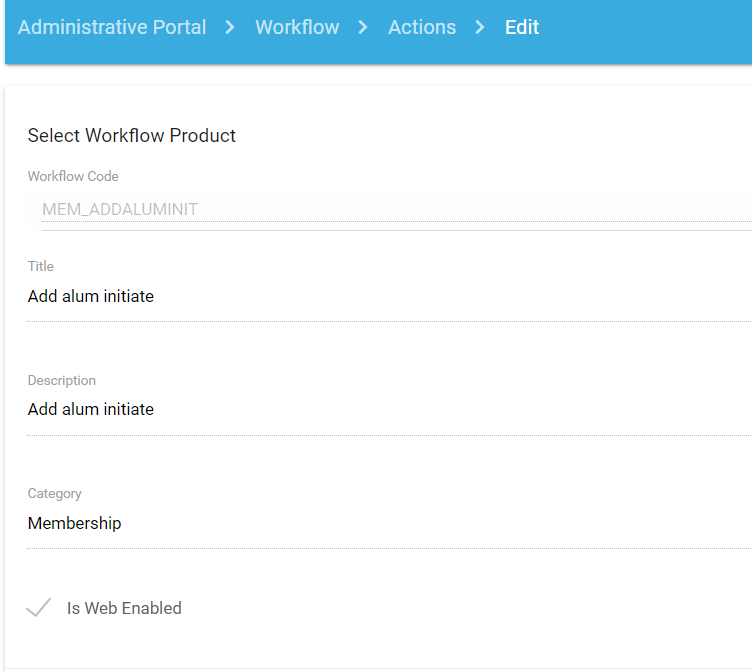
- In this example, we created MEM_ADDALUMINIT for adding a new alum initiate record into iMIS. (we cloned the MEM_ADDNEW action that is currently used to add new collegiate members)
- Make sure to update the other sections like qualifiers, additional information and activity mapping.
- Make sure to update the other sections like qualifiers, additional information and activity mapping.
- In this example, we created MEM_ADDALUMINIT for adding a new alum initiate record into iMIS. (we cloned the MEM_ADDNEW action that is currently used to add new collegiate members)
- Now we need to create the page that will be used by the chapter officer to add the new member.
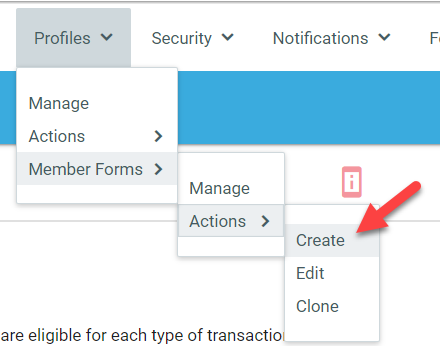
- Go to Profiles > Member Forms > Actions > Create
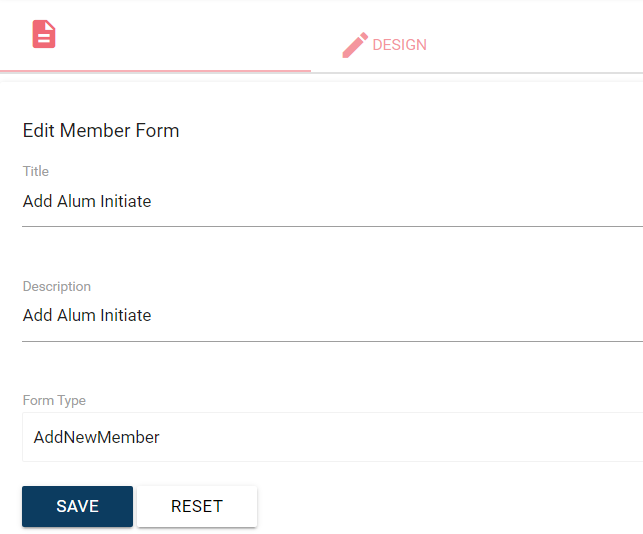
- Select AddNewMember as Form Type
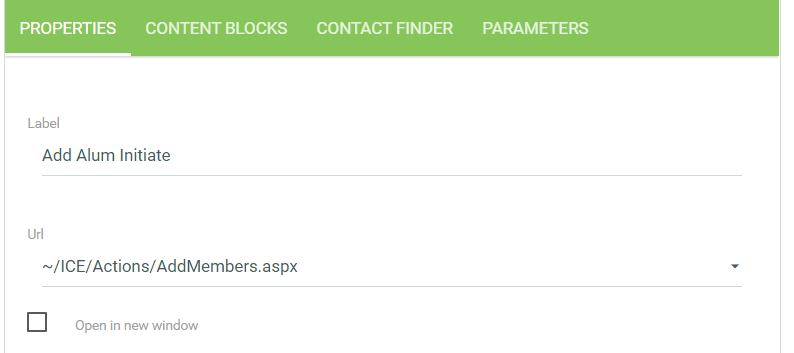
- Set a Title and Description to identify how this page will be used. In our example, we called it "Add Alum Initiate"
- Select the Design tab
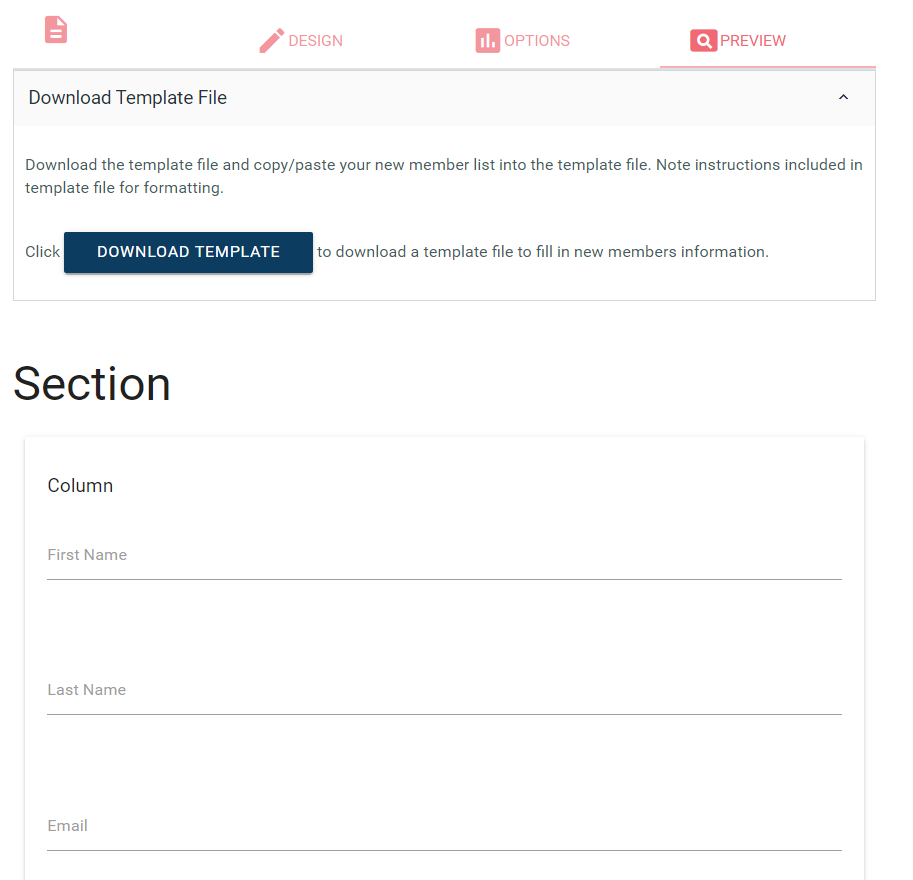
- On the left side, select a source that contains the field you would like to collect from the chapter officer about the new member.
We recommend collecting First Name, Last Name and Email at a minimum which is required to create a record in iMIS
Source Contains Contact Same fields as in CsContact business object or the Name table Address Same fields as in CsAddress business object or the Name_Address table ExtTable Allows selection from current User Defined tables
- To add a field to your form, select it on the left and drag it to the right in the area you would like. You will see a green border showing you a location where the field can be placed.
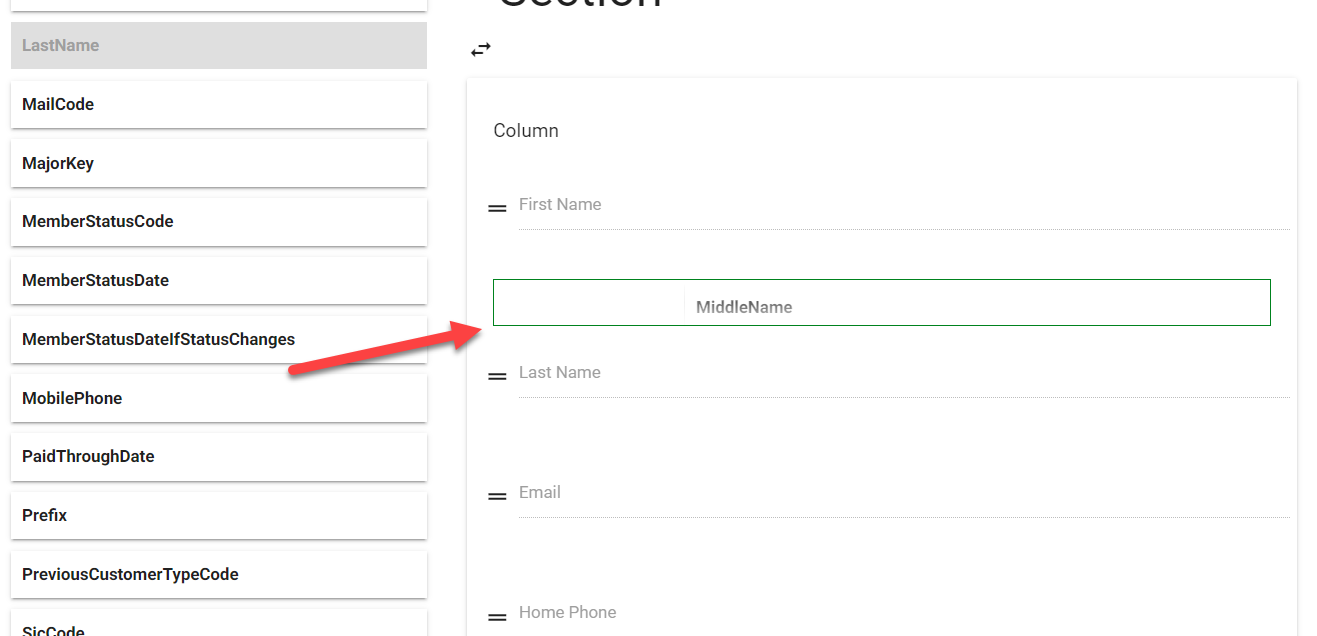
- Release of your mouse click will take you to the field properties window.
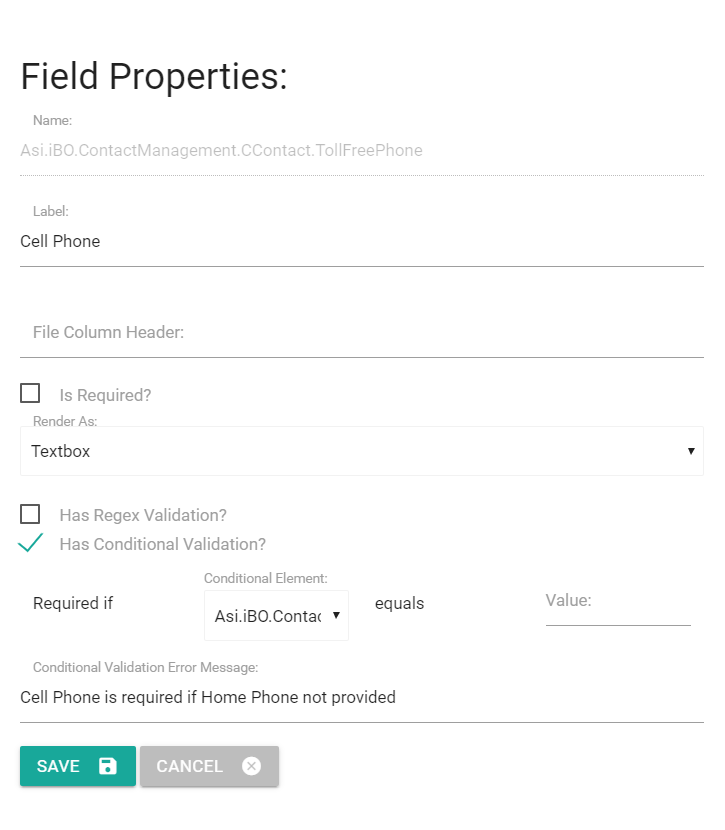
- You can modify the label which is what the user will see.
- The file column header would be the header used for the new member import file (license required)
- You can select if the field should be required.
- You can identify the format of the field.
- You can add Regex validation
- Regular Expression Examples
- U.S. Zip Code: ^\d{5}(?:[-\s]\d{4})?$
- Canadian and U.S. Zip Code: ^\d{5}-\d{4}|\d{5}|[A-Z]\d[A-Z] \d[A-Z]\d$
Phone Number: ^(\+\d{1,2}\s)?(\d{3})?[\s.-]\d{3}[\s.-]\d{4}$
- Email: \s*\w+([-+.']\w+)*@\w+([-.]\w+)*\.\w+([-.]\w+)*\s*
- Regular Expression Examples
- You can specify conditional validation to require a field if a criteria is met. In this example, I am going to require Cell Phone if Home Phone is not populated.
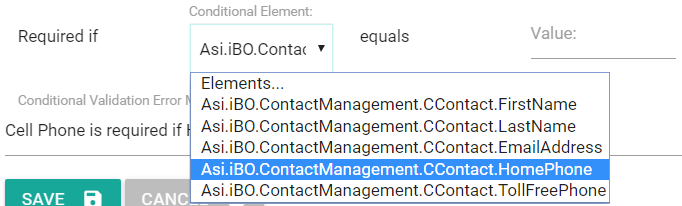
- You would select the Conditional Element which should be another field in your form.
- You then would specify the value expected to require the field.
- You can also specify the error message that appears if conditional validation is not met.
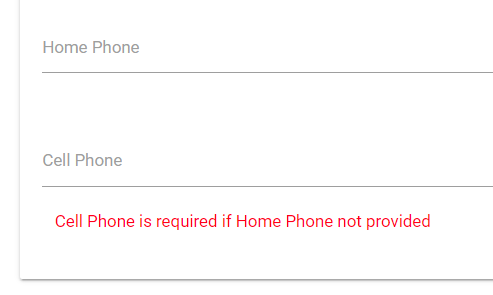
- Message example shown to user
- Use the Add New Row button to include a new section to separate your field groupings if desired
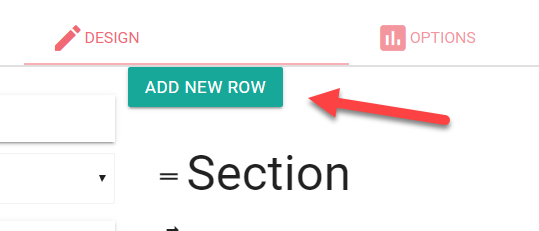
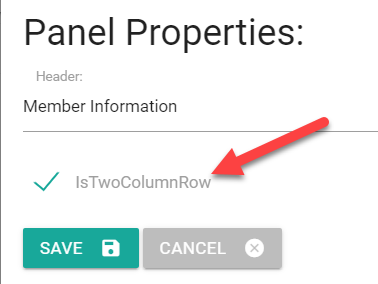
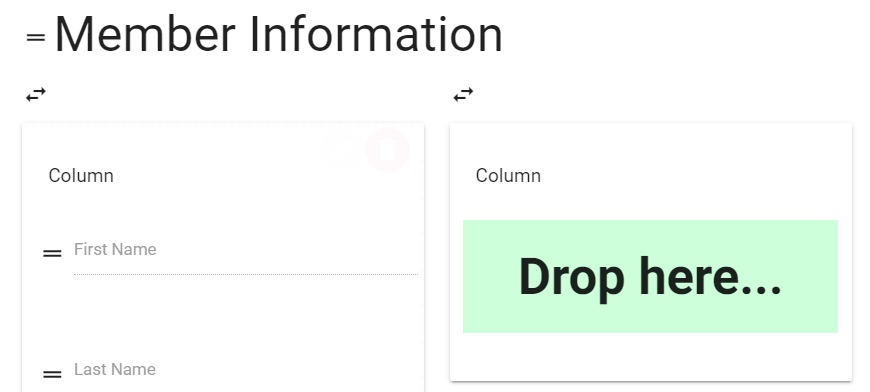
- Click on the Section header to change the text that will appear above your field grouping.
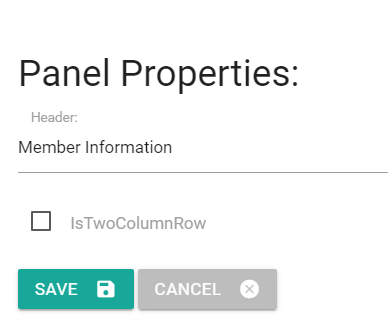
- When editing the section header, you can also select to add another column to your page if desired.
- The Options tab will provide a link to view your form in the user interface.
- Select the Preview tab to view your form within ICE admin along with the template file if in use.
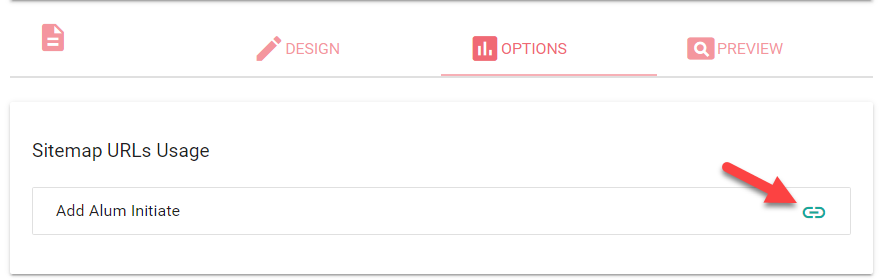
- Now you are ready to add your form to the sitemap! Got to Sitemaps > Manage > Select applicable sitemap
- Select the menu area you would like to add a new item under and use the green plus sign to add a new sitemap node.
- On the Properties tab, select the AddMembers URL control
- On the Parameters tab, select the workflow product and member form you created above. In our example, our workflow product is Add alum initiate and our member form is also Add alum initiate.
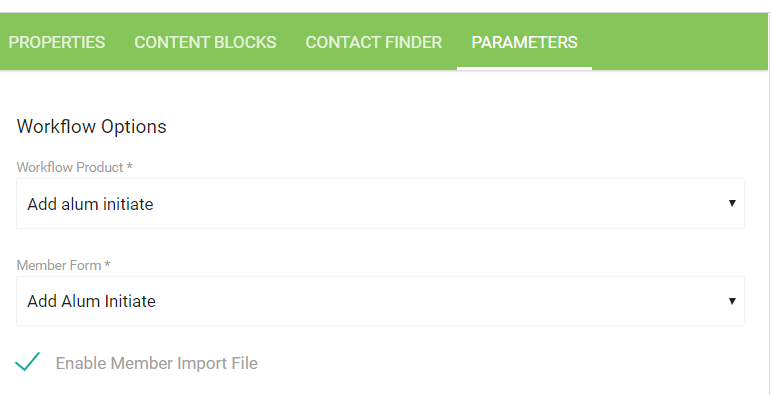
- Select if you would like to enable the member import file (license required).
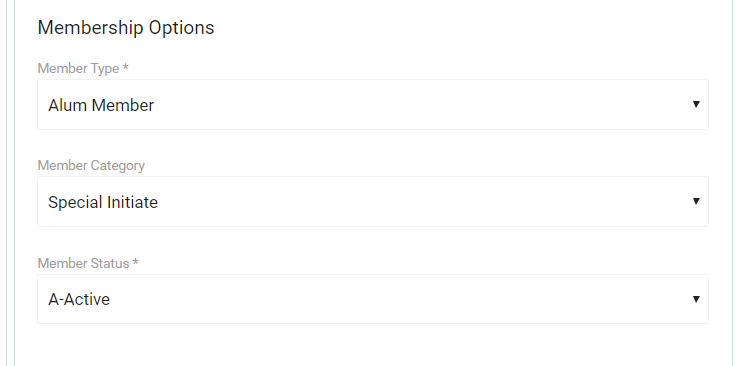
Under the Membership Options section, this is where you will specify the member type, status and category for the new record that will be created in iMIS.
IMPORTANT
The membership options should MATCH your qualifiers for the workflow action you are using on the page so that your membership script will continue to process necessary updates.
- Don't forget to update your content blocks! The content blocks pulled in by default will be the same used on your current add new member page so you may want to create new content blocks for this new page.
- You are ready to test adding new members!
- Go to your new menu item in the user interface and go through the steps to add new members.
- Confirm any validation applied is working as expected.
- Confirm records are created as expected.
Configurable Claim Account
This new feature allows the ICE Admin to create multiple claim account pages.
- Your current claim account page will NOT be affected by this update. You may decide to convert your current claim account page to use this new form option if desired so that you have more control of the page and can make updates without CSI assistance.
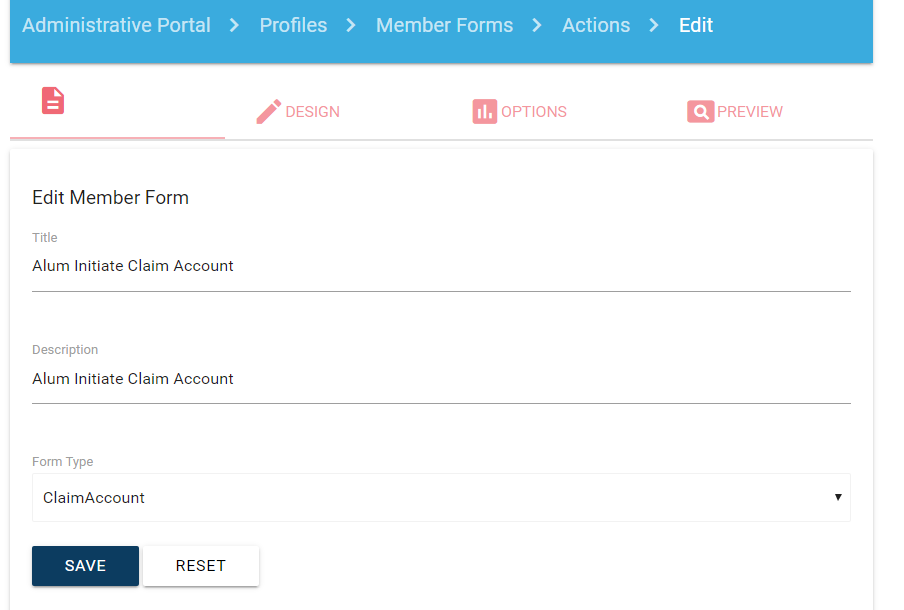
- Go to Profiles > Member Forms > Actions > Create
- Select ClaimAccount as Form Type
- Set a Title and Description to identify how this page will be used. In our example, we called it "Alum Initiate Claim Account"
- Select the Design tab
- Follow the same steps as mentioned above on the Add New Member form to create your claim account page.
- The Options tab allow you to specify the content blocks that should be used for each step.
- You can also identify the titles of each step.

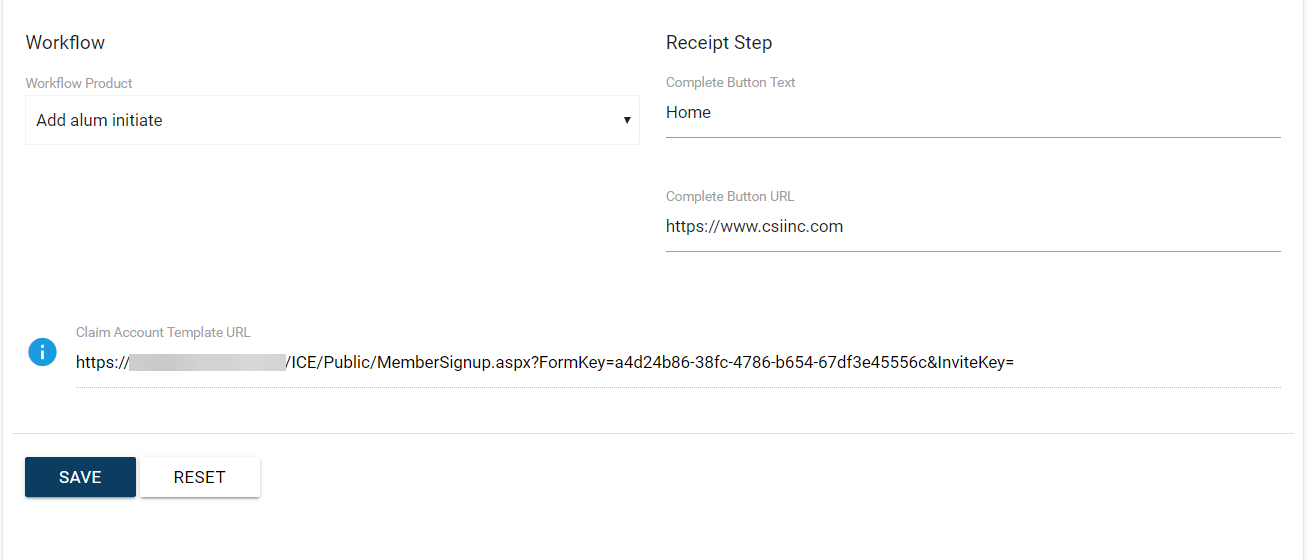
- You would select the workflow product that this claim account page is applicable to. In this example, we are using the workflow action that we used in our add new member step.
- You can also specify what the complete button text should show and what URL should the user be taken to. (this must be a complete url with http or https)
- The claim account template URL is the link you should use in messages or reports to identify the member's unique URL. Add a merge field into your message or report to pull in WORKFLOWTRANKEY from vcsi_ICE_Workflowtrans.
- You can also identify the titles of each step.
To find the URLs for the new members you added, you can use a query like below (make sure to insert your specific workflow action code):
Query
SQLSELECT n.ID , Chapter=(SELECT TOP 1 COMPANY FROM dbo.Name WHERE ID=t.BT_ID) , ChapterID=t.BT_ID , LastName=n.LAST_NAME , InviteCode=SUBSTRING(CAST(t.TRAN_KEY AS varchar(36)),1,8) , InviteKey=CAST(t.TRAN_KEY AS varchar(36)) , [Count]=COUNT(*) FROM dbo.csi_ICE_WorkflowTrans t JOIN dbo.Name n on n.ID=t.EFFECTED_ID WHERE t.PRODUCT_CODE='MEM_ADDALUMINIT' AND n.ID NOT IN (SELECT ID FROM dbo.Name_Security WHERE WEB_LOGIN>' ') GROUP BY n.ID, t.BT_ID, n.LAST_NAME, t.TRAN_KEY ORDER BY CAST(n.ID AS int) DESC- With your results, you can combine the Invite Key with your New Member Sign Up URL retrieved above. It should look something like: https://yourICEURL/ICE/Public/MemberSignup.aspx?FormKey=a4d24b86-32fc-4786-b654-67df3e45556c&InviteKey=3FA32FCC-637C-4459-A8EB-BBCDCE4E4687
- You can go through the claim account steps to confirm your content blocks, fields and updated Go To Task Center button is correct.
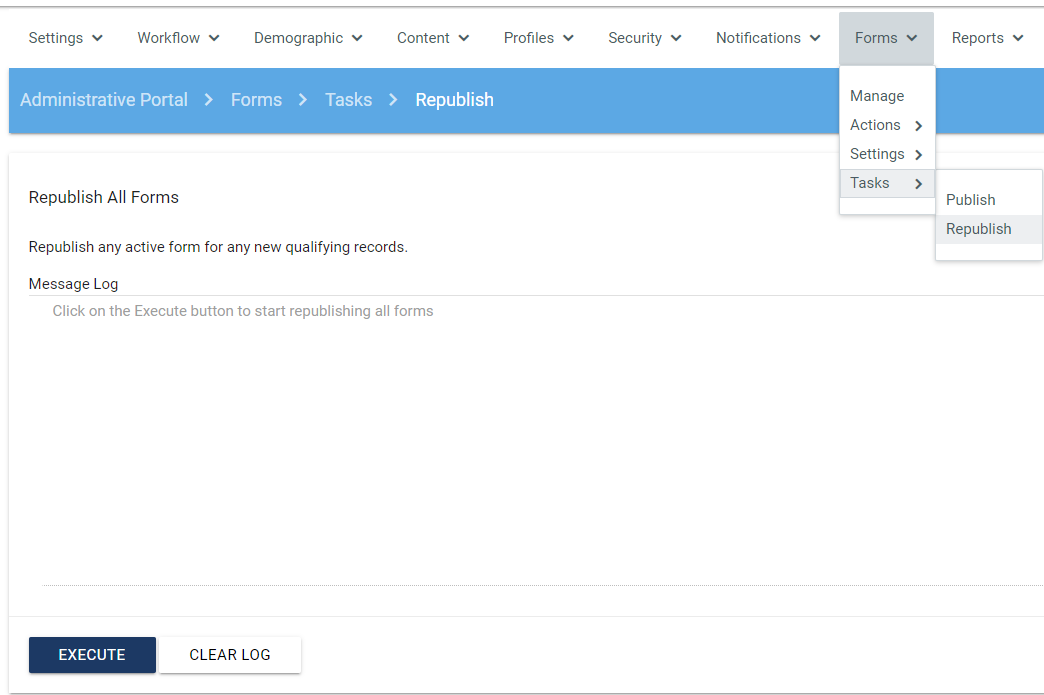
Republish All Forms
This new feature allows the ICE Admin to republish all active forms to any new chapters that now meet the qualifiers. Republishing a form will only produce rows for new chapters that now meet the qualifiers. Republish does NOT create duplicate forms for a chapter that already has a published instance of the form you selected.
See new menu option in ICE Admin under Forms > Tasks > Republish
Note
The Publish option has been moved under the Forms > Tasks menu.
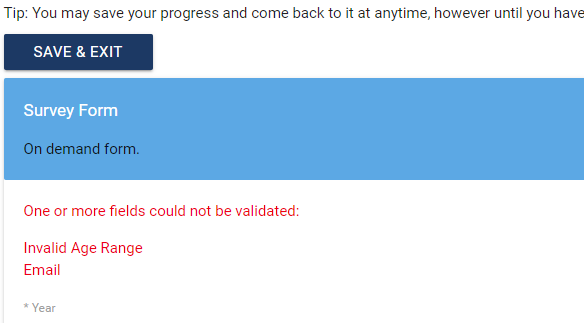
Form Validation Message Moved to Top
This is a change to current functionality. The message that appears when a form is incomplete, i.e. required fields not completed, will now appear at the top of the form rather than the bottom. This makes it easier for the user to see since the screen will refresh and they will be sent to the top of the form.
- Select a form with required fields or fields with validation.
- Attempt to submit the form without completing the required fields.
- Note the message at the top of the form notating the missing components.
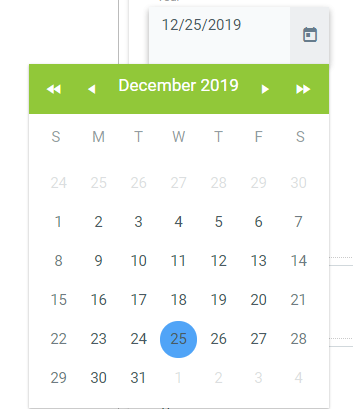
Week Number Removed from Calendar Control
This is a change to current functionality. The week number has been removed from the calendar control as it is not used and can be confusing to the user.
- Select a form with a date field.
- Select the calendar control and note that the week number is no longer there.
- Before

- After
- Before
Date Limit for Editing Perpetual or Continuously Editable Forms
This new feature allows the ICE Admin to specify a date or the number of days/months/years that a form should be edited if it is a Perpetual form type or marked as editable continuously.
- Select a Perpetual form or a Scheduled or On Demand form that is continuously editable
- On the Form Properties tab, there are two new configuration options
- Date Limit to Editing - this option allows you to specify a date when editing should no longer be available.
- Period Limit to Editing - this option allows you to specify a number of days/months/years when editing should no longer be available from date of submission.
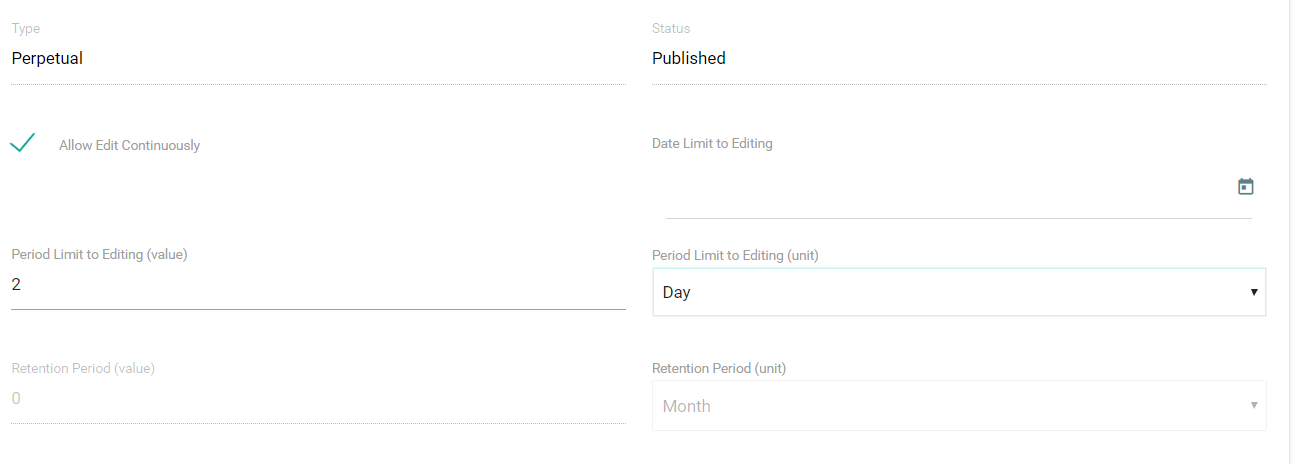
- In the below example, the form is set to not allow editing after 2 days from submission date
- Day of submission
- At 1 day
- At 2 days
- At 3 days

- Day of submission
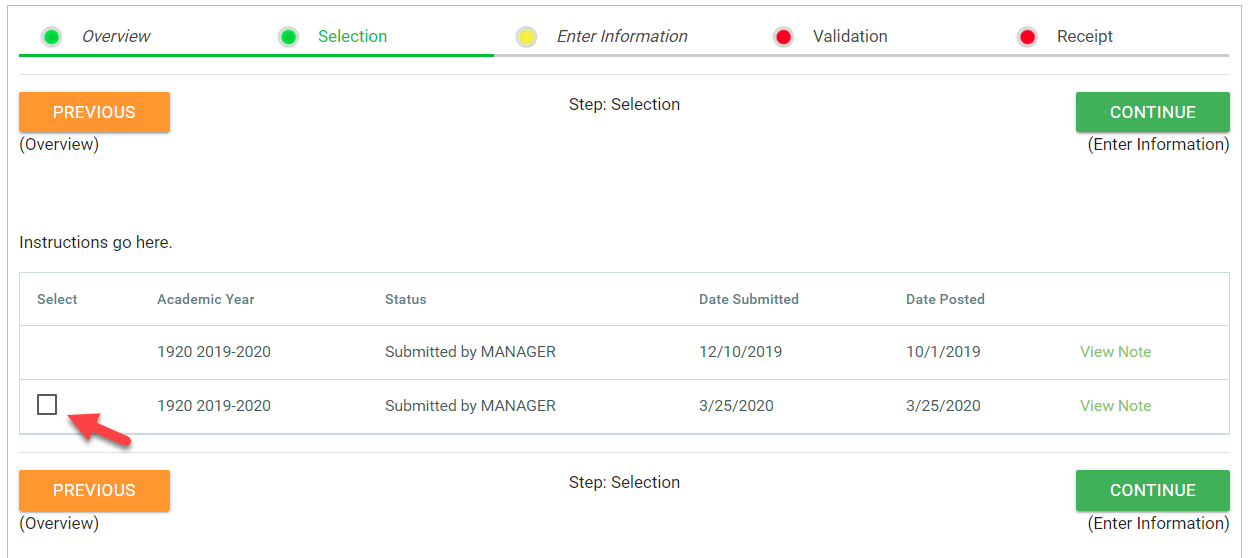
Manage Members Pagination
This new feature allows the ICE Admin to specify the number of members that should be shown per page when using the Manage Members control.
- Go to edit a sitemap node using the Manage Members control.
- Select the Parameters tab
- Enter a number under the new option for Pagination Options. This number represents the number of members to show per page. This is a global setting for all chapters for this menu item.

- In this example, the page size is set to 50.

When the user reaches the members selection step, the roster will only show 50 members at a time and the user can go to another page to find the member they are looking for. The user can also change the page size if they prefer to a smaller amount.

Note
It is recommended that instructional text be added to the content block at the top of the page to instruct the user to use the page options at the bottom. It is also recommended giving instructions on how to use the filter fields at the top of the page so they can easily jump to a specific member they are looking for.
Sitemap Display Option
This new feature allows the ICE Admin to set the sitemap to react to selection rather than mouse hover.
- Within ICE Admin, select Settings > System Configuration

- A value of "Enable" will allow hovering over menu item to make selection without clicking on the menu item. When hover is enabled, the menu will disappear if your mouse moves away from the selection.
- A value of "Disable" will require the user to click on the menu item to select and expand the menu to see the next level. If your mouse moves away from the selection, the menu will not disappear.
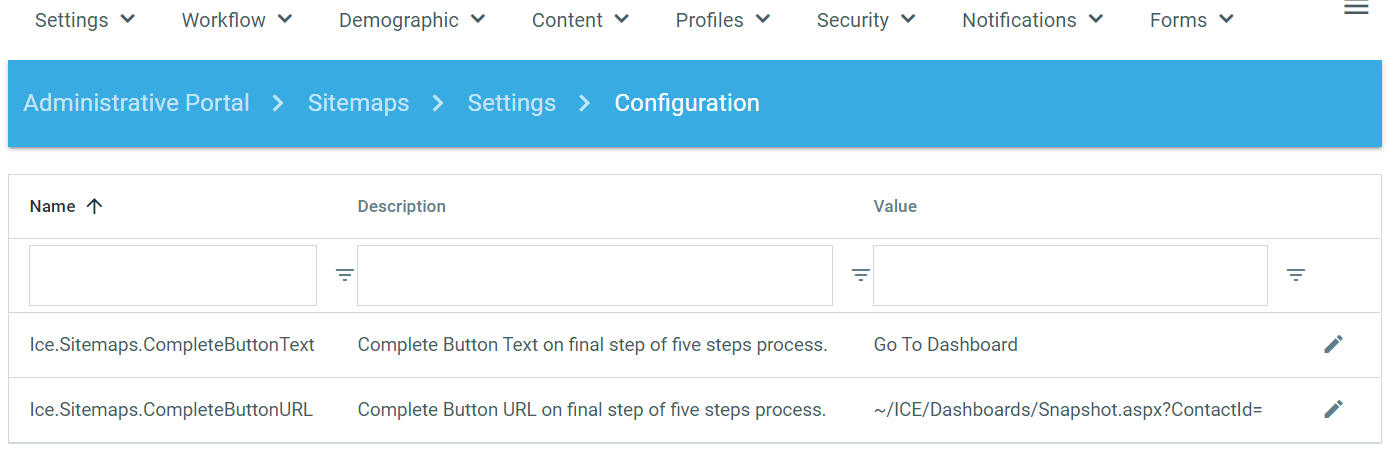
Configurable Go To Task Center Button
This feature allows the ICE Admin to configure the Go To Task Center button text and link that appears on the final step of the 5 step processes in ICE.
- Within ICE Admin, select Sitemaps > Settings > Configuration
CompleteButtonText - edit to specify the wording for the button
CompleteButtonURL - edit to specify the page that the user should be sent to once the button is selected (note: it is a partial URL of an ICE page)
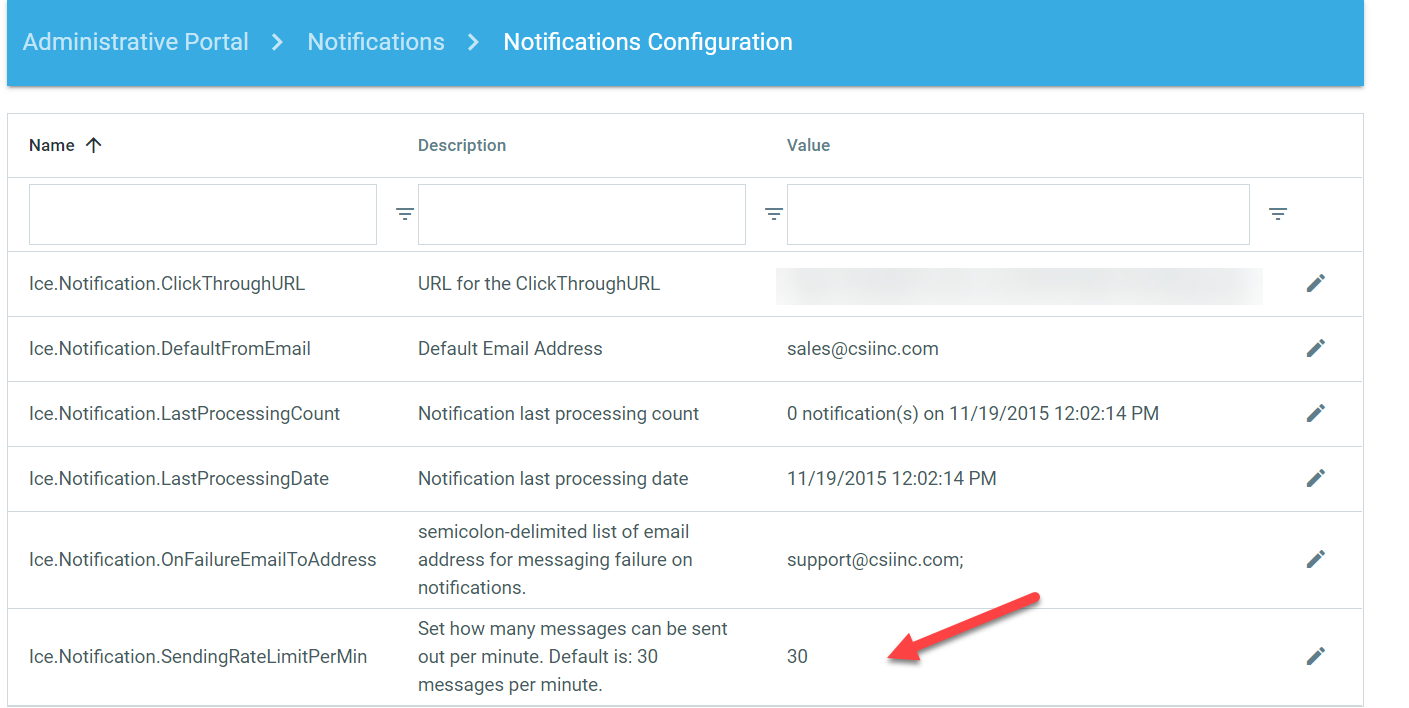
Email Notifications Limit
This feature allows the ICE Admin to limit the number of email sent from ICE per minute to comply with your SMTP requirements.
- Within ICE Admin, select Notifications > Notifications Configuration
- Add the limit to the SendingRateLimitPerMin field
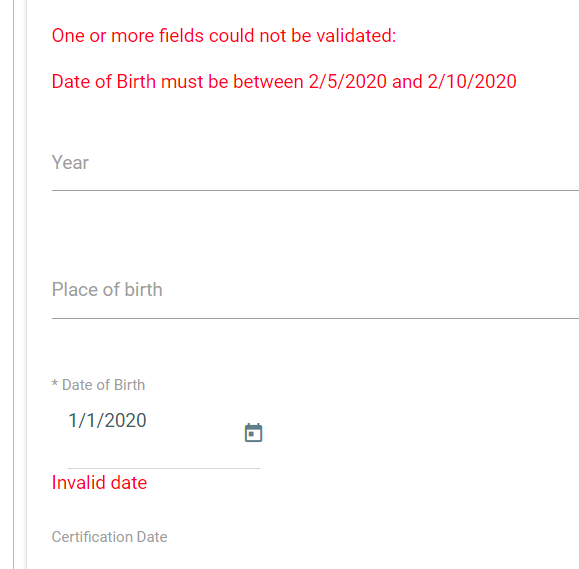
Date Range Validation within ICE Form
This feature allows the ICE Admin to specify date validation for date fields within an ICE form. This feature is consistent with the current date validation options for a workflow action.
- Select a form with a date field
- Go to the Design tab and select the field to edit
- Use the Date Range Validation field to specify the possible days before today or after that the date field should allow.
- Examples:
0/0 would require the date be today
0/30 would require the date to be today or within 30 days from today
30/30 would require the date to be today or 30 days in the past or future
- Examples:
- In this example, we specified 2/3 for the date range validation.
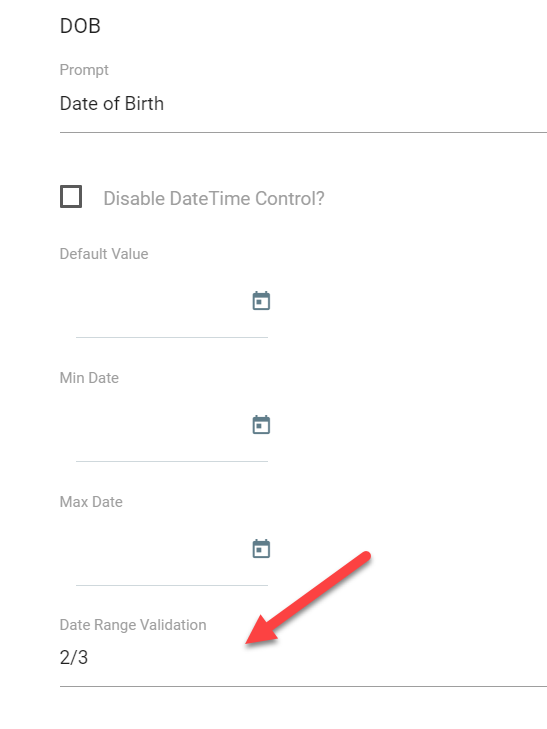
- When completing the form, if we enter a date that is outside this range, we are presented with a message
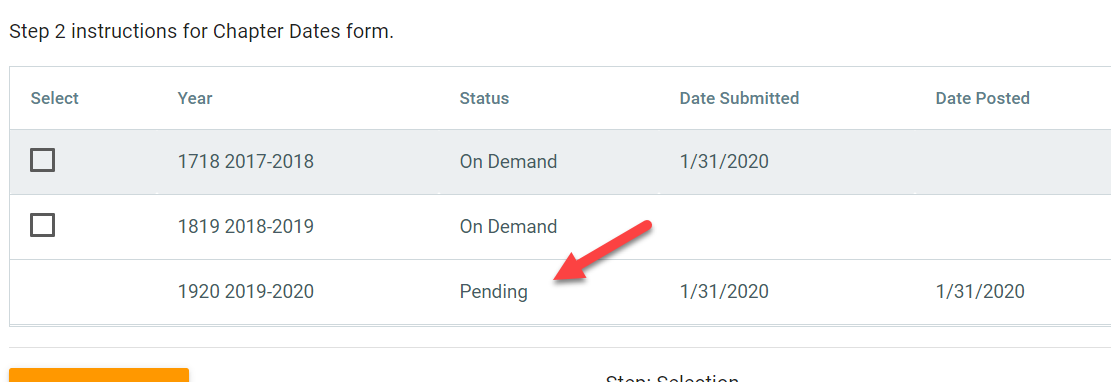
Form Pending Status Update
When a form is submitted and the user returns to the form submission page quickly, they are presented with a message showing that the form is being processed. The message for all forms was showing a "Pending Approval." Since all forms may not have an approval component, the message is confusing to the user.
The message has been updated to show "Pending" for forms that do NOT have approval requirement while the system is processing the submission. The message will show "Pending Approval" if the form has an approval requirement until it is processed in the Manage Approvals area.
Example of form without approval requirement
Example of a form with approval requirement

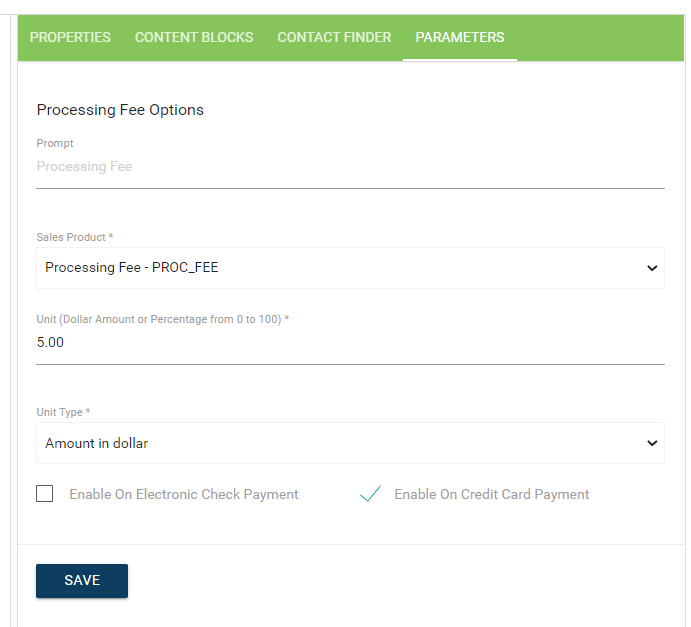
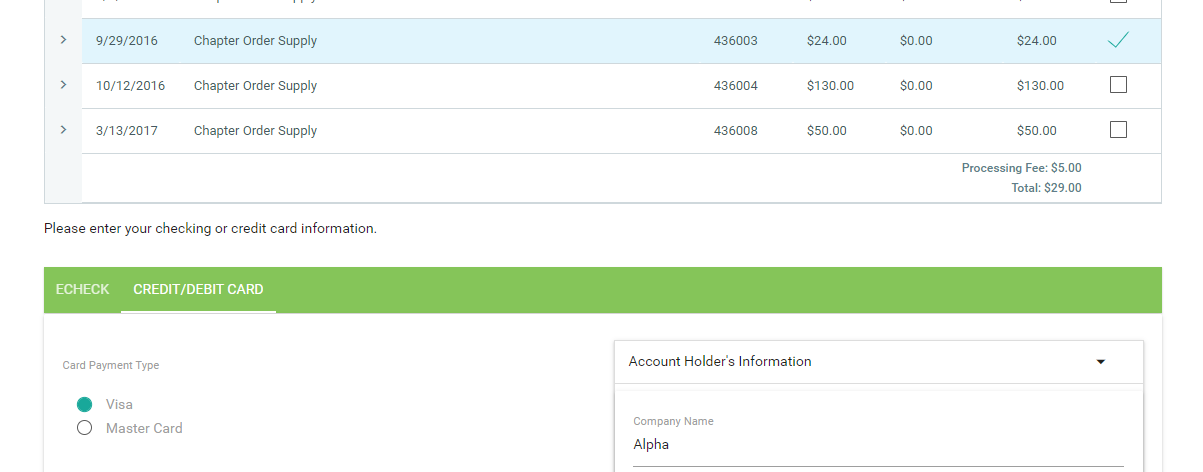
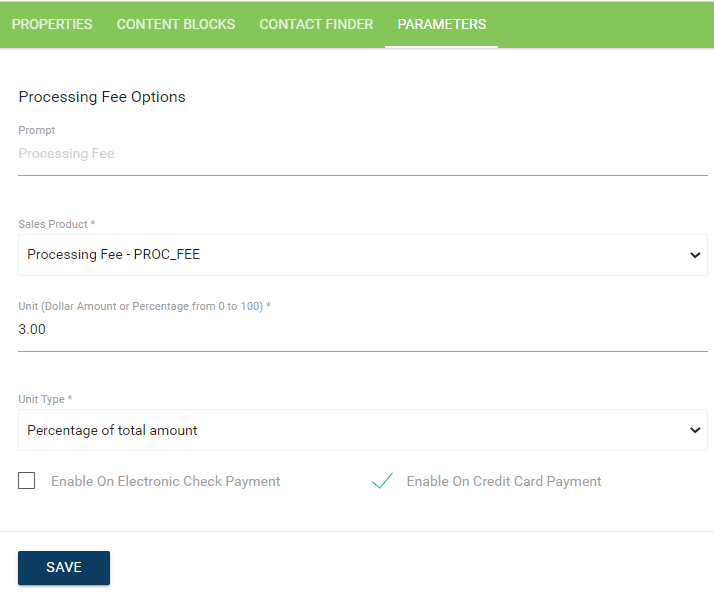
Ability to add processing fee for credit card or ACH transactions using ICE eCheck
The Submit Payments (~/ICE/Actions/SubmitPayments.aspx) and Manage Dues (~/ICE/Actions/ManageDues.aspx) pages now have options on the Parameters tab to add on a processing fee with payments.
From the Parameters tab, you will find the following new fields:
- Prompt - Label for "processing fee" that user will see
- Sales Product - select a product that exists in iMIS. Make sure GL account is set correctly in iMIS! Amount should be $0.
- Unit - enter the numerical value that will represent a flat dollar amount or percentage (5 for $5 flat amount of 5 for 5%)
- Unit Type - based on the numerical value added above, specify how the unit should be applied - Amount in dollar or Percentage of Total Amount
- Enable on Electronic Check Payment - check if you want the fee applied when user submits payment via ACH
- Enable on Credit Card Payment - check if you want the fee applied when user submits payment via credit card
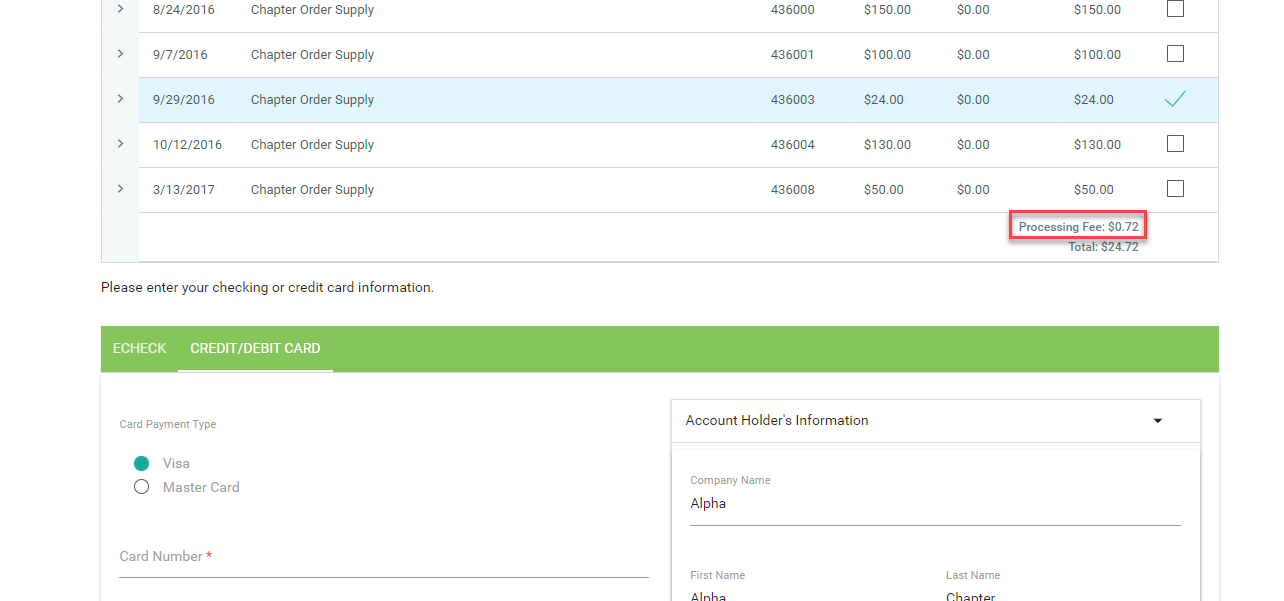
Example using Amount in dollar
Settings from Parameters tab
When making payment, user will see processing fee added.
Example using Percentage of Total Amount
Settings from Parameters tab
When making payment, user will see processing fee added.