
Financial Edge Importer
Application Type: Windows Desktop Application
Requirements: iMIS 15+, .NET Framework 4.5, Windows 7+
About
The Financial Edge GL Importer application reads a GL export file from iMIS that was created in the Fundware format, and massages the data into a format compatible with Blackbaud's The Financial Edge™ system.
Installation
Download the ZIP file via the provided link (provided to you by CSI via e-mail)
Extract the contents of the ZIP file to a folder on your main drive (such as
C:\FinancialEdgeImporter\)Your folder structure should look similar to this:
C:\FinancialEdgeImporter\FinancialEdge.exeC:\FinancialEdgeImporter\CSI.Core.dllC:\FinancialEdgeImporter\CSI.Core.Windows.dll
Right-click on
FinancialEdge.exeand select Create shortcutMove the shortcut to the Windows Start Menu, Taskbar, Desktop, or other easily accessible location.
To launch the program, simply click (or double-click, depending on its location) on the shortcut from the previous step.
Project ID Mode
The application can optionally be built with "Project ID" functionality.
This will take an account number with an asterisk (*) and split it into a project record. (Format: PROJECTID*ACCOUNTID)
If project ID mode is enabled, a separate line/row is written to the output file to delimit the project(s).
Logging In
When you launch the program, you will be presented with CSI's iMIS login dialog box:
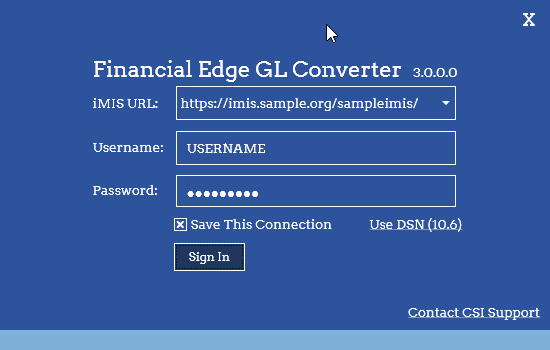
Sign in with your iMIS deskotp URL, and your iMIS username and password to continue.
The user you are signing in with must have either the CSIFINANCIALEDGE or CSIFE access keyword assigned to it, otherwise you will see an error message and will not be able to use the program.
Processing Window
After you sign in, the processing window will appear.
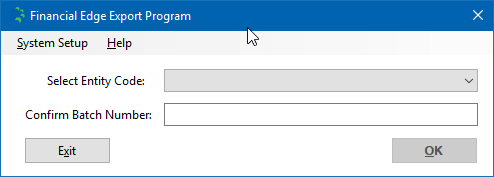
Select entity code: contains a dropdown list of the entities that were set up on the Setup screen (see below). Select the appropriate entity code to process files for.
Confirm batch number: will contain the next sequential Financial Edge batch number (saved from the previous time the program was run, and incremented by 1). Confirm that this is the correct batch number to be imported into Financial Edge, and adjust as necessary.
The first time you process a financial entity, you will need to enter the next available Financial Edge batch number manually. Subsequent runs will remember the batch number and auto-increment it for you.
After you have selected / confirmed your selection, press OK to process the file.
System Setup Window
Access the System Setup window by clicking the System Setup menu button at the top of the processing screen.
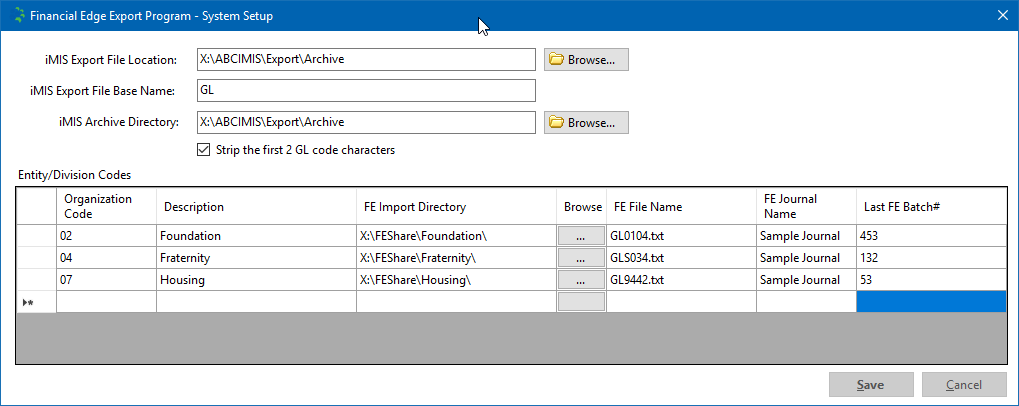
iMIS Export File Location
This folder path is where the Financial Edge program will look for new files from iMIS. This should match the export folder location that is in your iMIS G/L Interface settings.
iMIS Export File Base Name
This is the file prefix of the exported file from iMIS. For example, if your prefix is set to GL and your entity code is 03, the Financial Edge processor will look for a file in the "iMIS Export File Location" folder called GL03.txt.
iMIS Archive Directory
This is a folder where you would like the processed files to be copied to. The current processing date (in YYYYMMDD format) will be appended to the filename, so in the example from above, if that file were processed today (the date this documentation was written), the archive file name would be GL0320171024.txt (GL03 2017 10 24).
Entity/Division Codes
Each row in this table specifies how to read the files exported from iMIS, and what Financial Edge settings to apply to them.
Add a new row to this table for each entity or division code that you have set up in the Fundware general lookup table in iMIS.
Organization Code
This is the code that should be in the filename (as in the example above, GL03.txt, "03" is the organization code).
Description
This is the description of the organization code (for example, "Fraternity" or "Foundation").
FE Import Directory
This is the location where the processed file will be dropped so that it can be imported into Financial Edge.
Click the "..." button in the next column to browse for a folder on your computer or local network.
FE File Name
This is the resulting filename that should be saved after processing is completed. It must end with a valid file extension such as .txt or .csv.
FE Journal Name
This is the journal name that will be written into each file and imported into Financial Edge.
Last FE Batch#
This is the last batch number that was written into Financial Edge for the specified organization code. When the processor is run, this value is incremented by 1, and the next batch number appears automatically in the batch number field (as described above). During initial setup, this should be set to the last (most recent) batch that currently exists in Financial Edge, or if no batches exist, start at 1.
After you have configured the System Setup screen, click Save to save your changes. (Continue to fix any errors that pop up.)
When the Save button becomes greyed out, your settings have saved successfully. You can close the System Setup window by clicking the "X" in the upper-right corner to return to the processing screen.